Trees
Forest-Edge Ecology
The progression of plant life on a newly developed house lot—if it were left to time and serendipity —would go something like this. Annual weeds like shepherd's purse and mustard, appearing hither and thither at first, would eventually grow in profusion. The setting of seed initiates dieback in annuals, which in turn alters the carbon-to-nitrogen (C:N) ratio upward as lush stalks turn brittle and brown. Decay goes slowly at first, but eventually the accumulation of organic matter creates a shift in plant composition. Dandelion and plantain are among the first perennials. Grasses and taprooted volunteers like wild carrot and curly dock get a foothold and never look back. Organic matter continues to build. Goldenrod and raspberries arrive to stay. More carbon is stockpiled as ever-woodier stems decay. Tree seedlings start to appear: species like pin cherry, brought by birds; white birch and willow, carried by the wind; and perhaps apple if deer droppings or a thrown core rolls onto the scene. As woodsy plants grow, shade lessens the grip of perennial weeds. Blackberry canes and short-lived tree species begin to add lignin to the humic crescendo. Hardwoods and softwoods alike find increasingly hospitable ground. Along the very edge, where the bright sunshine can never be denied, those apple trees come into their own.
This is what we humans see... but it is far from the whole story.
The soil food web
The soil in the beginning of this plant progression saga could essentially be viewed as an uninhabited medium following that last scrape of the bulldozer. Now begins a biological onslaught of bacteria, fungi, and other soil dwellers that will gradually transition this ground from barren substrate to living earth. Those first weeds produce digestible biomass that becomes organic matter; the microorganism community transforms and releases nutrients from this organic matter so that even more plants can complete the renewal cycle. Bacteria tend to utilize simple organic compounds, such as root secretions and fresh plant residue. Fungi will utilize more complex compounds, such as cellulose, lignins, and soil humus. The ratio of fungi to bacteria begins to shift as succession plant species take over, which in turn provide more fibrous plant residues on which an even greater diversity of fungi thrive. The composition of plants adjusts as the soil becomes increasingly fungus-dominated.
We deem this interaction, which makes life on earth possible, the soil food web. Billions of living organisms exist in a single handful of soil. Such mind-boggling numbers serve to remind me that I am but one member of a huge interdependent team striving to orchard wisely
on my farm. The progression that takes place when microbial feeders restore soil balance—and just where that balance point lies for different plant species—spells out a far more accurate way to grasp plant dynamics than does available mineral fertility as indicated on a typical soil test. All soil organisms work together as a living system to support plant health by decomposing organic matter, cycling nutrients, and improving soil crumb structure. The health of untold organism communities within this living web plays a pivotal role in both enhancing and protecting the physical reality of fruiting trees and berries.
System health springs from the biology in the soil; it's as simple as that. Learning more about the soil food web beyond the basics of fungal dominance won't be necessary for fruit growing per se, but I would encourage it. The humic system performs best when fungi and bacteria are associated with microvores
such as protozoans and nematodes. All participants in the soil food web play vital roles in the assimilation and mineralization of nutrients for plant growth. The desire to serve this web of life in the soil—for that's what being an enlightened fruit grower really entails—springs from knowing your friends. Choosing to honor and support biological connection will help you avoid the many props required by a sick system. How we travel along this holistic high road begins with understanding what fungi like.
Interdependent and interconnected networks of organisms interact to make life possible. The soil food web encompasses the microbes and arthropods that ultimately provide balanced mineral nutrition for fruiting plants and thus promote overall tree health. Go, biology, go!
Fungal dominance
The integrated health of any fruit ecosystem correlates directly to the ratio of fungi to bacteria found in the living soil. Orchard soils ideally contain a fungal presence ten times higher than that of bacteria. This ratio defines forest-edge ecology, and it's this ratio that is going to drive all the recommendations about soil nutrition and understory management that lie ahead.
First, though, let's be clear about what we're talking about. Fungi are...
Mycorrhizal outreach through an extensive mycelium network is a major biological asset in the healthy orchard. Balanced mineral nutrition is assured when these fungal allies reach well beyond the rhizosphere (root zone) of fruiting plants. Here's a mind boggler: A handful of woodsy soil contains over twenty miles of these interwoven hyphae!.
Some of the participants in this arboreal food web are soil dwellers stretching their legs, so to speak; other canopy organisms are specific to particular plant species and intertwined with arthropod association. Certain epiphytic fungi are especially intriguing, having mycelia that run along the inner bark and promote overall tree health. Such arboreal relationships will play an integral role when we discuss holistic disease management in the orchard. Leaf colonization provides the desired competitive environment and—perhaps just as telling—phytochemical stimulation by which a plant can stand up to disease pressure all the more. Arboreal fungi are among the subtleties I refer to when stating that the best organic methods depend entirely on orchard health being in place across the board.
Working with Orchard Biology
We've identified what we want in orchard soil as regards microorganism dynamics. Now the big question is how to achieve such fungal dominance. Thinking like a tree again points the way. Nature builds soil from the top down: Leaves fall, tree limbs decay, mulch happens. All of which suggests the right sorts of food sources for fungal allies. We'll add a fertility component when we look at soil amendments elsewhere, but for now our primary focus centers entirely on the biology. Every orchardist who wants to be successful with organic methods will refer back to this section more than once.
Transition
Fruit plantings happen in one of two ways. The go-getter turns the lawn under and, plop, the trees and assorted berries are in. No real transition toward the fungal state occurs prior to the nursery order being made and delivered. The soil biology can recover from such unbridled enthusiasm—it's not wrong to do this—but soil preparation prior to planting offers certain advantages worthy of consideration. People with just a wee bit more foresight understand that a year of cover cropping and woodsy mulching not only offers the grower a chance to build organic matter and correct fertility imbalance but can also hasten fungal dominance. Here we're talking about transition techniques to jump-start the healthy orchard.
Outside your door lies a lawn, perhaps a pasture area or hay field, maybe an overgrown field with goldenrod and raspberry—situations that can rightly be described biologically as ranging from highly bacterial to lightly fungal at best. First the sod needs to go to clear the way for fruit plantings. Rougher ground with tree saplings may require some lightweight stump pulling within the strips where fruit trees are envisioned. Tilling is a bacterial act in itself, regardless of the mechanics chosen, as the turned-under organic matter creates a surf's up
call for soil bacteria. Persistent grasses (like quack grass) might require a double sowing of a buckwheat cover crop with more tillage in between to put an end to root runner vigor. Cultivated lawns will generally be ready following initial tillage for the fungal cover crop of choice—red or crimson clover—to be stirred into the top ½ inch of soil. These two nitrogen-fixing legumes have a stronger affinity for mycorrhizal fungi than the white and yellow clover species. Clovers won't make it in arid zones, so growers in the West can use bird's-foot trefoil to fix nitrogen instead. A nurse crop of oats can be seeded with any of these, then the works scythed down in place to decompose once the grain starts to head up, at which point the clover or trefoil will take over in earnest. Let me stress cutting in place to decompose that second time in late fall and then leaving to lie on the soil surface through the winter. Fungi respond to surface decomposition, whereas bacteria prefer soil disturbance. We are building a fungal duff of organic matter where the biological action desired is going to take place. Compost, deciduous wood chips, seaweed, and raked leaves can be added atop the clover stubble, if available. Yes, the roots of the cover crop are still in the ground and will likely grow anew come spring. Be calm—we have a plan.
The soil will be far more crumbly after this biological massage. You can fork out extant clover root systems in early spring where trees are going to be planted, a 4- to 6-foot diameter being a reasonable goal. Beds for berries (on the order of a 4-foot swath) can be forked through as well or ever-so-shallowly tilled to break the taproot connection, or they can be mulched with newspaper/cardboard over which wood chips will be spread. The clover beyond the immediate planting zone will share the space with other species in time. Frost seeding of select grasses (lightly, mind) and deliberately introducing taprooted herbs and wildflowers will steer understory diversity further without yet again disturbing the soil life profile.
Ramial wood chips
There are white rots and there are brown rots related to decomposition. The first support a deciduous environment; the latter deal with high tannin content and thereby define the evergreen forest. Let's talk about ramial wood chips as the main course for feeding mycorrhizal and saprophytic fungi in an orchard food web that in turn supports our fruit trees.
Rough, coarse, and lignin-rich is what rocks the biological kasbah. Ramial wood chips are about feeding the biology for the long haul.
This term ramial in defining the wood chip mulch of choice is paramount. Québec researchers originally used bois raméal to refer to twig wood less than 7 centimeters in diameter. The tops of deciduous trees and woodsy shrubs—not much more than 2½ inches around at the large end of the branch by rough Yankee reckoning—pruned and subsequently run through a chipper into coarse pieces are what rock the biological kasbah. The newest growth of a deciduous tree contains soluble lignins that have not yet polymerized into outright wood. Thus, the proportion of essential twig nutrients in the chips increases as average branch diameter decreases. Nitrogen, phosphorus, potassium, calcium, magnesium, and so forth are found in the green cambium and bud tissues where leaf photosynthesis production and root nutrition come together to make a tree... which we in turn can redirect to build ideal soil in our own orchards to make our fruit trees. Soil fungi will incorporate this ramial feast and gradually yield the nutrient profile back to our woodsy plantings through the action of a dynamic soil food web.
The size of the branches being chipped matters yet again when we consider the immediate impact on soil life. Carbon-rich materials used for mulch tie up nitrogen temporarily when soil decomposition forces the use of a limited nitrogen supply entirely for its work. Stunted plant growth can result when this happens. The carbon-to-nitrogen ratios in ramial-diameter wood average on the order of 30:1, going no higher than 170:1 as we consider the larger end of the recommended branch. These C:N ratios rise dramatically in stem wood (which should be used as home heating fuel anyway), running from 400:1 to as much as 750:1, thereby creating that soil dynamic where nitrogen becomes unavailable to the plant world until such log mulch has significantly been broken down. Paying attention to this sort of detail matters.
Soil fungi are adept at creating humus from a lignin source. Again, we are emulating how Nature works with the application of ramial wood chips. Most agricultural soils (other than the prairie grasslands) are of forest origin: Soil that has been built from the top down through fungal action undergoes humic stabilization—such soil has staying power and maximized nutrient recycling. Fruit trees belong in such soil. We are dealing with humification enhancement here rather than a mineralization (breakdown) process. Ongoing soil health results from soil structure being managed by soil organisms. Fungal hyphae physically bind soil particles together, creating stable aggregates that help increase water infiltration and the soil's water-holding capacity. This accumulation of acid-rich organic matter as humus is fueled in our orchards through the decomposition of ramial wood chips.
All of which brings us back to that rot business with which we started this discussion of fungal heaven. Rots are decomposing fungi that can be classified into two subgroups. The white rots use enzymatic chemistry on decaying hardwood to produce both fulvic and humic acids from lignins. The brown rots transform softwood cellulose to produce polyphenols and allopathic compounds specifically relied upon by evergreen species to suppress other plant growth. We've come to the hardwood–softwood divide. Can you tell which is the appropriate rot action for the floor of a deciduous orchard? The source of treetops used to make ramial wood chips must be deciduous species, for the most part. A mixed chipping containing no more than 20 percent softwood still will favor white rots. Don't outright waste the occasional pine sapling in a brush pile offering, but, on the other hand, do steer away from solely softwood wood chips for orchard use.
How to use all this ramial glory comes next . . . provided you first have a source. Having access to several acres of brushy growth along with a decent-sized chipper (though not necessarily a chipper-shredder, as coarser chips are better) makes ongoing ramial wood chip production a homegrown affair. The twig ends will come through such chipping still looking somewhat like a pile of sticks, and that's okay. Knowing a neighbor or two who clears the land in true pioneer fashion means you don't even necessarily have to do the work. Some towns chip landscape brush as part of a compost operation and rarely object to a home orchardist diverting some of that wood chip flow. The ultimate folks to approach work for the power company and clear brush beneath transmission lines. They chip for free, they fill a large truck, and they always need to dump that load. A reasonable spot to deliver is often all it takes for ramial wood chips to come your way.
Haphazard mulching
I'm a guy who likes to take the concept of diversity to extremes. Establishing an orchard intermixed with all sorts of other plants and bugs is a healthy thing to do. We get an especially good start on the diversity highway by being wantonly diverse about how we manage the understory, meaning the ground and plantings at the base of our fruit trees. It's time to introduce those of you on the straight and narrow to haphazard mulching... or as mom might say, being somewhat less than neat.
I know, I know. You have particular ideas about how often the lawn should be mowed. That all trees shall be in a straight line. That mulch should be applied uniformly and look tidy. That one dandelion uninvited is an abomination. Well, it's time for you to lighten up! The appearance of your orchard isn't about you. It's about the biology, stupid (to paraphrase a political inanity). It's about a full smorgasbord of varied tree nutrition to be explored and utilized by tree feeder roots. Life thrives in a diverse environment. Try to let go of cultural notions of a manicured garden, especially with your fruit trees. You can find a way to please the neighbors while accommodating principles of health and diversity. Seek the middle ground, and then, as you see better and better fruit, you can come on board completely. Everything is a process, including the orchardist.
Feeder roots of healthy fruiting plants seek nutrients in the fungal duff zone. Organism consuming organism in the vicinity of these roots makes available the right sort of nitrogen and other balanced nutrition.
Our goal, plain and simple, is fungal duff—that litter layer where mineralization and humification take place. Other plants will grow beneath our trees, certainly tufts of grass, but the density of these other species will be thin, essentially patches of green in between ramial wood chips, piles of shredded leaves, rotting hay, and compost smatterings. The preponderance of all this fungal food is what drives the fungal dominance we want for healthy trees and berries.
Recognizing what makes for acceptable orchard mulch is important. We have defined ramial wood chips, but nevertheless I know landscape notions are going to enter in here and confuse some of you. The arrays of familiar choices at the home and garden center generally do not cut it from a biological perspective. Bark mulch comes from softwood logs, for the most part, and therefore comes rich in tannic compounds that once protected standing evergreen trees from decay. Guess what? Tannins will suppress healthy growth in garden and orchard alike. Dyed bark mulch lifts biological ignorance to a whole new level—mulch that is pleasingly red
instead of earth-toned
is that way because of toxic dyes. You would knowingly treat the precious soil this way? Bulk wood chips in a bag, often cedar, sometimes hemlock, are a brown rot phenomenon. Sawdust comes with far too much carbon relative to nitrogen, as does uncomposted horse manure bedding. Let either rot for a few years and it's a whole different story, but applied fresh beneath the trees? No, no, no. And as for some sort of landscape cloth beneath the mulch that keeps volunteer plants at bay? Forget about it. Synthetic fabrics create a bacterial environment beneath that weed-protected
surface; meanwhile, mulch decomposition above slows to a standstill and no longer replenishes organic matter in the soil. The ground beneath compacts like cement. There's a direct correlation here: Human notions of neatness are rarely biological! Organic growers want ramial wood chips and ramial wood chips alone—applied directly to the living earth—for a woodsy mulch.
Haphazard basically means you don't do everything the same all at the same time. Just like you, feeder roots like an array of nutrient choices and environments. The reception found beneath fresh ramial wood chips is different from that beneath a one-year-old pile or a two-year-old pile or the remnants of a three-year-old pile. All are worthy, just offering slightly different available nutrients and soil food web happenings. The same goes for a rotting hay bale or randomly piled straw. Both of these grassy mulches increase the level of fungal predators—the good nematodes!—which in turn makes available the healthier form of nitrogen (we'll be distinguishing ammonium from nitrate sources ahead) to our fruit plants. Hay provides a good charge of potassium as it breaks down as well—potassium being one of the nutrients taken away when we harvest a full crop. All told, levels of both macronutrients and micronutrients are found to be consistently higher in the leaves of fruit trees that are mulched. The ability to hold moisture in the soil is yet another huge benefit of mulch, especially where the summer months get dry. And often hot: Soil temperatures are moderated considerably by a mulch cover.
Mulch can be thought of as shade
as well in that it suppresses an excess of competing plant species. This can be especially important during those first five years or so when a young tree needs to grow wood structure. I place a ring of peastone right up against the trunk of my young trees to keep that zone open and drier for many years to come. Small-sized gravel (screened to 3⁄8 inch) does the trick, about 3–4 inches in depth, placed as a 24- to 30-inch circle with the tree right in the center. Beyond this goes your choice of mulch, replenished as necessary, creating an outer ring within which a young tree can take off. The full-sized tree will eventually shade the ground at its feet more completely, helping to keep a sod cover from filling in this fungal-directed space. We'll be looking at certain herbs and flowers to add here once the trees come into their own.
Ramial wood chips can be put down anywhere from 2–8 inches deep. Perhaps this year I have enough wood chips to dump a wheelbarrow load or even a full tractor bucket on the south side of every tree, keeping it piled thick rather than spreading it out far and wide. Hay bales randomly go on another side of heavy-cropping trees. The next year that ramial dump goes to the north side . . . or the east side . . . or the west side, being rotated so different stages of decomposition can be found beneath every tree throughout the orchard. I watch understory plants shift from season to season, knowing that spiders and predatory ground beetles will find new homes as they move about as well. Spreading woodsy compost in the fall suits this haphazard pattern. The fungal duff stands renewed and healthy, ready and willing to pump out the fruit of our desire.
Let's pause just a moment to consider the conventional alternative. And I'm bringing this up only because I know some well-intentioned souls have asked me in the past if it's okay to use herbicides when growing fruit organically. (We're all learning at our own pace.) These chemicals directed at unwanted species of plants have a number of biological consequences. Decomposing fungi are destroyed and thus are no longer able to sequester atmospheric carbon into humus. The mycorrhizal network that transports nutrients and water to the rhizosphere (the zone around the roots) is broken. Now the tree requires inorganic fertilization—from chemicals, of course—to make up for this loss. Disease becomes a far bigger problem when nutrition is no longer balanced and scab-infected leaves from the season before lie on top of biologically dead ground. Honestly. Herbicides are part of the mind-set that we are changing here. Choose a diversity of mulches instead.
Pulsing agents
The soil can be a sleepy place, and all the more so when coming out of winter dormancy. Keep in mind that this is the engine that drives our fruit plantings, where soil organisms interact to transform and transport matter and energy to our trees. Nutrition-rich catalyst sprays directed at the ground and the branch structure of the trees are used to activate the ecosystem in early spring and right after harvest for a specific purpose tied to root happenings and the resource needs of the arboreal food web. This whole new concept
expands what many of you might think orcharding involves, and yet it makes perfect sense once you've come up to biological speed.
Roots start to stir at about the time we observe green tissue springing forth from dormant buds. Mycorrhizae respond, albeit slowly, as the cool earth eventually unveils a late-spring flush of feeder roots and accompanying hyphal growth. The days warm, insects are flying, birds are chirping, leaves are unfolding . . . but still the earth holds back, not quite fully awakened from its winter sleep. What follows sets the stage for managing disease pressures in the orchard by natural means.
Liquid fish and pure neem oil can be used as pulsing agents to give soil microbe populations a positive boost just as the trees announce their readiness with a showing of green. We'll be talking more about these spray materials in the sections ahead. Choose a day warmer than not and spray all your fruit trees and berry patches to the point of extreme runoff... wetting the ground thoroughly as well as the trunk and branch structure. This saturation makes nutrients available to both the soil food web and the overwintered species in the arboreal food web. Liquid fish (unlike fish emulsion) has not been pasteurized and thus contains the fatty acids and enzymes that fuel the biology. Cold-pressed neem oil has not been pasteurized and thus contains fatty acids and more than a hundred other compounds that fuel the biology. These fungal foods also help decompose the last of any overwintering leaves laden with potential scab spores from the year before. I add effective microbes to this first spray of the season as well to provide biological reinforcement for the canopy colonization that I'll be wanting in the months ahead.
The pulsing agent part of this biological approach continues with a repeat application one to two weeks later as the bud stage reaches early pink to full pink. Individual flower buds on fruit trees have spread apart and are right on that brink of popping open to unveil their beauty. Target ground and branch structure once again, but also give full credence to the upper portion of the tree. All sprays from here on out will have foliar uptake purpose, now that receptive green tissue is showing in earnest. A shot of effective microbes comes highly recommended yet again to ensure diverse colonization of leaf and bud surfaces. What seems unusual and new here—introducing orchard probiotics to the tree canopy—is absolutely
I time a fall application of neem oil and/or liquid fish to when approximately 40–60 percent of the leaves have fallen off the apple trees. Lots of dynamics are going on following harvest. I spray the entire tree and remaining leaves, as it's this stocking of the arboreal pantry that helps our microbial allies buckle down in the bud crevices for the dormant months ahead. I definitely make the ground wet, targeting fallen leaves to increase decomposition with the fatty acids and thinking about the fall root flush, which is now hitting its stride. A brew of non-aerated compost tea (or effective microbes, if you still have some product remaining from the spring) would be an especially great addition for furthering leaf decomposition and boosting end-of-season diversity yet again.
Arboreal brews
Herbal medicine at its finest is really about deep nutrition. Fermented teas of horsetail, nettle, and comfrey are local brews that offer wide-ranging constituent bioavailability to both foliage and friendly microbes. Kelp can be viewed as an herbal tonic from the sea. Neem oil is most certainly plant-based. A homemade garlic extract works in synthesis with other spray materials. Let's introduce the use of these arboreal brews through the heart of the growing season while we're tuned into supporting system biology.
Spring catalyst sprays along with such herbal side dishes provide food resources to canopy allies up until harvesttime. Many of us will likely incorporate specific insect strategies during this time (depending on the pest reality found at each orchard site), but right now we're giving emphasis to sustaining system health. Ours is a forthright approach. We are riding a new wave of thinking, as the time has come to grow nourishing fruit in essentially homegrown ways. The end of peak oil demands that this knowledge be developed and shared widely. We are moving beyond the old organic ways that once seemed necessary to control fruit tree disease. We have tuned in to the biological connection, and, by gum, these critters need feeding!
The Four Holistic Sprays of Spring (Part One)
The heart of a holistic approach to disease comes down to four health-supporting sprays for our fruit trees early in the growing season. We forgo copper, sulfur, and lime sulfur by doing this. These are the long-standing mineral fungicides relied upon in certified organic operations to ward off potential disease . . . but at a cost to mycorrhizal health, fruit finish, yields, and return bloom. An overview of organic allopathy will be coming, along with an understanding of specific challenges when health-minded orchardists might nevertheless feel compelled to call upon traditional spray options. Weather that induces serious disease risk demands focused attention. Yet we can often ride through extenuating circumstances simply by emphasizing orchard health across the board. Which brings us to the four holistic sprays of spring. Timing and rates are coming.
These fixings of orchard health consist of pure neem oil, unpasteurized liquid fish, and a diverse complex of microbes. That last component of this holistic recipe can be served up as effective microbes or aerated compost tea. This is primarily a nutritional brew for beneficial fungi that also happens to stimulate tree immune function. A competitive arboreal environment will ward off pathogenic disease, and all the more so when fruit tree phytochemistry is activated. The primary infection period for most tree disease is effectively straddled by these sprays. Yet there's more to this story. The nitrogen boost (from the fish) going into bloom will strengthen pollen viability. Insect pests will be impacted by azadirachtin compounds in the neem, which inhibit the progression from egg to larva to adult. These holistic spray applications serve as a biological replacement for petroleum-based dormant oil as well. Early-season moth cycles get disrupted, setting up lesser generations
the rest of the season. That should be plenty to wet your whistle for now, methinks.
The majority of plant surfaces have been satisfactorily colonized going into bloom with the first two holistic sprays of the season. This despite the vagaries of weather and ultraviolet degradation. The next steps are to support the arboreal food web through the month ahead—just as disease-causing organisms come onto the scene—along with stimulating the immune response of the tree itself. Some may think this sounds dubious, even preposterously risky from a commercial perspective, yet ultimately we can either fight microbe reality with heavy-hitting spray medicines or work from a deeper level of understanding. Enough rationale has been provided throughout this section for you to make that judgment for yourself. I place my bets for a good fruit harvest on the biological approach.
Those weeks during fruit bloom and early fruit set are when fungal and bacterial pathogens, along with a majority of insect pests, must be reckoned with. We'll examine these dynamics more thoroughly ahead, but the point to be taken now is this: The need to do something is far more critical during this phase than it will be throughout the rest of summer. Choosing to spray to sustain system health is different from choosing to spray to kill. If you're in the camp that has always regarded need to spray
as the ultimate reason not to grow fruit, shift gears, please. Recognizing your inner reluctance around spraying is needed to move ahead.
I use unpasteurized liquid fish two more times in my spray mix at the end of bloom (known as petal fall) and about a week to ten days later, absolutely along with pure neem oil and kelp and effective microbes. Fish has a substantial charge of nitrogen as well, and as we will soon learn, such foliar nutrition has high value at this time when our trees are developing seeds (within the fruit) and next year's flower bud cells. The spray schedule is tighter now—more on the order of weekly than biweekly—because the whole of creation takes active interest in this fruition. Growers honoring arboreal allies cannot see the microscopic action going on between good colonization and spore-landing disease organisms during this time... but relatively clean fruitlets and leaves as we enter the lazy days of summer eventually tell the story that matters: Health prevails.
Arboreal brews—if you choose to continue spraying for optimum health in the summer months—now go totally herbal. Pure neem oil continues to be at the heart of an ongoing nutritional spray program, along with certain fermented herbal teas. Basically, what's being achieved during these months when the fruit sizes up is ensuring good calcium levels, interrupting the summer moth complex, and upping resistance to rots and other surface diseases by boosting the cuticle defense of the tree. I maintain a ten-day application schedule through the month following petal fall, then go biweekly up until harvest to achieve a darned good fruit finish for community sales. Commercial fruit growing demands additional attention to be directed at aesthetic fungal diseases like flyspeck and sooty blotch that feed on cuticle exudates . . . which may not matter quite so much in home plantings, thus making the recommendation for summer applications just that—a recommendation. The four holistic spring sprays should make a decent fruit crop achievable, whether you choose to go for the gold or not.
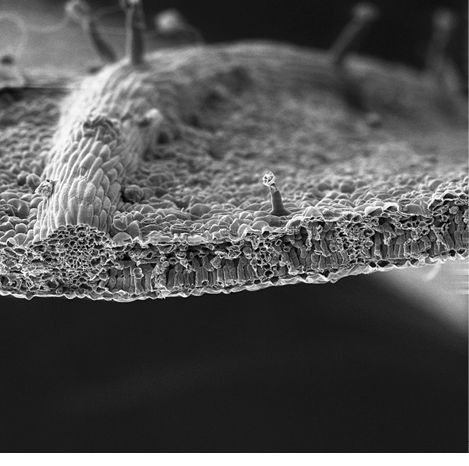
This microscopic view of a leaf surface reveals the playing field where beneficial microbes and pathogenic organisms vie for colonization rights. The stem of the leaf stretches above the stomata (respiratory openings), tower-like tricomes (leaf hairs), and chlorophyll-rich cells on the underside of this black walnut leaf. Half again as much resolution would be required to see the microbes that are undoubtedly covering this leaf surface. Photo courtesy of Louisa Howard, Dartmouth Electron Microscope Facility.
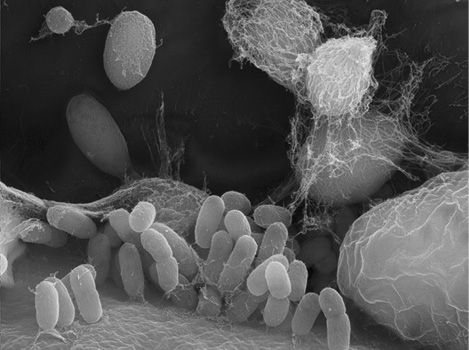
Speak of the devil . . . here stands the arboreal food web revealed in all its complexity. The pill-shaped forms in the front are bacteria. The larger egg-shaped masses are fungi wrapped in their hyphal strands. (Those that seem to be floating in the background are attached to the leaf surface as well, just a visually distorting micron away.) This is the realm of competitive colonization wherein lies a core tenet of holistic understanding. You can almost hear a disease spore yelling out, Quick, beam me up, Scotty! Photo courtesy of Louisa Howard, Dartmouth Electron Microscope Facility.
Holistic Health
Anyone looking to grow fruit faces a good hundred years' worth of chemical obstinacy despite this lengthy rundown of biological advantages. We must make certain our philosophy once and for all to answer that pivotal question with which we began this chapter: Are we going to honor tree wisdom or not?
Our grandparents' generation didn't make the turn toward chemical agriculture so much out of dire necessity as out of uncomprehending enthusiasm. Pest and disease problems are frustrating when you've worked so hard to plant, water, and cultivate, only to see moths gain the upper hand or rot ruin nearly every peach in a particularly wet summer. Blunt chemicals like lead arsenate and Bordeaux copper dealt a blow to mortal pest enemies in the Roaring Twenties. Insidious chemicals like DDT (among the many organochlorine/organophosphate compounds developed as nerve toxins during and after World War II) upped the ante. And what do we really know about the softer chemicals
like imidacloprid being used today, other than that honeybee populations worldwide have crashed precipitously? Advocates for chemical agriculture make a tantalizing case for labor saved, the certainty that food will come to hand, and the moral imperative that a burgeoning human population must be fed by industrial means. All this can be argued. Health data presented. Refined thinking pursued. I'm not going to engage anyone's beliefs here about what makes for righteous agriculture. I am, however, going to make clear what happens in the orchard ecosystem when chemicals are relied upon as a primary means of growing fruit.
In a sense, pests and disease in the orchard—whatever the scale—should be thought of as symptoms that show up whenever system health is less than optimum. Environmental stress, nutrition imbalance, lack of diversity, input ramifications, and human arrogance all contribute to this broad mandate for trouble. We may want to make big-picture decisions, yet almost invariably we react to a perceived threat in the here and now by seeking a potent medicine to alleviate a crop-threatening situation. Such short-term solutions merely address symptoms and can never be more than a prop for a sick patient . . . although they may seem to do good at the time. Eventually stronger medicine is needed as the system gets weaker from not having relied on its own internal fortitude. Mycorrhizal fungal connections are lost as fungicides used to prevent potential disease up high in the tree (a fairly common orchard strategy) change the hospitality of the living soil below. Feeder roots limit their reach in favor of the intravenous-like drip provided by soluble nitrogen. Mites and other foliar pests weaken plant vitality as beneficial allies disappear due to the use of broad-acting toxins. Inherent nutrition in the food we eat becomes a degenerative joke when there's little respect for soil biology. The grower, of course, gets a crop. Some say the fruit even looks grand. Next year it's more of the same. Chemicals again prop up a less-than-optimum situation. The next year the grower gets another crop, just as empty of real nutrition as the one before. The beat goes on.
This is not a basis for a happy home orchard where children walk through the grass to pick berries and birds sing. Nor will any fruit grower find joy in contemplating the -ide side
of conventional thinking: Insecticides, fungicides, herbicides, and soluble fertilizer-ides come with complicated instructions and myriad danger warnings. Perpetuating imbalance takes more effort than some people might wish to admit.
Choosing to go organic
is no reason to be smug, however, if we fail to make the connection to health across the board. Utilizing a substitute arsenal of natural toxins does not change the underlying paradigm of how we view food production. Dealing with symptoms—be it codling moth stings or nutrient deficiency or rust defoliation—is not the same as supporting health and biodiversity throughout the orchard ecosystem. Sometimes growers refer to this broader paradigm as deep organics, but I actually have more useful words to set the stage from an earlier book of mine, The Apple Grower:
Two terms from medicine lend far more credence to describing how we as orchardists relate to our trees in the quest to produce healthy, locally grown fruit. I would argue that each of us makes allopathic and holistic choices within the approach we've chosen to grow fruit. Every organic sulfur spray, for instance, works in an allopathic manner just as does every organophosphate spray. Both are aimed at removing the perceived threat by toxic means. Holistic actions on the other hand undertake to embrace the orchard system as a whole rather than address recurring symptoms. The more toxic a procedure, of course, the further we remove ourselves from integrating soil and tree health into self-sustaining solutions.
Natural defense mechanisms abound in a healthy orchard. Our job as growers is to support the underlying biology and abet biodiversity. Always and in all ways. Plants possess an immune system (of sorts) that can ward off pathogenic fungal disease. We can make herbal brews to help stimulate this internal phytochemistry in our trees. Creating diverse habitat for predators like ladybugs and lacewings keeps pest numbers in check. Mulching with ramial wood chips helps mycorrhizae thrive, and it's this fungal connection that provides the balanced nutrition necessary for a tree to better stand up to disease. Human ingenuity can direct insect traffic—aye, curculio, I'm going to tell my species how to finally outwit your species!—and then make a serious dent in returning population numbers. Effective trap-out methods for other major pests, devised by recognizing varietal preferences and behavior patterns, make the beneficial math we'll be talking about a no-brainer in this choice surrounding the use of ecosystem-altering chemistry.
I am not a purist by any means. There may be times when an allopathic touch will seem justified in a community orchard. Remember, I'm referring here not just to chemicals but to approved organic materials like mineral fungicides as well. The pivotal distinction for any orchard input should be does it build system health? Or does it cut, slash, and burn to suppress a symptomatic situation instead? Fruit growers with their livelihoods on the line naturally feel extreme
All these considerations happily shift in the attentive home orchard. You don't need every apple and peach to be perfect to be able to pay the taxman. You can choose varieties with reasonable fortitude and be more hands-on with problematic pests. A portion of the fruit can be sacrificed as long as your share is bountiful and reasonably unmarred. Harvests here in Lost Nation Orchard come in along the lines of 60–80 percent dessert-grade fruit, by which I mean reasonable to eat by any appreciative standard. The rest of our apple crop gets squeezed into real cider, truly one of the delights of this good life. Of course, crop appearance varies somewhat by variety, and curveballs are inevitably thrown to us in each new season. Yet what really matters goes on inside every piece of that fruit. Nutrient density and medicinal attributes of the food we eat correlate directly with how we grow our food. More flavorful fruit results when we optimize biological health. No amount of propaganda changes that truth.
You are on the way to becoming that attentive orchardist who observes and emulates Nature's ways. Decades of trial and error make up the path that has led to my recognition of the health connections being shared here. However, you alone will decide which ecosystem recommendations can reasonably be achieved in your own orchard. I can't emphasize enough that everything you do for the biology will come back to you many times over in terms of fruit-growing success. Put your energy into building health rather than battling opportunistic foes and thus often contributing to further problems. Trust that biodiversity has ways of restoring balance when short-term situations flare up. Honor all species, even when you take action to deter the select few. Give thanks every day, as attitude is part of this orchard journey too. Keep celebrating biological connection, knowing the next growing season and the season after that will get better and better.
Holistic health in the orchard absolutely rocks. With that as our guiding light—tree wisdom, if you will—we are ready to consider the scope of what you are about to undertake.
Three Trees Speak
Tree perspective offers insight into our role in the growing of fruit, no matter what your philosophical outlook on orcharding—chemical or organic or somewhere beyond all that. The ecosystem dance taking place speaks observable truth when growers pause to listen.
- The Wild Tree speaks
-
Some years both disease and insect problems seem to be in check in our camp. This happens when weather patterns defeat fungal pathogen plans and a degree of isolation disrupts major pests. A beneficial balance between symbiotic microbes and neighboring plant allies lies at the heart of successful cruise control. And yet all these advantages can fall short in other years . . . and then our fruit can be an ungodly mess. Budwood taken from resilient stock in an untamed setting, then grafted to rootstock, often doesn't prove to be noteworthy once brought to a managed orchard scenario. Hmmm.
- The Controlled Tree speaks
-
More medicine, mon, I need more medicine. Things done in the name of growing a high-yield crop can mess up ecosystem balance through unintended consequences to many species. More and more allopathic sprays are then required to control the situation. We become addicted to the fix, no longer striving to resist disease from within. People have a hard time realizing that trees like us can be found in a certified organic orchard just as surely as on commercial IPM acreage... leaving us to wonder about the pace of human observation.
- The Holistic Tree speaks
-
Fruit trees evolved with humankind. You need us just as we need you. Your job is to steward system health rather than disrupt the whole shebang in the name of one-sided control. Pests can be nudged, but eliminating any species outright is beyond your prerogative. Providing health-supporting nutrition to boost immune function and beneficial fungi should be obvious. And when that scab year from hell occurs, yes, you might consider harder-hitting spray tools like sulfur to allay pathogen pressure at certain peak moments. Just understand that constantly relying on biological compromise comes at a price to system health. A holistic grower appreciates that the whole often knows more than the human does.
Orchard Design
Any planting site for fruit trees and berries should be considered from two points of view. Old-time land sense reflects the green thumb consciousness of successful gardeners, who take into account what the individual plant requires physically to thrive. Modern notions of permaculture bring deeper principles of ecosystem interconnection into focus. I weave the two together whenever I envision the next aspect of my farm . . . and you can do the very same. Every yard has its advantages as well as limitations. The absolutely ideal site for fruit trees may not exist at your place, but that doesn't mean you can't come up with reasonable accommodation. Families with several acres have more choice in these matters than those with a narrow yard. Still, following a few basic site rules ensures fruiting potential. We'll weave permaculture considerations in around those as best we can. Favoring biological advantage will always be the driving imperative behind every orchard layout.
Keeping Life Reasonable
My wife, Nancy, would likely tell you that I am not the guy to be giving advice about not overdoing when it comes to planting fruit trees and making gardens. It's ever so easy to get caught up in all the wonderful possibilities! Still, keeping a sense of balance in life requires that we go into any new venture with some idea of what lies ahead.
A good part of the satisfaction of growing your own food in a diverse landscape lies in keeping up with all that needs to be done in a timely manner. Constantly having to look at tasks that should have been done last week, if not a month ago, will bring agonizing joy at best. It might start one spring with never getting the far raspberry bed pruned at all. Or you'll score several truckloads of wood chips from a local landscaper and still be looking at the untouched pile a couple of years later. The grass grows up around young apple trees in the back forty until you forget things even got planted. How many seasons has it been since the currants were actually picked and put up as tasty preserves? I sure didn't stick those fly-encrusted sticky ball traps in the back closet, honey. You get the idea. Far better to see half a dozen apple trees with good branch structure, haphazard mulch in place, the peaches thinned to assure good fruit size, and healthy foliage supported by deep nutritional sprays . . . not to mention all those luscious blackberries ripening down yonder.
Ask yourself a few basic questions up front: How much fruit is enough? How much fruit is too much? Can my family commit to an ongoing list of orchard tasks? What do I need to achieve each week in the orchard? How does all this fit with the rest of my life?
Starting small is far better than going for the gusto. This has always been true of the better home orchardists I've known. Experience brings understanding as to when things need to be done. Confidence builds when a pruning cut follows the rules or certain bugs obey the plan. Now you can see how adding two apricot trees would be a next bit of fun. Maybe it's training an Asian pear on espalier; maybe it's grafting in heirloom apple varieties from your region. You're starting to recognize beneficial species and appreciate the role of all sorts of flowering plants in the landscape. Brewing fermented herbal teas has become as natural as remembering to hang those renewed fly traps in June.
Things start to flow in the home orchard for two reasons. One, you've taken the plunge and planted a few things. Moving beyond intentions requires you to get your hands in the dirt. And that in turn will launch your personal learning curve into the fascinating world of actually growing fruit. Be patient about this. Everything isn't going to go right. Recognize such learning opportunities as a chance to do better next year. In fact, be stubborn about this. Every back-to-the-lander quickly learns that something else does go right in that very same season. Nature gives and Nature takes. Here's a beautiful argument for an even wider diversity of fruit plantings, to gain the best crop insurance going for your family.
Which brings us back to that point about me not being the guy to set the limits on anyone's orcharding horizon. Fruit growing quickly becomes a passion. Keep it reasonable enough so that you never lose sight of the fun.
Tree Practicalities
Choosing the types of fruit you first wish to grow begins the process of putting in an orchard. Lay of the land insists that certain practicalities be met, and chief among these is well-drained ground. Terrain adjustments prior to planting can improve root prospects considerably where conditions may be less than optimum. Good air movement plays a huge role in abating disease pressure and getting tender blossoms through tenuous times. Orientation to the sun may be helpful if you have a choice in the matter. Direct sunshine throughout the day empowers fruit buds, so sidestepping excessive shade from tall trees and nearby buildings will be integral to productive cropping. The soil structure at your place may seem mostly a matter of destiny. Hold tight, however, for soil biology has the power to turn even a heavy clay soil into receptive earth as well as bind a porous sandy soil back toward fertile promise.
Aerobic Ground
The roots of fruit trees need to be able to breathe throughout the active growing season. Choose planting locations where groundwater finds its summer equilibrium point a good 3–4 feet beneath the surface. Pear trees will tolerate wet feet to some extent, but berries, stone fruits, and apples will develop root rot in constantly anaerobic conditions.
Don't worry about puddles on semi-frozen ground at the height of spring thaw. It's the normal depth of the water table (once it settles) that determines whether tree roots will thrive or wallow. Impermeable ledge relatively close to the surface can create drainage issues, even on sloping ground. Some of you will be able to improve drainage by resurfacing your land to allow a lower-lying swale to drain such pockets. Others may be able to install drainage tile to capture a high water table above the tree site and redirect it via the flow of gravity to lower ground. Flexible black plastic pipe with moisture-collecting slits, placed in a gravel trench, buried at least 24 inches deep, and then covered with landscape cloth before backfilling does the job admirably. Such steps need to be taken before the trees are planted, of course.
Creating planting mounds for individual trees, or more extended berms for group plantings, will work provided you achieve depth enough for roots before they encounter permanent groundwater or that impermeable ledge. Such rising of the earth happens in one of two ways. Importing structural soil is fine if you can indeed get decent dirt. That means asking precisely where that convenient dump-truck-load of loam might be coming from. Chemically treated soil taken from a non-organic farm field is so biologically impoverished that vast amounts of fertilizer are needed to get a crop. Mixing this abused soil with a significant amount of woodsy compost and soil amendments will be necessary to restore some oomph within the terrain being formed. Cover cropping the resulting berms for a year must be part of the plan as well. A better source (with respect to your orchard needs anyway) is native topsoil being scraped away for yet another development. Creating miniature dales with the soil already on site may gain that slight bit of elevation needed. Sloped terrain lends itself to terracing—the piled edge of the berm now having the greater depth for fruiting plants. Both approaches are absolutely ripe for some biological riffs.
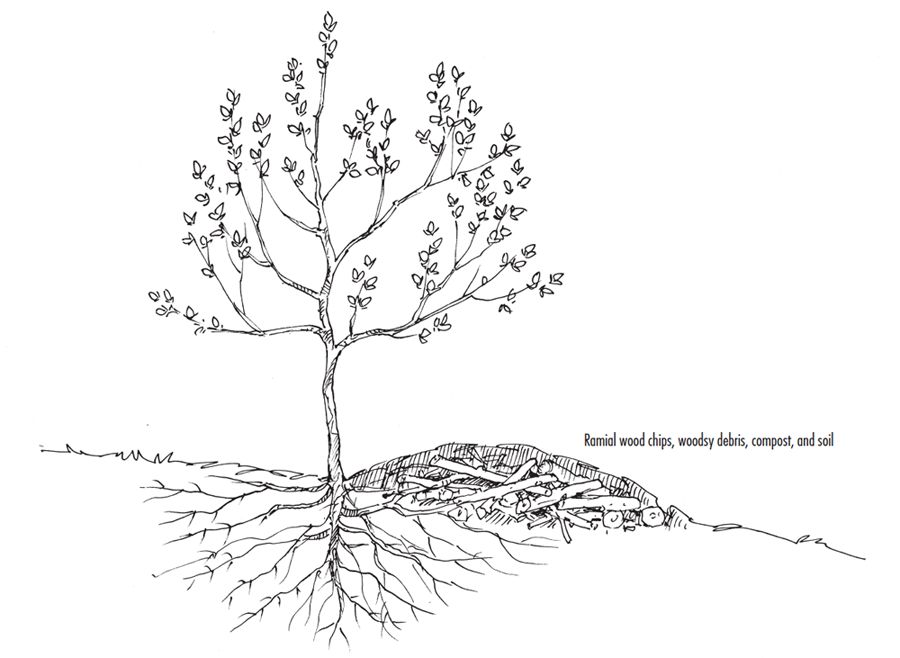
Deeper berms can be made across a mild slope by trenching the uphill side of an envisioned row of fruit trees and placing the removed soil along the downhill side. Filling the resulting trench with ramial wood chips (above where the trees will go) creates a biological deposit account for tree roots and mycorrhizae alike. This particular approach will be vital to create a catch basin for moisture in inland regions on the West Coast, where irrigation is a far bigger issue than drainage.
A permaculture technique from Germany takes this idea of burying woodsy debris for long-term fungal fertility to new heights. So-called Hugelkultur is nothing more than creating planting mounds filled principally with decomposing wood and other compostable roughage. This makes for raised beds loaded with organic material, nutrients, and air pockets for roots. The deep soil of the bed becomes incredibly rich and loaded with soil life as the years pass. More tiny air pockets form as the wood continues to decompose . . . and this aeration has healthy impact for the various soil fungi we want in an orchard setting. The woody debris in turn helps hold nutrients and keep them from passing through to the groundwater below.

Slightly raising the elevation by creating a planting berm can often make enough of a difference on sites with a higher water table.
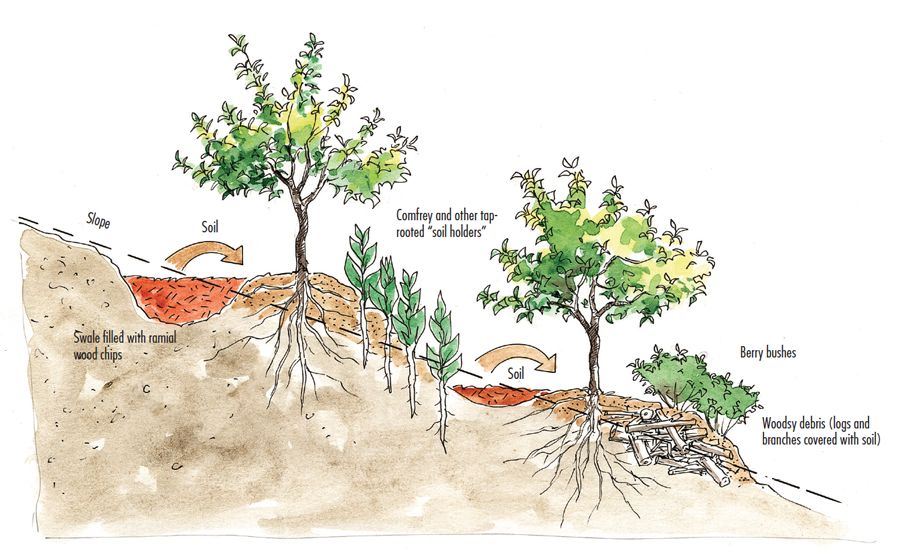
A grower named Sepp Holzer in the Austrian Alps has taken this agroforestry notion even farther to create a swale-based microclimate for tender fruit trees. In this case, the woodsy debris forms the core of earthen mounds alongside the tree row, on one side or perhaps even both sides, depending on the terrain and prevailing wind direction. The bottoms of the inward slopes are lined with rocks to collect summer heat and radiate it back into the sheltered tree swale. The tops of the mounds and outward slopes are interplanted with an assortment of small fruits, which benefit from the soil food web activity accentuated by the organic matter below. Poles can be used to extend mound height to prop up fir boughs, which provide a winter shadow for tender trees. Holzer's use of ecological relationships and cycles to provide sheltered living conditions for tree fruits growing a zone farther north than recommended deserves serious scrutiny.
The permaculture technique know as Hugelkultur involves utilizing woodsy debris to form sheltering berms around fruit trees. This essentially creates a mycorrhizal haven beneath the ground that promotes tree health for many years to come.
Let's add one more element to this discussion about planting mounds. Burying burnt woodsy debris beneath the ground provides a nutrient haven for mycorrhizal fungi. Some of you might have heard the buzz around using biochar as an ancient means of fostering long-term fertility. The pore structure of blackened carbon (essentially) serves as a physical sanctuary for mycorrhizal hyphae and various symbiotic bacteria, thereby promoting microbe diversity. (I know I appear to be straying beyond mere drainage issues here, but bear with me. Orchard design based on biological principles sometimes leads to unexpected places.)
An experiment on my part several years back incorporated all these notions. I knew nothing of Hugelkultur at the time and in truth was simply being practical about clearing ground. I piled brush and pulled root systems (of hardwood trees located in intended apple tree rows) on a downhill slope and deliberately scorched the branch ends and larger stump surfaces with a dry leaf fire. Notch one up for crude biochar made in place. Uphill soil was then pushed over the works to create a level planting plateau. Since then, much work has gone into mulching with ramial wood chips, all deciduous, all in the guise of building woodsy soil from the top down. The apple trees planted at the intersection of this altered slope are the healthiest on my farm. Now, that's a biological planting mound!
Biological terracing brings deciduous banking into full play. Uphill swales filled in with woodsy matter in dry areas can be used to retain moisture for trees planted on a slope. Conversely, the very ground being cleared to make way for an orchard (where rainfall is not an issue) can provide a similar mycorrhizal resource to build up the planting terrace in the first place.
Air Movement
A bit of light wind helps keep disease at bay and can deter frost at blossom time. Planting on a slight slope usually ensures better air movement. Flatter ground will work too so long as nearby impediments can be made less so—a well-placed opening or two in a downhill hedge or solid-board fence may be necessary to allow the wind to stir the air. On the other hand, some sites will require a windward hedge to buffer persistently strong winds. Possibilities for a windbreak can be far more diverse than the short-lived, root-competing poplars people often seem to rely upon for this purpose. Dual-purpose plants will feed wildlife or fix nitrogen or provide habitat for bird friends. Consider hybrid hazelnuts, Nanking cherry (also know as sweet bush cherry), beach plums, or Siberian pea shrub (Caragana arborescens), as well as ornamentals like dogwoods, lilac, or highbush cranberry. The wind's drying qualities in winter can be a bigger problem in prairie orchards, where fruit buds desiccate in part due to frozen trunks and branches not being able to supply water from the roots. A tart cherry or apricot tree in the Midwest may require the protection of scattered evergreens (to take the brunt of cold winds) in order to successfully fruit.
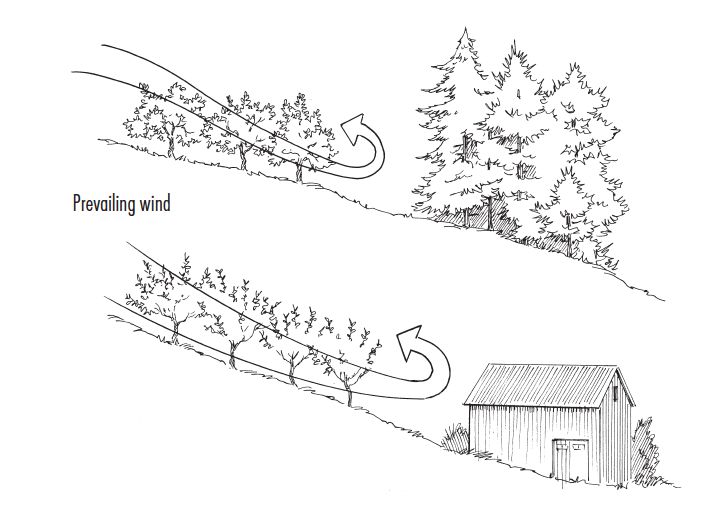
Slope alone does not guarantee frost will pass you by. Openings in a frost barrier that allow cold air to continue downhill or planting farther uphill from an obstruction can prove significant.
Buffering tender fruit buds from the cold winds of winter can be as simple as a spacious evergreen stand planted on the windward side.
Sun access
Excessive shade simply won't do. The fruiting process is driven by photosynthesis. That requires access to plenty of sunshine. Morning sun has better value in terms of drying out the orchard after a heavy dew or night rain. Still, the longer those trees can find the light throughout the day—from sunrise to sundown—the better. Fruiting plants require a minimum of six to eight hours of sun per day during the growing season; stone fruits do better with even more. Southern growers will find that gooseberries and currants actually need some overstory shading in order to deal with excessive heat, whereas farther north a location in full sun for the Ribes family will probably be fine.
Aspect to the sun has some relevance but will not doom any effort outright. Stone fruits bloom before apples and many of the berries by two weeks or more. Tender blossoms touched by an early-spring frost will be lost as far as fruit set goes that season. Planting such earlier-blooming fruits on a north-facing slope can help delay bloom and thus may save the day in borderline areas. Use a nudge of common sense with that last recommendation, however: Growers in far northern zones don't need to set back bloom, and in fact putting trees on a north-facing slope may end up proving entirely detrimental to growing a productive tree. In the next section we'll be discussing management techniques to deal with cold that potentially have more usefulness when the temperature plummets within a certain range. Protection from the hot summer sun in southern zones can be found by favoring a northerly aspect. Partial shade during the warmest part of the day can improve the texture of apples and protect fruit from sunburn; pruning for a denser tree canopy or using a reflective spray of white kaolin clay can help achieve the same result for those who have limited options in terms of site location. Pome fruit trees to be espaliered (trained in two dimensions on a trellis) will do best if planted on east- or north-facing walls in hot climates, while a west- or south-facing wall may be preferred in cooler climates.
Soil structure
Soil type is what it is to start. However, both an extremely sandy soil and a heavy clay muck can be positively influenced by soil biology and additions of organic matter. Mulching and composting over time go a long way toward improving unfriendly ground. The ratio of calcium to magnesium has relevance when nudging the biology toward certain achievements regarding soil structure. Having the proper mixture of minerals, organic matter, air, and water in the upper layers of the soil—the area where plants grow—is ultimately more important than feeling limited for the rest of your life by poor soil structure.
Were I to write a suspense novel about all this it would absolutely be called The Glomalin Factor. This soil superglue permeates organic matter, binding it to silt, sand, and clay particles. Not only does glomalin contain 30–40 percent carbon, but it also forms clumps of soil granules, called aggregates. Glomalin gives soil its tilth, that subtle textural quality that enables experienced growers to judge great soil by crumbling a handful through their fingers. A sandy soil's moisture-retention capacity can be increased, just as a clay soil can be unbound (to drain better) by this substance. Here lies the key to improving soil structure. And so, you eagerly ask, where can you buy this wonder product?
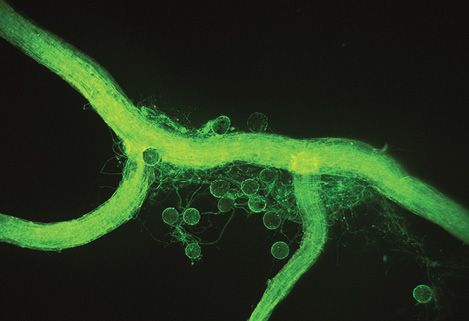
A microscopic view of a mycorrhizal fungus growing on a feeder root. The round bodies are spores, and the thread-like filaments are hyphae. The substance coating them is glomalin, revealed by a green dye tagged to an antibody that reacts against glomalin. Photo courtesy of Sara Wright, USDA Agricultural Research Service.
Mycorrhizal fungi are the exclusive producers of glomalin. The arbuscular strains of these fungi use carbon from the plant to grow and make glomalin. This is the other half of the mutually beneficial pact between mycorrhizae and the roots of fruiting plants (the first being providing nutrients and moisture to the colonized roots in exchange for photosynthate sugars). Glomalin is secreted along the outside of the hyphal filament to provide enough rigidity to span the air spaces between soil particles and contain nutrient flow.
The fungi follow the root, continually forming new hyphae to colonize feeder root expansion. Hyphae higher up on what become permanent roots stop transporting nutrients eventually, at which point the coating of protective glomalin sloughs off into the soil. It then attaches to soil particles, minerals, and organic matter. The resulting aggregate soil structure becomes stable enough to resist wind and water erosion yet remains porous enough to allow air, water, and roots move through it. Any soil becomes capable of hosting a greater diversity of beneficial microbes, holding more water, and resisting crusting on the surface as glomalin levels build.
Permaculture Principles
The mutual dependency among various plants—the backbone of any ecosystem—reveals permaculture principles we should consider. Every life interacts with untold other lives. The microbe world certainly points the way in this regard. Similarly, permaculture is a framework we humans can use to comprehend plant and insect interactions that help us achieve our fruiting goals.
Every plant serves at least one niche function. Some offer food, others medicine, and obviously for more than just our two-legged species. Certain plants abet mycorrhizal association, even going so far as to play a role in the production of edible mushrooms. Others provide shade or fix nitrogen or offer sanctuary for tiny allies. Still others make an array of nutrients available, be it by taproot or as cut-and-drop neighbors destined to become mulch. Fuel, fiber, and fodder elements are often desirable as well. Consideration for how such multiple functions support the bigger picture begins the permaculture design process.
Every plant fills a certain space as well, both aboveground and below. Fruit trees call for a good share of direct sunshine in order to be productive. Ergo, we have the top layer of an edible forest garden. Overshadowing nut trees become a longer-term part of some designs by introducing a succession factor—a dozen years of interplanted sour cherries makes many a pie before the overstory phase of nut saplings dominates light dynamics. A shrub layer woven throughout serves as a natural habitat for spiders and birds, provides a low-lying windbreak, produces berries in the partial shade, and even defines pathways for visiting friends. Kiwi vines can find sunlight enough as well, whether growing up an arbored pavilion or a neighboring shade tree. Herbs and wildflowers create important pocket communities of diversity. In a similar vein, root systems seek different plateaus in the soil in becoming active trading partners on the Soil Food Web Exchange. Far more space in a diverse orchard planting can be productively utilized than you might otherwise think is possible from listening to the conventional party line, which says that trees must be isolated in rows for maximum production.
To speak of planting a guild
captures the harmony inherent in a permaculture-inspired layout for the home orchard. I discuss orchard architecture with fellow fruit growers working on a commercial scale, but here you and I will explore the concept of the fruit guild. A natural community of plants achieves a balance among recycling nutrients, resisting disease, and keeping pests in check while conserving water and attracting beneficial insects and other animals into the fold. Such an ecosystem hums with an inner graciousness. Humans can readily disrupt such scenes—all the more so when we come in with talk of monoculture and high yields and allopathic medicines to take care of problems we ourselves induce with our agricultural precepts. We can't do that kind of thing in a guild, however. Now the pulse of the whole guides us surely toward sustainable means. Our stewardship becomes more and more refined as we learn to trust an integrated tapestry of beneficial relationships. I get almost as much out of this term philosophically as I do in contemplating what to plant next to what! Which, of course, is where this permaculture term intends to shine the light.
We have many varietal tree size considerations to speak of in the pages ahead. Still, let's visualize planting three apple trees to start you down the fruiting path. Three trees in a row in the midst of regularly mowed grass does not make a guild. But reposition those trees to form the three points of a triangle, say on the order of about 20–30 feet apart for vigorous stock. Soil prep has already provided the beginnings of a biologically rich fungal duff, mulched principally with ramial wood chips, extending slightly beyond this cluster of apple trees in all directions. The light space bordering the trees calls for currant bushes and gooseberries. Perhaps a contained bed of raspberries bulge this island planting outward on the far side. Woodsy herbs and wild greens fill in hither and thither in the mulched ground at the feet of the trees. Clusters of flowering plants create a meandering horizon within the tree triad, some of these chosen specifically to attract helpful insects and support pollinator populations. Deep-taprooted plants (placed in the anticipated dripline of the fully grown tree) are chosen as living mulch because of their mineral-rich growth habit. Juneberries planted nearby provide a delicious treat for hungry birds, which in turn detour from the blueberry bushes that dominate another island bulge. A comfortable chair waits for you under a large apple limb. Yet even before you actually begin to plant, you decide to stretch open the trees to the facing sun, adding a few more apples to complete a fan layout, and just in front of those go the very peach varieties that your grandparents gobbled as kids. We're here now, right in the midst of an integrated fruit guild . . . right in the midst of your orchard.
The actual layout that you come up with will be driven by the pleasure you derive from weaving beauty into your surroundings. Certainly you can integrate raised beds for vegetables into the design if that's desired. The concept of an island can literally become a forest garden filling the whole of your property, with patches of bright sunshine left for the benefit of more food plantings. Espalier-trained fruit trees along a rail fence can give definition to boundaries. Medicinal herbs interspersed in a rock garden at the feet of a noble grandfather tree create intriguing terrain. More traditional orchard layouts of trees aligned in a meadow setting are fine, too—desirable ecosystem dynamics can arise by virtue of all sorts of other plantings in the vicinity. Visiting others with thoughtful orchard designs often will generate additional ideas, such as incorporating meandering paths and hidden nooks.
Food, beauty, and diversity all come together in appropriate landscaping. An orchard based upon these three primary goals will be stunning whatever the season. Some varieties have especially spectacular spring bloom, while others load on the fall colors. A golden leaf carpet lies under the nectarines; cherries turn a mix of red and yellow; blueberries radiate whatever the season. Shades of green from unexpected plants below add delightful contrast to the trees all summer long. The variety of insects encountered marks every day as a marvel. Winter settles serenely on barren apple limbs while the jay calls: All walk in beauty in this place. This is the full circle of integration, a permaculture-based ecosystem that not only hums with balance but delights our hearts in every moment of the year.
The Buzz on Biodiversity
Permaculture people speak of two classes of plants to encourage within any gardenscape. Recognizing the role of dynamic accumulators and beneficial accumulators helps us bring specific plant interactions into focus.
Companion planting is far more than an old wives' tale. All plants contribute to the ecosystem, even those we mistakenly call weeds. Deep-taprooted species draw minerals up from the subsoil; green tops die back at season's end; root systems eventually pass on; fungi and company decompose the once vibrant botany. Minerals become available through the organic matter to other plants; these minerals have been accumulated,
and so we now become conscious of the dynamic accumulator class of plants.
Similarly, a flowering plant like sweet cicely (
Plant allies
One medicinal herb serves as an understory superstar in my orchard around freestanding apple and pear trees. First, however, we require the inevitable disclaimer: You are about to hear the many benefits of this particular plant . . . just know now, right off the bat, that once introduced to your ground, comfrey will likely be an indomitable force for many years to come. Digging it out—if you ever come up with a biological reason to change your mind—will be difficult. Please: Do not come back and blame me!
The marvel of comfrey from a fruit tree perspective begins with its deep-reaching root system, which effectively mines potassium, calcium, and other untapped minerals. Its leaves and stalks are flush with nutrient wealth, producing a lush plant that blossoms just after petal fall on apple trees in a cascading series of delightful pale purple-pink umbel florets. Bumblebees delight in this subsequent nectar source. As comfrey starts to set seed, it becomes carbon-heavy—and thus top-heavy—and soon falls in every random direction as living mulch, thereby suppressing grass growth and preventing it from becoming the dominant ground cover. A new round of herbal shoots from comfrey's insistent roots responds to this sunlight opportunity, repeating this same cycle at least two times more in a given year. The circumference of a comfrey circle grows as the mother plant expands outward. The soil here becomes deep brown, even black, brimming with life force. Fruit tree feeder roots find this an irresistible invitation, totally unlike the reception provided by a dense sod where high carbon dioxide levels produced by fine grasses (in the process of root transpiration) proves disagreeable. Comfrey leaves room in the humus for trees to find full mycorrhizal connection. And to think—all you had to do was plant comfrey starts (root crowns) around the anticipated dripline of the tree to launch this self-renewing orchard plan.
A broad mix of species belongs under and within the vicinity of fruit trees. You can make deliberate choices here to reflect a certain look, or you can trust serendipity (enhanced by introduced species left to go to seed) to bring a diverse understory to the fore. Red clover has nitrogen-fixing capability, being a legume, which ties in nicely to comfrey's need for high nitrogen . . . which in turn will be made available to fruit tree roots in the form of ammonium by the action of soil life. Legumes are noted as well for raising available phosphorus levels. The humble dandelion is especially adept at drawing potassium up. Chicory's specialty is twofold: This plant accumulates zinc, and, when it dies, the hole left by the decaying root is an act of soil aeration in itself. Other plants like nettle, yarrow, and horsetail contribute similarly to this crescendo of specific nutrients. Are we tuning in to how a diverse understory contributes homegrown fertility to the orchard through organic matter cycled through the soil food web? Minerals are being mined and brought to the surface by this array of taprooted plants, and this will go on for a long, long time.
Woodsy herbs abet the fungal dominance we seek directly in the tree zone. In a sense, we could invent a new permaculture term here for plants like thyme, marjoram, and lavender, calling these mycorrhizal accumulators in their own right. The neatness of low-lying herbs will appeal to some of you more than the wild look found on my orchard acreage, and that's okay. Less stout perennials will be smothered under the shovelfuls of crumbly compost thrown at the base of fruit trees each fall, whereas these woody-stemmed herbs can stand up to greater biological depths. Aromatic herbs also allow us to see the trunk, unlike tall lush growth right up against the stem of each tree. Daffodils planted in a ring, bulb touching bulb, about a foot out from a young sapling, serve this same purpose and more. These spring flowers absorb their light share before the tree reaches full leaf, after which the green growth from the bulb quickly fades away, leaving more openness right around the base of the tree. Daffodil bulbs turn out to be disagreeable to voles as well, which are basically voracious mouse cousins inclined to eat apple tree bark in late fall and winter, given the opportunity. Other culinary herbs including mints and chives are reputed to help with peach leaf curl and apple scab, but for the life of me I can't envision how this lore relates to fungal disease cycles. Still, diversity rules, and I have planted less woodsy herbs out under the dripline of some of my fruit trees—the point being, yes, you can integrate an array of kitchen herbs in the orchard if you wish.
Bitter herbs like wormwood, southernwood, rue, hyssop, pennyroyal, and gentian have long been used for tree protection in still another way. These highly aromatic plants are sensed by fruit pests, creating olfactory confusion within the fruit guild. Such plant allies can be used more effectively in smaller fruit plantings than in more extensive commercial blocks. Plant knowledge like this can come into play in protecting highly desirable fruit or even in funneling insects toward sacrificial trap trees. Tansy and sage have a high camphor content that has been observed to deter codling moths. Nasturtium has a similar influence on woolly apple aphid, so if you happen to have susceptible rootstock, plant several around your apple and pear trees and enjoy a peppery nibble to boot.
Insect allies
Numerous plants attract beneficial species of insects to the orchard ecosystem. Biodiversity comes into its own now, revealing all sorts of fascinating nuances. Consider the self-contained world of an angelica plant in flower. Hundreds of pollinators—including an array of tiny wasps that parasitize the larvae or eggs of larger insects—feed on the nectar and pollen offered by angelica and similar wildflowers. It's the other plants in the fruit guild that deliver balance in the populations of fruit pests by providing habitat for the good bugs.
Savvy commercial orchardists plant diversity strips of specific flowering plants within a solid block of trees to draw the predators and parasitoids that help keep other insect pests in check. The home orchard, on the hand, flourishes with diversity advantages by virtue of plants you're already inclined to grow in garden areas. Wild corners should be granted due diligence—a dear friend once told me to always leave a place for the fairies to dwell. Hers was a diversity message, celebrating what we humans tend to dismiss as unsightly and unmanaged. Yet it's the wildlings that truly shine as beneficial plant allies.
The richer the diversity in and around the fruit orchard, the higher the rate of natural control. A richly flowering under-vicinity in spring might include wild strawberry, lungwort, buttercup, hawkweed, dandelion, and violet to go with bordering shrubs of willow and chokecherry. Summer flowers noted in healthy orchard settings include wild carrot, dill, mountain mints, white daisy, swamp milkweed, sweet clover, alfalfa, joe-pye weed, and boneset. The glory continues into autumn with sunflower, goldenrod, aster, and sneezeweed. We could get downright mathematical here: Plant diversity plus bug diversity equals biodiversity.
This ecological formula takes on an exponential component beyond the flower-attracting good bug
dynamic explained so far. Let's look at one specific interaction surrounding apple maggot fly. This ubiquitous pest lays its eggs in midsummer into ripening apple fruit, resulting in interior destruction of the flesh. Certain flowering shrubs—winterberry, dogwood, and blueberry among them—attract a range of other fruit-feeding flies not interested in apple. Braconid wasps parasitize these flies as well as the resident apple maggot fly. Braconid numbers rise with prospects of increased host resources, leading to reduced apple maggot fly pressure overall. All this takes place based on the proximity of neighboring plants like winterberry.
Mixing up different types of fruit trees also plays into beneficial advantage. Peach, cherry, and apricot trees have extrafloral nectar glands on the base of leaf blades. Lady beetles are able to feed on this nectar and thus get a jump start on controlling rosy apple aphids on nearby apple trees.
Also lending a helping hand here are spiders, the populations of which are supported by plants that you might not consider relevant to growing fruit. One of my very first discoveries as an orchard observer took place lying beneath an apple tree, taking a break from scything high grass. A tarnished plant bug glimmered in the hot sun, caught in a spider's web. I watched the spider immobilize this minor pest of tree fruit, knowing that numerous wildflowers like goldenrod and dogbane in the plant understory had given this predator a chance to establish big plans for those who might damage michael's apples. (I take all this very personally!) Ground juniper, rugosa rose, and all those berries we'll be talking about ahead make for more permanent spider cover near fruit trees.
Syrphid flies—the larvae of which were introduced earlier as aphid-eating machines—have short mouthparts. These insects require flowers with an open structure such as cow parsley, dandelion, buckwheat, golden alexander, and sweet cicely. Stinging nettle is useful in the orchard environs because it has a host-specific aphid that builds up early in spring, in turn encouraging populations of predators to build up before other aphid species show up on young fruit trees. Come fall, the dry stalks of nettle and other tea herbs like lemon balm provide good habitat for overwintering ladybugs. Small-flowered plants seem especially attractive to tiny parasitic wasps including valerian, Queen Anne's lace, butterfly weed, and hardy marguerite.
So many interactions, so many friends. An orchard ecosystem designed around diversity provides front-line answers that make pest challenges far more manageable.
A Front-Yard Orchard
Exemplary home orchards can be found in many places. Yet the passionate work of Jana and David Ulmer in Sebastopol, California, truly knocks my socks off. Perhaps it was that first taste of a tree-ripened pluot. Perhaps it was flipping the notion of backyard orcharding right on its head—this is an orchard of prominence, filling the whole of the front yard with nearly every fruit imaginable.
The ecosystem created in this mixed orchard and garden scene provides diversity aplenty. Every view features different fruits of choice, from multi-variety peach trees and the blueberry cage to espaliered apples and grapes dangling beneath neatly trellised vines. A fruiting horizon like this can be honed only by decades of experience.
David started grafting persimmons, plums, pears, and you name it in northern Mississippi in the late 1970s. That first orchard spread steadily over 5 acres, providing tree-ripened fruits every Saturday morning for the local farmers' market. Yet life leads on, and he found his next home on the northern California coast, ground that noted plant breeder Luther Burbank once described as the greatest place to grow fruit on this continent. Wow. The new orchard, while every bit as Zone 8 as before in terms of winter lows, offered vaster harvest prospects—the relatively cool summer climate of coastal California ripens to perfection many varieties that in the hot and humid South would bake on the tree. David was leaving bacterial leaf spot and extreme fire blight behind . . . not yet knowing what he might find this second time around.
Most of his stone fruits are now planted four trees to a hole, about 18 inches apart in the planting circle, in a sense becoming one tree in form. The advantages of this are immediately clear: Seedling rootstock can be budded in place to different varieties, open center pruning results from letting each variety fill its quadrant, and having four trees in proximity tones down vigor. Peaches, pluots, apricots, and plums planted thusly allow for many varieties in a small space, spreading out the harvest while at the same time giving enough, but not too much, of each variety for the family. One critical insight for a West Coast orchard was quickly learned: Stone fruit pruning needs to be done here in late summer in order to shortcut bacterial canker. This disease determinedly spreads onto tree wounds in the wet dormant season of California, whereas good drying breezes right after harvest deter infection. Sharing his grafting passion has been somewhat tempered by this new reality as well—taking scionwood in winter favors canker, so now David removes green buds only in early August (when it's bone-dry) to give to fellow fruit enthusiasts.
This dynamic gardening couple opted to keep the pome fruit closer to the earth. A rail fence on the perimeter of the planting area defines the orchard bounds. Apples, primarily on Bud.9 rootstock, are located halfway between the posts (spaced 8 feet apart) and trained to a rail cordon espalier. A pear at every other post is trained to be more columnar, grafted primarily onto OH×F 333 and OH×F 51 to limit excessive vigor. The apples are deliberately steered toward the non-pear post. Mucho pinching of shoots back to a bud or two takes place on a regular basis to keep this system both productive and contained. Winter apples that are desired in greater quantity—Lady Williams, Pink Lady, Sundowner, GoldRush, and Hauer Pippin—are grown as freestanding trees where the chickens can be brought in for bug duty down below.
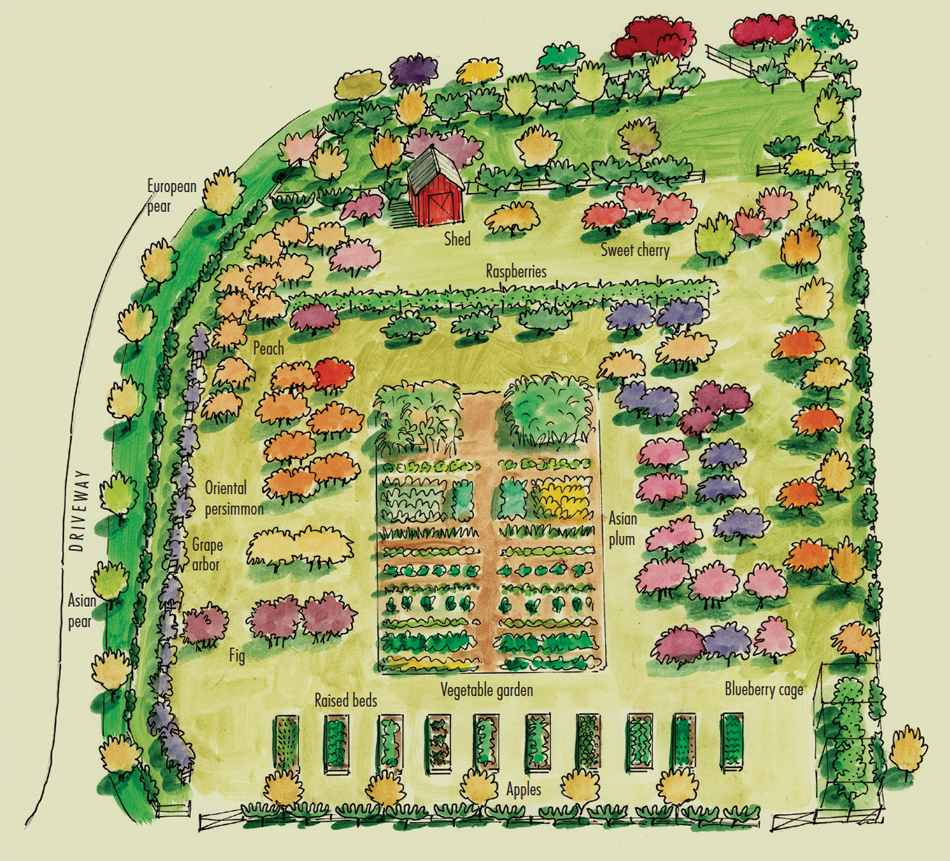
All sorts of fruits can be integrated in beautiful ways. The Ulmers seem to have it all, from first berries and mayhaws in late spring to juicy peaches and pluots at the height of summer to the very best California heirloom apples come fall.
Orchard Horticulture
Visions of orchard grandeur need to be backed with a solid foundation in basic horticultural skills like choosing acclimated varieties, planting, soil fertility, and pruning. In this regard, words on paper can prove useful as a guide, but at some point these lessons must be translated into the realm of direct experience. Seeing someone demonstrate firsthand what needs to be done helps, but know this: Confidence in holding those pruning shears simply waits around the corner. Theory begins to become ingrained the moment you decide where to make that very first cut. Why? Because at that point you've moved beyond mere words to learn directly from the true teachers—namely the trees and the other plants in your home orchard and garden. Think about what it means to stretch roots into rich soil, to develop fruit buds with vigor, to close cambium tissue across a graft. It's that oneness with the tree that accomplishes far more than descriptive words alone can achieve.
Choice of Variety
Descriptions of many delectable fruits are coming soon. Let's start with understanding how to choose cultivars in the broader sense for the place where you live.
Climate zones are the first tool to guide wise selection for a particular area. Perennial plants must be able to survive the lowest temperature each winter in order to live into the next growing season. A hardiness zone map takes into account what to expect on average where you live—a highly unusual cold snap every century can always undo the best-laid plans, of course. Shifting climate has introduced changes to these maps in the last two decades, suggesting that less hardy varieties can now be planted farther north. Similarly, growers in southern zones need to account for the effect of excessive heat on fruiting prospects. The USDA plant hardiness zone map, along with the American Horticultural Society's heat zone map, will give you the roughest idea to get started. The Cooperative Extension in your state or province might have more detailed hardiness zone maps available that better account for local variations.
One way or another, you now have a zone number to speak of as we begin this search for the best fruit trees and berries. Keep in mind that all notions of threshold temperatures are influenced yet again by microclimate. Your unique location may have a significant influence that the general zones fail to pinpoint. Local topography, proximity of neighboring shelter, aspect to the sun, subtle local variations in snow cover, and extended warmth in fall (from a nearby body of water, for instance) definitely affect fruiting prospects. Such variations may make it possible for you to boldly plant what no neighbor has planted before . . . allowing you to trial a cultivar rated one or even two zones colder than otherwise might be advised in a nursery catalog.
Other fruit growers nearby know far more about what grows dependably in your region than anyone else. Lessons learned over the course of a lifetime are priceless—being able to tap into such knowledge is a great reason to seek out new friends. A number of cultivars may easily survive the lowest temperature where you live; the bigger question is, which are the ones that will thrive? Superior cultivars in terms of flavor, annual bearing, vigor as a function of soil type, and growth habit are revealed through hands-on experience. Talking with the proprietors of local nurseries is part of this conversation. Regional fruit groups like the Backyard Fruit Growers (in southeastern Pennsylvania) hold scionwood swaps for grafting purposes—you can get all sorts of varietal advice at such gatherings of local experts. Truly pertinent information about bloom dates, chill factor, inherent disease resistance, and the normal harvest window needs to be considered in making good choices.
Blossom time
Bloom refers to the time of season when fruit trees and berries produce flowers. Many types of fruit require an overlap of bloom times in order for two varieties to pollinize each other. That's the general rule—specific cultivars may well be self-fertile, partially self-fertile, or self-sterile (apple triploids, for example). We'll broach such dynamics more thoroughly when we begin talking about each fruit. Synchronizing pollination is more of a consideration in warmer zones, where the overall bloom season may be spread over the course of six to eight weeks, especially when jump-started by a warm spell followed by a cold snap that delays later-blooming varieties. Trees in the North seem to know to wait until all vestiges of winter have passed . . . and then bloom for most fruit types will likely overlap. Nurseries identify particular cultivars as early, mid, or late bloomers; although it is wise not to rely on a variety listed as early to pollinize a variety listed as late, much of this can be taken care of by planting more than two varieties of a particular fruit.
Tender blossoms ask one other thing, especially of growers in the middle growing zones. Generally speaking, late bloomers will do better over the years than the earliest bloomers. The odds are simply that much higher that a killing freeze will come earlier rather than later in spring. No guarantees here, but there's a reason commercial fruit growers in the Midwest and the Mid-Atlantic bet the farm on apple varieties like Melrose, Ralls, and Fuji. We'll account for this with stone fruit cultivars as well, yet because peaches and cherries often bloom before apples, some tricks of the trade may be in order.
Chill factor
Apples and other deciduous fruits require a chilling period to break their winter rest. Buds do not emerge from dormancy until a certain number of hours between 32°F and 45°F (0°C and 7°C) have accumulated between November and February (in the Northern Hemisphere). Apples, pears, and stone fruits have chilling requirements that range from two hundred to seventeen hundred hours at these temperatures. This adaptive feature prevents plants from breaking dormancy on warm winter days when tender green tissue would be subjected to freezing temperatures. Conversely, if the buds do not receive sufficient chilling temperatures during the winter to completely release dormancy, trees may develop physiological symptoms such as delayed and extended bloom, delayed foliation, and reduced fruit set. Growers in the warmest zones accordingly are advised to plant low-chill varieties that need four hundred hours or less of official downtime.
Standing up to disease
Whether a cultivar is resistant or outright susceptible to disease is influenced by what you do to support ecosystem health. Still, when push comes to shove in a rainy growing season, it's wise to have chosen varieties that are somewhat adapted to the major disease challenges of your location. Many so-called heirloom varieties came into favor, in part, because such trees possessed an innate ability to stand up to regional pressures, be this apple scab, the rust diseases, or peach leaf curl. Similarly, modern varieties have been developed through deliberate cross-breeding work to find the right combination of resistant parent genetics. All this leads to commonsense recommendations of what to plant, yet it's equally important to note that even the immune varieties
face an ever-adapting world of fungi and bacteria that are finding ways around our supposed ingenuity. I cannot emphasize enough that real-time disease resistance as delivered by health-centered orchard management trumps the temporal claims of any new super-variety.
Harvest window
Having time enough to allow fruit to fully ripen makes or breaks an orchard choice. Stone fruits and berries appropriate to your location (other than the fall-bearing types) will ripen in the summer months. No problem there. Early apples and quite a few pears never face a hard freeze either. Late varieties, on the other hand, can survive as trees in northern locations but may not have a long enough harvest window to dependably produce flavorful fruit. Pome fruits (apple, pear, and quince) can withstand a light frost in fall—such moderate cold actually helps bring on coloration and increases fruit sugar levels—but fruit starts to lose its long-term keeping ability once air temperatures dip much below 25°F (–4°C). Nights in the teens spell doom in terms of texture gone rubbery and flavor heading toward vinegar. The length of the orchard growing season between a blossom-killing freeze in spring and a substantial harvest freeze in fall determines which varieties can be expected to set fruit and ripen in any given zone. One personal gain from a warming climate here in northern New Hampshire has been an extended fall season, which allows as much as a month more time to ripen classic winter apples like Golden Russet and Northern Spy.
Nursery source
Where you get your fruiting plants plays a huge role in what takes place after you put your selections in the ground. Regional nurseries are the best source, for three distinct reasons. One, the trees and berries will either come bareroot if being shipped in the mail or be freshly dug with soil somewhat intact. Such plants are youthful and rarin' to go, rather than having become rootbound in a pot while waiting to sell for a year or more. Two, purchasing from a nurseryman in a similar climate zone puts you in touch with someone who knows the better varieties to suggest and probably carries some less-well-known selections for precisely that same reason. (You do not receive sound orchard advice from the kid at the national chain store, which features the same handful of varieties across the country.)
Organic nurseries exist but are relatively few and far between. How a tree is grown after budwood has been grafted to rootstock to become a marketable sapling matters with respect to how the soil at the nursery has been revered. Large operations are likely to rely on fumigation to prepare planting beds, fungicides to ensure fewer setbacks, and soluble chemical fertilization to push branching or feathered growth. A smaller, more hands-on operation will have a wider range of heritage varieties available, will rotate planting fields and cover crops to prepare soil anew, and may even apply mycorrhizal root dips to colonize baby trees with beneficial fungi. The rootstock nurseries are definitely not organic—a question of mere economics—so the reality is that no nursery tree (unless it's been grown from seed by the nursery itself) will be untouched by industrial agriculture. I am very glad to say that no one yet offers genetically modified cultivars. Ultimately, the tree's time with you in the years ahead will be the most telling of all.
Rootstock
Every seed inside every piece of fruit represents an entirely new cultivar if we were to grow it out to maturity. Peaches come somewhat true to type, but a cross-pollinated apple can often prove radically different from its two parents. Thus orchardists maintain a desirable cultivar through grafting, this ancient art being the means by which we create the top of a named varietal tree. The rooted bottom of any grafted tree comes with similar expectation, only now the goal shifts to controlling vigor by using rootstock with known qualities.
Different rootstocks provide options for everyone to enjoy the thrill of growing tree fruit. People with limited growing space can opt to choose dwarf rootstock, which limits the height of a tree to as little as 6–8 feet. Such could be the case with apples, cherries, and some hybrid plums. Pears, on the other hand, zoom to more substantial size, as pear rootstock retains a degree of untamed vigor. Peaches, nectarines, and apricots fall in between when it comes to root selections. And let's not forget that apples, cherries, and domesticated plums can be substantial trees in their own right. I tend to be a guy who likes a tree to be a tree . . . as a degree of vigor in the choice of rootstock will often be biologically advantageous and ensure a longer-lived tree to boot.
Deciding which size-controlling rootstock to use involves a number of horticultural considerations. Nurseries often simplify much of this by informing home orchardists to choose a small, medium, or large tree—sometimes expressed slightly more accurately as a choice among dwarf, semi-dwarf, semi-standard, and standard (full-sized) trees. Buds from a particular apple cultivar can be grafted onto different rootstocks, giving one-and-the-same apple trees in name and characteristics, yet with varying degrees of oomph. Similarly, different varieties of a fruit type can be grafted onto all the same rootstock, resulting in mature trees that size differently, despite a consistent vigor down below. Thus a vigorous cultivar on semi-dwarf rootstock could be classified as large, whereas a less vigorous cultivar on the same rootstock may even be classified as small. Pruning also has an undeniable impact on size when it comes to maintaining a certain tree height.
Tree health ramifications definitely tie into this choice of rootstock. Apple and pear rootstocks should exhibit resistance to fire blight bacteria and crown rot fungi. Stone fruit rootstocks need to circumvent issues with root lesion nematodes and latent viruses. Certain roots do better in lighter, well-drained soils; others can tolerate heavier clay. Ability to deal with drought is very much a function of vigor. Winter hardiness certainly matters the farther north you go. Graft compatibility between the variety and the rootstock comes down to an agreeable scion-to-root combination: A brittle graft union may grow a tree but then snap under a full load of fruit not many years later. Nurseries take all this into account when promoting their selections.
The freestanding tree
The roots of any tree anchor what we see above to its spot of earth. Roots range far and deep seeking nutrients and moisture to sustain growth. The vigor of this action determines which rootstocks have the ability to stand on their own without staking or other physical support.
Every trademarked rootstock originated from a single seed, grown to maturity, and then selected for particular traits. Those with extreme dwarfing attributes are genetic runts, in truth, with less thrifty root systems that will require help throughout the life of that tree. Granted, commercial growers find an advantage in being able to manipulate smaller trees at less cost per tree, and thus you'll hear countless arguments as to why dwarfing stock is the way to go. Others make the case that less than full vigor is a lifetime compromise and thus argue that all rootstock should be seedlings grown from cross-pollinated seed—unique genetic specimens in every respect. Propagating a specific rootstock again and again for grafting purposes is done by cloning the original tree. This can be accomplished by pruning a sapling to produce side shoots, which when mounded in moist sawdust establish their own roots. Snap off these rooted shoots and, voilà, you have clonal rootstock with one and the same genetics as the original parent (that indeed first grew from a seed).
My rootstock bias is defined by what you need to do as a grower to properly care for a tree. Dwarf trees require limiting vegetative competition, the medicinal support of fungicides, regular irrigation, and trunk support in the form of a stake or trellis. Semi-standard and seedling trees, on the other hand, require far less fuss in maintaining fungal duff; they procure balanced nutrition and moisture through a vaster root system and thus are more likely to succeed with holistic approaches to disease. Simply having trees with the ability to grow above deer browsing height will be reason enough for some of you. Good anchorage in the face of strong winds completes this package of potential advantages.
The health divide in my mind comes down to whether a fruit tree requires lifetime support or whether that tree can be freestanding. There's plenty of room for diversity in this statement. Community orchardists know that having a mix of selections provides a form of rootstock insurance
where the same variety has different degrees of harvest success in different years. Trees can range from half-sized to full-sized, with all these considered to be freestanding. The efficiency of biological management in the long run means more than all that fanfare for dwarf advantage from the commercial crowd.
Dwarf tree circumstance
A garden setting lends itself to a more intensive scale of management, so let's look at why some home orchardists might decide upon dwarfing rootstock nevertheless.
Staking is not always just for dwarf trees. Leaders, frankly, don't necessarily cooperate with vertical intent. This freestanding tree needs central support in the form of a temporary stake to abet upward training as lean toward the sun has proven too alluring.
- The space issue is critical when you have a very small yard. Trees trained to espalier are confined to the plane of a wall or fence, and deliberately shaped by pinching shoot growth several times during the growing season . No grower wants an overly vigorous rootstock working against this plan.
- Row management in the garden accommodates dwarf trees. Woodsy mulch defines a 3-foot-wide bed where the trees are staked at a spacing of 5–8 feet apart. Perennial herbs can be planted between these trees, but don't overdo companion planting with dwarf stock. Open garden ground lies beyond the permanently mulched area, be it for potatoes, garlic, or peas. These require cultivation anyway. An oat cover crop follows the vegetable harvest in late summer. Such management accounts for the timing of the trees' feeder root flush (learn more about Root happenings just ahead in this chapter) going into autumn. The oats winter-kill, perhaps allowing a no-till planting of squash or pickling cukes . . . which favors the late-spring feeder root flush of the fruit trees.
- Others might want to stack that guild design. Permaculture seeks to utilize all niches within an ecosystem. Fruit trees insist on sunlight access. This creates justification for going ever smaller on the edges. Many of the stone fruits suit here, but if you want apples in this sunny edge space, consider individually staked dwarf trees.
- You may want only a bushel or two of a certain variety at most. Dwarf trees certainly keep yields down. But here's a caveat to remember: Learn to graft and you can have a dozen kinds of apples on one tree instead of a dozen demanding small trees.
Rootstock precepts
We're going to focus in on several good rootstocks for each fruit type in the sections ahead. Nurseries often do the same, highlighting the roots that best serve their bioregion based on soil type, hardiness, and disease concerns; then they whittle even that selection down to a vigorous root and a more dwarfing type at a minimum. Offering every Malling, Mazzard, and Farmingdale cross would be too overwhelming to manage—and in the case of fledgling orchardists too overwhelming to even think about.
Apples offer a wider array of rootstock choice than any other fruit, with dozens upon dozens selected by research stations across the globe. Runted trees found in the wild in Asia in the time of Alexander the Great got the ball rolling and led to medieval gardens featuring the golden fruits of the small-growing Paradise apple. Plant breeders at the East Malling Research Station in England gathered many such selections in 1912 to classify more precisely. The semi-dwarf rootstock we know as Malling 7 (abbreviated as M.7) traces its cloned lineage back to an apple called Doucin Reinette that originated around 1688 in France. Further research at the Merton Research Station, also in England, involved crossing Northern Spy genetics into Malling progeny, in hopes of developing rootstocks resistant to woolly apple aphids. The semi-standard rootstock we know as Malling-Merton 111 (abbreviated as MM.111) was chosen as one worthy of commercial propagation from the numerous numbered selections started in 1952. Are we catching on to rootstock lingo here?
Peaches are often put on seedling roots, so naming peach rootstock after the parent cultivar (whose pits were planted to provide relatively uniform roots) makes sense. You'll also see botanical names used on occasion, such as Prunus americana for wild plum seedlings. Sometimes there's a fascinating story to tell, such as that of Professor Reimer's discovery of two blight-resistant pears on the old Buckman homestead in Farmington, Illinois: Neither was quite perfected as a rootstock in and of itself, but together they have allowed nurserymen do all sorts of promising things with the crosses made between the original Old Home and Farmington cultivars.
Growing roots
Some of you might decide to graft your own trees. Rootstock can be purchased, be it in bundles of a hundred direct from a rootstock nursery or in less daunting amounts from a regional nursery selling grafted trees. A few inspired homesteaders among you invariably ask about doing this on the cheap.
The options for creating your own rootstock revolve around seedling genetics. Planting seeds results in baby trees. You won't have a known entity necessarily, but chances are such rootstock will be packed with vigor. Fruit tree seed requires stratification, being the softening of the seed coat by variable weather in winter to enable inner germination. Seed thrown on the edge of a compost pile in fall will sprout come spring; similarly, seed placed in a ziplock bag in a slightly moist growing medium in the fridge for sixty days before being potted up will respond successfully. Digging up a root sucker from the type of fruit tree you wish to graft is another way to get rootstock. Heading off a sapling and burying the resulting shoot response in well-composted sawdust should produce independent roots on those shoots in a year's time. Snap off the shoots with roots and you have rootstock.
Don't overlook wild seedlings that pop up in the pasture or along the fence line. Such trees can be moved or left in place. John Bunker of Fedco Trees in Maine showed me a 150-year-old apple tree that had been grafted to Grimes Golden. The graft union was still evident, about 3 feet above the ground, where this apple variety had ever-so-slightly outpaced its understock in circumference.
Grafting
Here's an orcharding skill that will vastly enhance your fruit exploration horizons. Grafting involves a sharp knife and the mind-set of a surgeon—but don't let that intimidate you! Budwood from one cultivar (called the scion) is either attached or inserted into the growth tissue of a rooted tree; branch structure growing from beyond that graft point will now be the desired cultivar. This shift in varietal genetics at the graft union works with all fruits, noting that fruit type to fruit type is generally essential.
Orchardists can propagate a new tree of the same exact cultivar only by grafting (as every seed represents a new variety as a result of cross-pollination). Rootstock can be bench-grafted in late winter for planting out in nursery beds in early spring. The resultant growth from a whip-and-tongue union can provide a suitable tree for transplanting out in the orchard the following spring, though less vigorous shoot response will likely require another year of growth in the nursery bed. All this happens from getting one of two scion buds to sprout forth beyond where the graft was made. Bench grafts make a dependable union that grows upright and straight. Not all your grafts will necessarily succeed, but no matter. Often buds down low on the rootstock will send forth several survival shoots. Select one of these (by snipping off the weaker ones early on) and the favored strong shoot can be grafted anew the following spring.
Home orchardists can have much more fun than that, of course. Different varieties of a fruit type can be grafted onto one and the same tree. This might include transforming a branch to an effective pollinizer variety (like an edible crab apple), particularly if the trees you already have are not quite in tune pollination-wise, if not outright self-sterile. Bridge grafting can save the day when rodents girdle unprotected trees. Scions taken from watersprouts are grafted around the trunk to span the missing cambium zone. Topworking comes into play when you realize your fickle nature and decide to change varieties on an otherwise productive root system. New roots can even be put onto a stunted tree by inarching: Plant another rootstock as close to the base of the tree in question as possible; then, when the bark is slipping, splice this sapling into the trunk to maximize cambial contact. You'll see no increase in vigor the first year, but after that expect that tree to be back in business.
Opportunities abound for learning how to graft. Regional fruit groups delve into the basics in annual workshops held every spring. Fruit enthusiasts generously share scionwood of all sorts at these gatherings, and rootstock will be available for sale. Members of the North American Fruit Explorers share advice online and in their quarterly publication, Pomona. Nearby growers simply need to be asked for their advice. We will start here by detailing what it takes to get a successful take with two of the grafting techniques most frequently used in orcharding. Despite all the words, keep in mind that grafting is fundamentally simple. You can indeed do this.
Grafting success
The odds for successful grafting go up considerably when you pay attention to detail. Cambium alignment involves matching up the green growth cells of the inner bark on the exposed scion to the same on the exposed rootstock. Take a first-year shoot and slice it open across the diagonal. Look closely. Between the heartwood and the dark outer bark is an inner green layer called the cambium. This is literally where the tree grows, nutrients are transported up and down, and water flows in the form of sap, and, yes, it's where growth cells can bond across a grafting cut and form callus tissue. Maximizing contact between the cambium of both the scion and the rootstock is what gives your graft its potential for future growth.
It all begins with an exceedingly sharp knife. A true grafting knife is flat on one side and honed on the other. This allows the blade to slide through supple shoot tissue and leave a completely flat plane in its wake. The angled cut used in grafting exposes more of the cambium zone: A straight cut across a shoot has nowhere near the elongated surface area of an angled cut. A practiced hand can make this cut on the order of 1½ inches long. The key word here is practice. You need to achieve a smooth plane on each cut so that bulges and raggedness alike do not interfere with cells touching and thus forming a bonding callus. Look through a magnifying glass and you will quickly see what I mean. Inexperienced people seemingly stutter while making this cut, concocting a series of angle-changing pull strokes rather than a confident single slice through the center of the shoot. (Note: One-year-old wood slices far more readily in this regard than two-year-old wood.) I hold the knife firmly, my index finger behind the blade and my thumb snugged tight to the base of the handle, coming in toward my body for more control. I hold scionwood at its top end and the rooted shoot at its base so as to have outward-bound growth when the resulting two angle cuts are aligned. Dwell on that point a moment: Scionwood doesn't have roots to reveal which end is up; you'll need to pay attention to upward-pointing bud growth to avoid putting buds on backward. I'll talk about size matching between shoots for the whip-and-tongue graft, but that won't be at all relevant for the bark inlay.
All this should be done with minimal human contact with the plane of the cut. Oils from our hands can interfere with cambium bonding.
Quality scions are integral to grafting success. Scionwood can be gathered anytime after the tree has gone dormant, though most growers wait till January and February. Shoot size should be 3⁄16–5⁄16 inch in diameter; pieces that are too small tend to dehydrate quickly, and those any larger will not work up well. If scionwood has been dehydrated or mildewed while in storage, the odds will be reduced that the graft will take. Budwood allowed to freeze (once off the tree) prior to grafting can be worthless. Using wood older than the past season's growth also lessens chances. Be sure to tag the bundled wood from each variety clearly before wrapping it in lightly moistened newspaper, tucking it into a plastic bag, and storing it in the refrigerator or a cooler kept in an unheated space. Dipping the cut ends in paraffin (melted wax) seems to keep the cambium slightly more juicy
for when the splices are made. Do not store scionwood with apples, as the ethylene gas from the maturing fruit may cause buds to abort.
The timing of grafts depends on whether you're working inside or outside. Bench grafts can be made as soon as you receive a rootstock order from the nursery throughout that final month or two of winter. Otherwise rootstock needs to be stored in a cool place and kept lightly moist until you are ready to get to work. Field grafting requires waiting until closer to budbreak to take knife in hand. Once sap starts to flow, the bark on smaller shoots will seem to slip, and that is your cue. I think of the week before that first peek of green tissue (in a growing fruit bud) reveals itself to as much as two weeks beyond as the ideal window for grafting outside. This period allows time for dormant scion tissue to set in place before being taxed by an activated growth process when the days fully warm up. Sooner is better with apples and pears, as the resulting shoot growth that summer will be that much greater. Experience has also shown that successful takes will considerably outnumber failures if you work within this window, whereas ever-later grafting will see the odds reverse exponentially. Peaches and nectarines demand more warmth for callusing to occur, which is the reason summer budding is preferable with the larger stone fruits.
What you do with those completed bench grafts has import as well. A healing temperature of 50–60°F (10–16°C) is ideal for growing callus tissue with apples, pears, and even plums. This is cool enough to keep buds from waking up too quickly and yet far warmer than the temperatures late winter offers outside at night. Peaches and nectarines require around 70–85°F (21–29°C) for dormant grafting. Hold the bench grafts in a suitable space for about a week. If the ground is still frozen after this time, find a cooler location in an outbuilding to slow down the pace of bud development. I pack completed bench grafts into flat trays, keeping the roots lightly moist in a woodsy mulch or shredded newspaper. A seaweed solution is best for wetting the roots, as cytokinins in cold-processed kelp contribute to the growth of callus tissue. Should bud growth begin before you get these young'uns in the ground, which is not a bad thing at all, harden off this nursery stock for a day or two in the outside air, just as you would garden transplants coming out of the greenhouse.
Whip and tongue
The common whip-and-tongue graft relies on the cambium zones of both the scion and the rootstock making intimate contact along bark edges that are matched in size. Hold the scion along the rootstock or the shoot on an existing tree. Height of grafting on the bare rootstock is usually 4–8 inches above ground level. Move the scion up or down the rootstock until you see the spot where the relative diameter of each is about the same. Snip off the scion stick about 2 inches below this matching point, but leave the top long (more than two buds' worth) so you have more of a handle when making the angle cut on the scion. Now do what needs to be done with that confidently held knife of yours, taking care to make cuts on both shoots so that the relative length of exposed tissue is approximately the same.
Let's assume nearly full alignment has been achieved when holding the two cuts together. Maybe one cut has a longer tail; maybe the other cut narrows at its base more than the other. Make it your goal to have 80 percent visual contact. Keep in mind that getting too fussy often, makes things worse.
A locking mechanism can be achieved with a whip-and-tongue splice by making a slight receiving notch in the plane of each angle cut. Position this approximately halfway down on the scion cut and halfway up on the understock cut. Wiggle your knife into each cut at a slightly steeper angle than the cut itself, going into the shoot wood 1⁄8 inch or so. These notches interlock when the two shoot pieces are pulled together and are spaced so that the outer cambium perfectly
aligns. Some grafters skip this step, particularly when attaching smaller scionwood, but that puts the onus entirely on the wrap to hold the scion in place while callusing occurs.
Grafting Supplies
Every grafter has a preferred way of doing things. The supplies you need follow from there.
- Cut
-
You can jump right in for less than $20 with a Victorinox folding grafting knife. The blade is honed on just one side to achieve that smooth cambium cut. Some folks manage with a bulkier razor utility knife. Whatever you use, keep it sharp!
- Wrap
-
Rubber grafting strips pull the edges of a whip-and-tongue splice together exceedingly well. Hold the band on the understock with your one thumb and then wrap upward. I leave space between wraps going up, so to be able to see that side-to-side alignment hasn't slipped, go for full closure on the way back down the length of the union, and then overlap the other end of the grafting strip to knot the two ends together. Don't be afraid of pulling the rubber too tight, as this optimizes cambium closure. The frustrating aspect is when the band slips out from under your finger and quickly unwinds. Electrician's splicing tape will be self-fusing and, if given a stretch before wrapping, works nearly as well. Masking tape is cheaper and flexible enough. Grafts covered in parafilm (a clear, stretchy polyethylene tape that deteriorates in sunlight) are not going to dry out but still require a more substantial wrap underneath to hold pressure on the union.
- Seal
-
Trowbridge's Grafting Wax smells great, seals well, and doesn't crack, but requires heat to liquefy. Doc Farwell's latex grafting compound goes on easily with a brush, doesn't get brittle when dry, stretches as the graft grows, and remains in place for years at a time, providing a bright yellow marker to the graft union. Treekote (a black asphalt emulsion) works in the cold, dries quickly if it's going to rain, and comes with a brush attached to the container cap for smearing directly over the grafting rubber and onto cut surfaces. Long ago a graft would have been tied with cotton string, then straight cow manure slathered on to cover the entire works.
Procedure
The scion should be trimmed to two buds in length before making the actual joining. Otherwise the long end tends to get in the way of wrapping the union. Never leave more than this, as excess buds will require too much in the way of water and nutrient support. Often a shoot will develop from both buds, and once you decide which is the stronger response (the first to reach 2–4 inches in length), prune the other off so all growth the rest of that first summer concentrates in the chosen one. Similarly, any shoots developing along the rootstock should be rubbed off as well.
Wrap the graft union with a rubber grafting strip so as to pull all cambium edges tight against one another. Some orchardists opt for using black electrician's tape or parafilm instead. Do not extend the wrapping over the scion buds. Apply a sealant to make sure cut surfaces will not dry out, including the naked tip of the scion. I coat over the grafting rubber as well, just to be sure any gaps in the wrap coverage aren't exposed. This special rubber will begin to decompose in several weeks, so, for all intents and purposes, the whip-and-tongue union is launched on the day it's made. Those using other wrap options need to come back in a month or two to carefully snip away the tape (about the same time you choose the stronger shoot response) so as to prevent the unyielding tape from girdling into new growth.
One last thing: Label each graft as you complete it. Mixing up scion varieties happens quickly unless you are meticulous in the order you go about all this.
Bark inlay graft
A fruit tree can be changed over to a new variety by bark-grafting its central leader and principal lateral branches right at the plane of the removal cut. Commercial growers topwork entire blocks to a current market favorite at much less cost than replanting. Fruiting often begins in the third year after converting such trees, as the growth emanating from established root systems can be phenomenal.
Select branches of the tree that are 1–4 inches in diameter for bark inlay grafting. This is best done in those immediate weeks following the appearance of green tissue when the bark is slipping on the bigger wood of the tree. Make a clean heading cut where the stem is smooth and free of knots, being careful not to tear the bark when the weighted branch falls away. Take your knife and firmly scribe a vertical cut about 1½ inches long into the bark. Be sure to go deep enough to slice through the cambium layer. Make two such slits on opposite sides for branches that are 2 inches in diameter or less, adding one more slit for each inch of increase in branch diameter—thus a 3-inch branch would see three slits made so that three scions can be inserted. You can use the tip of the knife to ever-so-slightly wedge open the bark at the top of the slice for receiving each scion.
The scions are cut just as for a whip-and-tongue union, but with some added refinements. Very carefully peel off a fine strip of outer bark on both edges of the angle cut to reveal sideways cambium—this will make fuller contact with the surrounding bark cambium. I also like to nip off the point of the scion angle—this helps in pushing the scion into place while also exposing a nudge of cambium outward toward the bark cover.
Preparing the scion for a bark inlay graft involves visualizing where cambium contact will best occur. Edging both sides of the smooth cut and beveling a chip tip at the point reveals additional surface area where that can happen.
This scion wedge can now gently be pushed into place behind the bark of the branch, being careful to keep it centered between the two flaps of bark as they slide apart to receive the scion. The cut surface of the scion faces the inner wood of the branch. Push the scion in so that hardly a vestige of its cut surface can be seen above the plane of the cut branch.
Parafilm tape (½ inch wide) is ideal to wrap this type of graft. Wrap the branch circumference tightly to ensure good contact between bark and scion. Do this the whole way down the length of the slits, around and around the branch. I strive to catch the rim of the cut with the parafilm as well to help seal the exposed bark edge of the branch. A simple tuck of this stretchy tape over itself and then pulled tightly will hold these wraps in place. The clear plastic acts like a solarium to provide a good callusing temperature as well as preventing desiccation. The remaining exposed surfaces must then be covered completely with a sealant. Be sure to dab gook into any space where each scion meets the cut plane of the branch . . . and don't forget coating those scion tips above the requisite two buds per scion. Plan on coming back to your bark grafts in eight to twelve weeks to lightly snip away the plastic once the tissue integration is complete.
Choosing which shoots to keep for the long haul shifts somewhat with this type of graft. Each scion will likely take—but if not, there's some degree of assurance that at least one will. Treat each scion as before, choosing the stronger bud response once the shoots get to be 2–4 inches in length. Let a single shoot from every scion grow out at each branch location that first summer. This is necessary to eventually produce a full callus ring around the pruning cut itself. Next spring, depending on what you see, you can either remove the extra shoots entirely (on smaller-diameter cuts) or head back all but one shoot at each branch location to further develop the closure callus for an additional growing season or two. Many years down the road you won't even be able to see where this process was done on a vigorously growing tree.
One last trick of the trade comes into play in further assuring topworking success. Leave at least one nurse limb as a photosynthesis sink for the roots during that first season if you're doing over an entire tree structure. Such limbs can be pruned away the following year or left to serve as a pollinizer for the new grafted variety.
Multi-variety tree
Henry Lang up in Milan, New Hampshire, had a single apple tree with nearly 230 varieties grafted onto it. Tags fluttered throughout this tree in an attempt to keep track of which branch bore which fruit. It's a complicated undertaking—imagine pruning under the constraint of mistakenly clipping off all the budwood of Magog Red Streak with a single snip—yet any home orchardist can have a lot of fun putting a modest number of varieties on a single tree.
Graft scionwood of different varieties onto an existing tree in early spring. A young tree in training could readily have the chosen varieties spliced onto each pencil-sized scaffold branch. A vigorous wild tree has the advantage of established maturity, particularly where borers are numerous and browsing deer devastate young plantings. Such a tree may be beautifully shaped and healthy and, given a few well-positioned grafts, could begin bearing palatable fruit.
Look for small wood near the trunk on which to place whip-and-tongue grafts, be it a watersprout in need of spreading or lateral growth with good scaffold potential. Grafting in the tree's interior allows a whole branch to eventually become a new variety, which is much easier to keep track of than twig wood in the outer canopy. The bark inlay graft is useful on more sizable branches. Time this transformation to when bark is definitely slipping
on the tree during those weeks following green tip. Be sure to place a tag on each grafted branch-to-be so you'll know what's what later on.
A successful graft might grow 3 feet or more that first summer if tree vigor is good and competing shoots have been somewhat pruned away to allow sunlight to the new wood. Chosen shoots can then be bent under an existing branch or tied into place that next winter for greater lateral reach. Prune away the undesired portions of the tree slowly as each grafted branch fills in its envisioned space. A few years down the road the wild branch structure will be gone, leaving you an apple tree with Arkansas Black, Fireside, Dudley, and Ashmead's Kernel forming the lower scaffold; Oriole, Rambo, and Melrose midway; and an entire new top of St. Edmund's Russet.
A multiple-variety tree provides a good way to test different fruit cultivars at your site as well as grow scionwood to graft onto rootstock. The example above was apple, but this mixing of varieties works just as well with pears and the stone fruits. I'll be making the case for the plum thicket ahead: Here, hybrid plum varieties are grafted onto individual root suckers to form a pollinator's paradise within the thicket. Dave Wilson Nursery out in California advocates a four-in-a-hole plan for all stone fruit: Four growth-compatible cultivars are planted together (about 18 inches apart in a square pattern) in a large hole, thus forming a varietal vase offering four types of mouthwatering apricots, nectarines, and wonderful crosses like the pluot. Similarly, you could create a high-density hedgerow with a dozen different peach cultivars planted 36 inches apart. Sunlight envelops this varietal hodgepodge as a single tree in its own right.
Planting Care
The best time to plant a tree was twenty years ago; the second-best time is now.
Chinese proverb
Fruit trees and berries should be planted as early in the spring as possible after the soil has dried out sufficiently. Soil preparation the year before helps in getting nursery stock planted that much earlier. Cold soil temperatures will promote the development of calluses at the tips of any torn roots. Normal spring rains will then settle the soil around the roots before leaf growth occurs. Catch this timing right and your trees will slide into full gear with nary a backward look. Planting delays do happen, however, and in that case orders from the nursery can be tucked away in moist wood shavings or the like in a cool place for a week or two. If it's going to be longer (you're off to the Bahamas!) bareroot plants should be heeled in the garden until proper planting holes can be dug. Trees planted after leaves have started to grow will experience transplant shock, in part because feeder root growth has begun. This can potentially stunt both the upper tree and root development, so don't wait too long. Heavy pruning can help, and reliable irrigation is better—but respecting tree dynamics is the best strategy of all.
Growers in Zone 6 and south should take advantage of fall planting. The root growth that takes place in mild winters gets the young tree established and raring to go by spring. Fully dormant trees can be transplanted from mid-November through December. Larger two-year nursery trees suffer less transplant shock when fall-planted and thus retain a head start on one-year whips. Roots continue to grow even though tops are dormant in regions where soil temperatures remain above 40°F (4°C). Damage to the roots is more likely to occur in northern zones from the frost-heaving of recently disturbed soil. Mulching a new tree after the ground freezes can alleviate this concern . . . just be sure to wrap tender young trunks to protect them from voles.
Trees can be purchased directly from nurseries as bareroot stock or already potted up at a local garden center. You might even be able to obtain trees of bearing age from a local orchardist (admittedly, a big-bucks proposition suitable mainly for those without patience). I recommend the bareroot option hands down: Young whips do not go through transplant shock like more sizable trees that have been waiting, rootbound, in bundled soil for a year or more. People tempted by the bigger tree right there that very day frequently end up making a less-than-stellar variety choice, transplanting a tree that's in full leaf (definitely not recommended), and then compromising future growth for years to come by not loosening up the roots so they can reach out beyond the matted disaster often found in the pot. Repeat after me: I will plan ahead and arrange for bareroot stock to plant out at the right time.
Prior to planting, you should never allow the roots of any plant to dry out. Soaking the roots in a bucket of seaweed solution will help reduce transplant stress; do this the night before planting and pledge not to leave roots soaking for more than twenty-four hours. A relatively calm, cloudy day is preferable to a sunny, windy day for planting. Be sure each tree and fruiting shrub is individually labeled to identify who's who in the planting plan. Brambles often come bundled in tens for planting out in beds. Digging holes ahead of time for a planting session can be more efficient than a dig then plant, dig then plant
routine.
A proper hole
The tree hole obviously needs to be large enough to accommodate the root system. However, digging a hole significantly larger than that preps the immediate soil zone for root outreach. A 3-foot-diameter hole generally fits the bill. I will trench out a channel for an excessively long root rather than curl it in toward the trunk. Loosening the subsoil in the bottom of a 16- to 20-inch-deep hole provides additional leeway in setting the height of the graft union aboveground. A buried graft union will eventually establish its own roots, which override the desired dwarfing effect of clonal rootstock. I aim to keep the graft union 4 inches above the soil line, planting only slightly deeper than the tree may have grown in the nursery. Keep in mind that the settling of looser soils may bring the graft union down another inch or so. Trees on seedling roots are the one exception: The graft union can be buried if you wish to encourage self-rooting of the scion cultivar.
Do not mix massive amounts of compost with the soil in the planting hole. The roots will soon extend much farther into the surrounding earth for long-term sustenance. A super-enriched planting hole gives roots little reason to leave the home base. I prefer to backfill the tree only with the soil that came out of the hole, with the more friable topsoil placed against the roots and the subsoil used to finish filling the hole. Tree nutrition in the years ahead will come from above in the form of orchard compost and ramial wood chips to build that desirable fungal duff, where 90 percent of the feeder roots will be found. Extension advice to load young fruit plantings up on nitrate fertilizers for the first several years will work against the fungal connection we seek for long-term tree health.
Roughly serrating the sides of a hole dug in heavy soil with a digging fork helps fracture a too-smooth clay finish. Growing roots need to readily penetrate into the surrounding soil; otherwise they may circle around the glazed bowl that can inadvertently result from clay particle adhesion caused by digging the hole. Piling good soil to one side of the planting hole and less loamy subsoil to another side as you dig allows you to systematically plant without compacting the turned earth as you maneuver about. I sprinkle a pound of rock phosphate (for early root development) and the same amount of Azomite (for trace nutrients) onto these soil piles and into the tree hole itself, stirring all together in the planting process.
Berries are more straightforward (not having been grafted in the first place), because the soil line evident from nursery days marks the very goal for planting day. Preparing the bed during the previous year makes planting a quick task, particularly for brambles. Use a hoe to create a deep-enough planting furrow, then line out cane stock at the recommended spacing.
Trees and fruiting bushes planted in containers will require much more frequent watering and feeding with compost tea and herbal brews. Porous-walled pots will lose moisture rapidly compared with a thick-walled tub or whiskey barrel. Drainage holes are a must to prevent roots from sitting in standing water; a gravel layer at the very bottom is strongly suggested to facilitate this drainage. Suggested soil mix for potting up: equal parts compost, perlite, peat moss, and decomposing forest leaf litter. Ramial mulch atop this soil is the right biological touch. Containerized trees eventually get severely rootbound but can be a fun novelty while the plants thrive.
Mycorrhizal root dips
A young tree with fungal allies from day one has that much better a chance of succeeding. A wee bit of mycorrhizal root investment is a worthy idea, because all commercial rootstocks lack this basic biological connection. Planting fields are fumigated, tilled, and otherwise manipulated as a matter of course. Very few nurseries in turn choose to inoculate the trees created by grafting onto rootstock purchased from these big commercial propagators. The soil where you're planting an orchard doesn't necessarily lack the mycorrhizal species needed for fruit trees—that depends on landscaping history and the proximity of other tree roots. Yet jump-starting a barren root system makes sense to me, as it can take several years for disturbed soil to otherwise be restored in this important fungal respect. You have two options to ensure mycorrhizal presence from the get-go: one to be purchased, the other to be gifted.
Root dips contain spore inoculum of a number of widely adapted mycorrhizal species suitable for deciduous trees. Rarely is there just one fungus type per root system, and at least one species in these products will work for any soil/plant/climate situation. The dormant spores will become activated once they come in contact with the growing roots of your fruit trees. These horticultural hydrogels cling to the roots, dipped right at planting time. Fungal mycelium persists within the roots that first year and then grows out into the surrounding soil the next spring and every year thereafter.
Quality inoculum is key. Mycorrhizal Applications in Oregon has earned a reputation for putting out reliable products. Home orchardists can find numerous brands at local garden centers whose spore inoculum comes from this company. Be aware that cheaper products in chain stores are often made with hyphal fragments rather than genuine mature spores. I've long worked with BioOrganics in California, another reputable source, but probably more for community orchardists, as each 3-pound container of their root dip contains enough inoculum for several hundred trees. Humic acids are a good fungal food when mycorrhizae are getting established. Another underlying purpose of this root investment is to set a fire under you to foster this fungal ecosystem year after year with woodsy compost, liquid fish sprays, and ramial mulch.
Soil from a healthy forest ecosystem can be used to inoculate existing home orchard plantings as well. Think of this as akin to Grandma's sourdough bread yeast: A small ball of dough is set aside each time to enliven the next batch. Similarly, a small amount of topsoil taken from the root zone of a wild apple tree (or any young hardwood stand for that matter) should gift your recently planted fruit trees with mycorrhizal species absolutely suited to your bioregion. Subtleties need to be observed in this process to assure success. Hyphae (brought in from other soil) have a limited capacity to grow and will die within a few days if they do not encounter a susceptible root. The upshot here is you can bring a quart of soil for each of your trees and immediately spread it beneath decomposing wood mulch, where the finer part of each tree's permanent root system will be found. Think of this as a mycorrhizal side-dressing for fruit trees planted a year or two before you learned of this advice.
Spread those roots
Every time I plant a tree I'm aware of the intimacy of this moment. That root system in my hands will be empowering a new friend that may well be here for generations to come. Shall I just stick it in the ground, oblivious of the way of roots? I think not. Envision what's at stake here as you gently introduce these roots to Mother Earth once again.
A slight mound of loosened soil in the bottom of the planting hole helps in spreading out the roots. The very bottom roots are laid out across this mound. Press soil firmly on top of these as you backfill, taking care to recognize that the next layer of roots should be held up with one hand as you do this. That second layer of roots now goes atop the soil in between—and being thus supported won't tear off the rootstock. People who plop all roots in a single downward direction simply don't understand that a living tree is not a mere fence post. The roots should radiate in all directions around the tree just as they grew in the nursery bed, thus improving anchorage and nutrient access from the outset. With a little forethought, a rootless pocket can be left for a stake 6 inches from the trunk on the leeward side of dwarfing stock. Puddle water in the root zone to collapse any remaining air pockets before replacing the top level of soil. Dancing a happy jig is one way to approach a final tamping-down of moist soil and the straightening-out of any errant lean to the newly planted tree.
Heading height
Nursery whips are headed back at planting time to encourage specific growth in the young tree. Shearing off the leader shoot at a certain height will do two things. The buds immediately below the cut will be invigorated to shoot for the sky, with anywhere from three to five shoots forming sharp vertical crotch angles. Shortly you will choose one of these to become the new leader. Auxin hormone flow is significantly affected by the apical dominance of this multiple bud response, by which I mean that the additional terminal buds now involved will strongly suppress lateral growth in the buds immediately below. (I know these terms are challenging, but hang in there!) Farther down on this pruned whip, other buds will respond to a buildup of cytokinin hormones that reverse the inhibitory effect of auxin on lateral growth in the buds above. This is exactly what you want for this young whippersnapper! All this horticultural gibberish points to our ability as orchardists to choose at what height scaffold branches are going to be encouraged on the tree-to-be. Let's go for the clincher: Heading height marks the distance aboveground where the first layer of fruit-bearing branches comes off the trunk.
You determine the height at which first branches will radiate off the trunk by making a heading cut to whips at planting time. Bud response up high will come in the form of a crow's foot, causing laterals to push out a handspan below the heading cut and these upper vertical shoots.
A one-year whip is snipped at 28–42 inches above the ground, based on the vigor of the rootstock and the vision you have for a freestanding tree. The eventual branch structure being sought here will happen 6–8 inches below this heading cut. This helps compensate as well for any broken roots (lost in digging up the tree or the shipping process) that needed to be pruned away prior to planting. When newly planted trees are not headed severely enough, they will develop first laterals well above the desired heading height. Scaffold branches on a full-sized fruit tree that start around 3 feet above the ground are just about right. A portion of the fruit will be able to be picked without a ladder, and yet most fruit buds will be above deer browsing height and up in the breezes that help deter fungal disease.
Every tree coming from the nursery is not necessarily going to be a whip. Advice about heading height accordingly calls for some refinement when you are planting a feathered tree. Prime nursery stock often will have substantial side branches already, particularly if the grafted tree took two growing seasons to come of size. Choose a few of the strongest and best placed of these laterals to stay as permanent branches at a desirable height. If the reach of these side shoots seems out of proportion with the diameter of the leader, growers will cut such feathers
back to an outboard-facing bud. On the other hand, leaving an excessive amount of small side shoots this first year will divide the energy of the tree and thus hinder strong side branches from forming. The heading cut to the leader itself will be made 8–12 inches above the uppermost lateral left on more developed nursery stock.
There's one last thing to do this first growing season. Choosing a central leader from that crow's foot of three or so vertical shoots induced by the initial heading cut is important. I come back to all newly planted trees in late June to pinch off all but the strongest of these shoots with narrow crotch angles. These uppermost shoots need to reach several inches in length before doing this to allow the excess auxin being produced (by the collective terminal buds of the crow's foot) to work its will on the buds below. The chosen leader can now focus on its singular upward mission while the developing laterals below do their thing.
Growing productive wood
Fruit trees do better without immediate sod competition when first planted. Clean cultivation of the entire orchard was recommended at the turn of the last century, with a soil-building cover crop planted in late summer to provide winter cover. Mulch is the more biological choice, as we can add substantial organic matter in the process. Enabling young trees to grow wood through heavy mulching or shallow hoeing will mimic what canopy shading will eventually do in the bearing years of the tree. There's simply not enough branch structure yet to shade the ground below to suppress weed growth.
Ring mulching a newly planted tree differs from the haphazard mulching described earlier. The prime choices for mulching material remain either ramial wood chips or spoiled hay. Yet because we specifically want to knock back sod intrusion for several years, it's worth going to some extra trouble. Thick layers of newspaper or cardboard beneath the mulch cuts off light to any competing plants that still may be root-invested and capable of making a comeback in the immediate area around the tree planting hole. The diameter of this ring should start at a minimum of 5 feet for the first-year tree and extend to as much as 6–8 feet several years hence to accommodate the growing tree. Keep in mind that peastone should fill the inner ring of such a mulch doughnut, creating a weed-free inner circle some 2 feet in diameter around the trunk. Organic mulches right up against the trunk of the tree will retain too much moisture. The peastone can be replenished anytime if subsequent forking out of root runners from stubborn quack grass penetrate the outer ring mulch.
Investing in organic fertilizer these first years to build wood is highly recommended. A basic organic blend like Pro-Gro (5-3-4) ups the nitrogen ante to ensure solid growth. Hold back the fertilizer in the first year of planting—let those roots get established with the soil at hand—and begin the mineral feeding program in subsequent springs. A quart-sized yogurt container (or a 1-pound coffee can) tends to be my official measure. A mix of protein meals, nitrate of soda, humates, and rock dusts gets sprinkled across the mulch zone and the peastone. Stirring this into the topsoil takes place only if I have a need to fork out excess dandelions or encroaching sod . . . otherwise the organic elements will wash down to the waiting microbes and thus the feeder roots of the young tree. The rate here builds over the years, starting with a half-full container and increasing threefold by year five. That amounts to 1–3 pounds, increasing by ½ pound per year. The radius of spread increases accordingly as well, from 4–6 to 8–10 feet, anticipating the roots radiating out farther and farther with each new season. Orchard compost gets applied each fall out in the mulch zone (but not over the peastone) to boost organic matter levels. This feeding program needs to be adjusted according to the tree in front of you, of course, as rich soil in some locations may fuel plenty of growth without additional measures. Annual shoot growth exceeding 24–30 inches would be considered too rampant. Less vigorous trees, on the other hand, that come into bearing late would benefit from carrying on this plan (at the 3-pound plateau) for another year or two.
Watering
Once leafed out, all fruit tree and berry plantings need regular watering throughout the first growing season. The rule of thumb here is 1 inch of rain a week. That translates to a 5-gallon bucketful per first-year tree in my roundabout mind, perhaps half that on a blueberry bush. You do need to water in such a way that the water goes into the ground where the tree sits. A mulch ring around individual trees helps prevent surface runoff. Home orchardists in southern zones are advised to provide such a drink at least twice a week in hot weather because of evaporation. Fruiting plants in containers need to be checked almost daily.
Let's look at the hierarchy of roots in the soil. Woody plants have a framework consisting of primary and secondary permanent roots, transport and storage roots, nonwoody feeder roots, and root hairs. The feeder roots and root hairs are the most important part of the root system for uptake of water and nutrients from the soil. These are particularly sensitive to drought. Keep in mind that practically all of a tree's overall root system is located in the top 3 feet of the soil, and a good portion of that resides in the top foot. This is especially true of the feeder roots. Dry soil causes feeder roots and root hairs to shrivel and become nonfunctional. As a consequence, water deficit develops more quickly than we might be inclined to think.
Mature trees on semi-standard and standard rootstock can likely be dry-farmed in deep soils, but dwarf rootstock will need regular watering unless it rains consistently throughout the summer. Let's zero in on that prescribed inch of rain per week for those of you who require long-term irrigation of fruit plantings. It turns out that 0.6 gallon of water per square foot provides that rainfall equivalent. Consider a single tree for a moment. Roots extend beyond the dripline by half again the height of the tree, and likely go considerably deeper than the tree is tall. So water requirements for mature trees that are calculated on the basis of dripline square footage should be doubled to account for root reach. Surface application will cover the true diameter
of the tree, whereas drip irrigation is definitely a matter of thinking in terms of point application.
Drip irrigation systems are efficient water users but can result in more localized wet spots, leading to confined root systems and localized leaching of nutrients. A good half of the root area needs to be wetted at a minimum, which is why split-row application should be considered in an irrigation layout for fruit plantings. The ground surface may appear mostly dry, but it's the inverted moisture cone from each point of application that counts. Irrigating in the late afternoon and through the night increases water use efficiency.
Overwatering creates anaerobic zones. Oxygen being transported to the root system becomes negligible; alcohols produced in such a saturation fermentation of the soil kill beneficial organisms outright. Planting advice to avoid wet ground in the first place springs from wanting to keep orchard ground under fungal protection. Good fungi need their living conditions to be aerobic, just as you and I do. However, bacteria dominate along with pathogenic fungi when the soil stays saturated. This in turn leads to problems with various root and crown rot conditions. One common mistake first-time orchardists make is literally drowning trees in the first season, especially apricots and cherries. Stone fruit species are the most sensitive to flooding, which can be seen by wilting of the leaves within several days' time followed by dropping of the leaves and outright death if the roots of these trees remain underwater for much longer than a week.
Nutrient exchange depends on proper moisture levels as well. Calcium, which is the foundation of all biological systems, requires water to move up through the xylem of the tree's trunk. Post-harvest irrigation in dry regions helps increase calcium levels in the fruiting spurs for next season.
Soil Fertility
The nutrition taken up by the fruit we grow in turn nourishes us and our families. And yet soil fertility is too often viewed as solely a means to pump up yields . . . sending the concept of nutrient density for health's sake out the window. Orchardists need to understand the place of soil chemistry in this bigger picture. Nutrient balance is a dynamic achievement that ties to many factors beyond what comes in a bag from the fertilizer store. Our role is to get the house in order so that the soil biology can then run on cruise control.
Biology rules!
The soil food web in all its diversity and complexity trumps reductionist soil chemistry many times over. New orchardists reading this book are by now up to speed, but those of you with fixed notions about fertilizer may have some cultural and generational brainwashing to overcome.
A healthy soil consists of a surprising amount of porous space, a nearly equal volume of pulverized rock, and 5 percent (give or take) organic matter. This living skin of our planet rests on a solid bed of rock—the parent material from which the mineral portion was formed. The trillions upon trillions upon trillions of organisms within this medium are what make life possible on earth. Biologists describe soil as a marriage between the mineral world and the organic world. Many of the elements essential for plant life are provided by the molecular structure of the minerals. It's the organic partnership of the microorganism community that transforms these nutrients into bioavailable forms.
Bacteria, fungi, nematodes, protozoans, and arthropods are constantly shuffling nutrients back and forth. The inorganic ions dissolved in water and/or making up mineral molecules become attached to organic compounds within these living organisms and eventually get banked in humus. When organisms take up mineral elements to construct cells, enzymes, and other organic compounds necessary for growth, they are said to be immobilizing nutrients. When organisms excrete inorganic waste compounds, they are said to be mineralizing nutrients. This back-and-forth process keys upon available carbon (the energy source provided by organic matter) to fuel shifts in microbe populations. Plenty of carbon allows a diverse biomass to increase dramatically, resulting in soil nutrients being absorbed and thus immobilized in the cells of fungi and bacteria. When the balance tilts the other way—with not enough carbon to support the microbial biomass—the population drops and cells die, releasing soluble nutrients in unbound mineral form that can be taken up by plants. Feeder roots with mycorrhizal association have a healthy affinity for microbe-derived nutrients. Yet there's more to this story.
The proximity of microbial action in the rhizosphere is what makes mineralized inorganics far more bioavailable than the soluble inorganics commonly provided by modern-day chemical fertilizer. A dead, inert soil (biologically speaking) has only the latter to offer—its mineral nutrient value basically being determined by the use of such fertilizers in the first place. Under this scenario, a vast proportion of mineral salts drain off into the water table, as roots are capable of absorbing only the tiny bit that enters the rhizosphere. The odds of the plant's roots benefiting from much of a chemical fertilizer application are not unlike your chances of winning a big lottery jackpot . . . and thus the constant call for more and more fertilizer to be applied as a crutch in an impoverished agriculture system.
Here's the ace up the sleeve offered by vibrant soil biology: Mineralization is a two-way street. Those soluble nutrients produced by the microbes but not taken up immediately by the roots go right back into the next generation of microbes. There's rhythm here—a responsive beat, a tidal sensibility even. Plant roots in turn exude carbon, which keeps microbe diversity and the immobilization/mineralization balance humming right along. It's the life aspect of the soil that introduces and enforces the whole concept of balanced nutrition, as opposed to the overstocked flooding of the reductionist chemical approach.
Let's zoom in even closer. The real story behind weathering mineral rock to release nutrients includes numerous bacteria that live in association with mycorrhizal fungal hyphae. These bacteria secrete acids that can etch rock, thus securing it for uptake by the mycorrhizae to be sent on to the plant. Protozoans eat bacteria primarily, releasing additional nutrients that stimulate the growth of more bacteria and fungi. When soil scientists say bacteria mineralize nitrogen in soil, what's really happening is that protozoans release nitrogen as waste in consuming bacteria. Similarly, nematodes release excess nitrogen in the form of ammonium when consuming either bacteria or fungi. All this happens in the vicinity of the root system of the plant, where feeder root hairs absorb the proffered nutrients. Organically derived elements rarely leach away, even when mineralized in soluble form, as some hungry critter is always on hand awaiting its next meal.
Healthy soil is a biological factory that with time gets richer, increasingly complex, and absolutely sustainable for the long haul. The assumption by chemical advocates that a larger pool of a given nutrient, whatever the form, will enhance plant growth is very unrepresentative of what actually happens in the soil. The total amount of a nutrient in the soil is nowhere near as important in terms of the soil's fertility as is the availability of that nutrient. That is the proprietary function of soil life and the reason organic growers emphasize the copious use of organic matter. The untapped minerals in almost any soil—once accessed by a healthy humus complex—are more than sufficient to revitalize every sensible orchard, year after year after year.
Soil testing
Our role in starting an orchard is simply to check that the pantry basics utilized by all these forms of life are in relative balance. A soil test that emphasizes biological parameters is the best tool by which to gauge this. Certain soil amendments will likely be called for to achieve a proper starting point for the biology. That life system in turn will provide a well-balanced meal for the feeder roots of our fruiting plants.
It's easy to feel anxious looking at the numbers presented on a typical soil test. Values for different nutrients will be recorded as low, medium, or high. Different labs use different extraction solvents to approximate either total nutrient reserves or what's most likely available to plant roots. The recommendations that follow reflect the bias of the lab doing the test. Most state university soil labs plug chemical options. On the other hand, the biological labs listed in the appendices not only will speak organics but will emphasize the percent base saturation of those elements that determine soil acidity. Those numbers hold great relevance for health-oriented growing according to William Albrecht, a Missouri soil scientist whose work in the middle of the last century has influenced many in the ecological agriculture movement today. Let's look at the more meaningful parts found on a soil report from the holistic perspective and then follow that with a discussion of important macronutrients and micronutrients.
Getting an initial read on your soil is strongly advised. A follow-up test a year or two later provides feedback on how any initial adjustments actually played out in improving base saturation, particularly with respect to calcium. Giving attention to fungal duff management from here on in now takes precedence—growing healthy fruit will never be about constant soil manipulation once the grower understands that it's a vibrant soil food web that gets the job done right. By all means take a soil test every few years beyond this initial soil-building phase if you wish to keep a finger on the pulse of regional nutrient concerns . . . though simply following the deep nutrition advice that follows this chapter should stand you in good stead from here on in.
Sampling the soil
Gathering soil to send to the lab for analysis requires care. One spot of ground may look like all the rest, but then again it might have been influenced by some factor in the recent past and may have a unique character or composition. That's why a representative soil sample consists of twelve to twenty slices of earth randomly selected from the area under consideration for planting. Zigzag throughout your orchard ground to gather the samples so as to get a broad survey of the situation. Berry patches and tree ground can be treated as one if they have similar history. I like to use dripline locations when testing the soil in bearing blocks of trees, as this is where root action takes place and compost has been spread over the years.
A stainless-steel soil-sampling tool delivers a consistent core each time, but you can achieve reasonable results with a clean spade. Testing the top layer of soil requires that each sample be a uniformly thick slice down through the top 4–6 inches of soil. (Wriggle the spade into the ground to create an initial opening, and then slice behind this plane ½ inch back to the desired depth.) Brushing away the plant matter at the very top is good practice. Mix all the individual samples together in a clean pail. Two cups' worth of this mix will be sent to the lab for analysis, either in a new ziplock bag or in the sampling bag provided by request. The requisite sampling form can often be downloaded from the Internet. Here's where you provide the lab with the soil's description, intended crop plans, and any recent history of liming or other soil work.
Orchard Compost
Organic farmers and gardeners alike use compost to return goodness to the soil. Nutrients get restored, organic matter levels build up, and microorganism communities for the plants being grown receive a diversity boost. But wait... that last proves valid for fruit trees only if the grower knows to distinguish between garden compost and orchard compost.
Compost serves as an inoculum of not just bacteria but also fungi, protozoans, nematodes, and often microarthropods when properly made. Much has been made of the enzymes and plant growth hormones produced in compost, but in truth these materials are everyday by-products of the biology. Compost turns out to be a darned good way to reinvigorate the soil food web. Biologically rich compost will nudge an acidic pH situation slightly more in that direction, but this will be counterbalanced through microbe inducements in the feeder root zone that are definitively alkaline. Composted organic matter is Nature's buffer in its most essential form.
The amount of nitrogenous green
material (fresh manure, grass clippings, alfalfa meal, and vegetable wastes) available determines the ratio of fungi to bacteria that will flourish in finished compost. The carbon-to-nitrogen ratio expresses how nitrogen stands in relation to carbon content in the organic debris being composted. Achieving a C:N ratio of 25:1 promotes rapid decomposition through high heat, resulting in a bacteria-dominated compost just right for the vegetable garden. Leaf mold, straw, cornstalks, woodsy brush, and moderate amounts of sawdust (from stable bedding) are much higher in carbon than nitrogen and thus are recommended as brown
material. A simple recipe for garden compost is alternating layers of green and brown ingredients in equal proportion, turning weekly to generate bacterial heat, and winning some sort of speed race for getting finished compost to the garden in ten weeks or less. Doubling up the brown aspect boosts the C:N ratio to 40:1 to make orchard compost. Incorporating deciduous wood chips and even the occasional layer of living soil helps achieve this goal. Orchard compost is not turned, and in fact it is aged for many months before being spread beneath the trees and on berry beds. Some people make bacterial compost and then add ramial wood chips, whereas others layer in more brown matter from the get-go. The passage of time is what's key.
Fungi thrive on nondisturbance. Roughage high in lignin content creates air passages, providing oxygen for the aerobic fungi that will thrive in a woodsy medium. Spraying the pile on occasion with liquid fish will feed a diversity of fungal species. Soil amendments forked into the pile in late summer—greensand, granite meal, rock phosphate, Azomite, kelp, and gypsum—will be taken up by the compost food web and the nutrients made bioavailable for feeder root uptake when the matured compost gets spread later that fall.
How much compost to use per tree is tied to a number of factors. Let's assume the soil-buildup phase has been completed with respect to mineral amendments and that organic matter levels in the soil are satisfactory. Fungal duff management beneath bearing trees calls for deliberately decomposing leaves and prunings in place. A maintenance rate of compost to complement this orchard recycling would amount to 2 tons per acre, which in turn looks like a pile that's 4 cubic yards in volume. Let's further assume freestanding trees with a dripline area on the order of a 16-foot diameter. This spacing amounts to approximately 120 trees per acre. That 4-cubic-yard pile would contain 108 cubic feet, so about a cubic foot of compost per tree hits the mark. That amounts to one and a half 5-gallon buckets' worth per tree per year. Compost doesn't need to be spread tight to the trunk, and extending the application a few feet beyond the dripline is good by the roots.
Organic matter
The percentage of organic matter (OM) in your soil eventually reflects your commitment to a living soil system. This number will vary in different regions, primarily because warmer growing zones consistently face an accelerated pace of microbial decomposition. Still, when it comes to keeping up with the Joneses, trust me: Organic matter means more than that new car or designer kitchen any day.
Organic matter supplies low to medium concentrations of nutrients, and almost always in well-balanced quantities. Furthermore, decaying plant matter and organisms have a slow-release mechanism, allowing nutrients to become available to plants over a period of several months, if not years. Nor will such nutrients leach away as readily as happens in dead soils. Lastly, organic matter gradually improves soil structure as earthworms and other soil organisms interact and feed.
A diverse understory of plants is the principal means of replenishing organic matter from one growing season to the next. Orchard compost and/or a variety of haphazard mulches contribute here as well. The soluble lignins in ramial wood chips fuel the biology that produces humus, the best type of organic matter of all. Humus is a highly stable material providing for long-term nutrient storage. This ability of a particular soil structure will be expressed as cation exchange capacity (CEC) on soil tests. Humic and fulvic acids made available through humus banking are what improve micronutrient assimilation across the board. The addition of purchased humates to poor soils helps jump-start the biological action required to process more and more organic matter.
The relevance of measuring total nutrient levels in a soil gets addressed in the organic matter department as well. What counts—and this is what a good biological soil lab will insist upon—are the levels of available nutrients. Legitimate debates as to how best to determine such levels are ongoing, but guess what? Simply having a good OM score indicates that sufficient carbon and nitrogen reserves are on hand. Organic matter at 5 percent provides a potential of 120 pounds per acre of nitrogen yearly. A healthy soil with a good mineralization rate (on the order of 2–4 percent) provides more than enough nitrogen to sustain good orchard yields. This recognition of what biological diversity alone can do with a sustained supply of organic matter is going to become very pertinent.
pH daydreaming
Everybody seems to talk about soil pH as the cat's pajamas. Understanding this measure of soil acidity calls for a holistic sense of what's really going on here.
Acid soils are low in fertility because too much of the cation exchange capacity is occupied by either hydrogen (which is not a plant nutrient) or aluminum (which can be toxic to plants), all of which is indicated by a soil pH range running between 3.5 and 6.0. Liming soils affects who's on first by the substitution of calcium and magnesium for a hydrogen ion on the humic acid chain. Some acidity in the form of hydrogen ions is necessary to make other nutrients available, which is why fertile orchard ground has a pH range somewhere between 6.3 and 6.7. An alkaline soil, on the other hand, is oversaturated with calcium and/or magnesium. Southern salty soils are usually very alkaline, with pH ranging between 8.0 and 9.0. The application of acid salts (such as iron or manganese sulfates) results in a complex chemical reaction that literally pulls calcium and magnesium out in a leachable form.
The key question to ask here is: What do the microbes think about all this? Excessive manipulation can be harmful to the everyday functioning of the soil food web. The pH created by ongoing nutrient exchange in the rhizosphere and amendments added by the grower influences what types of microorganisms live in the soil. This has impact on the form of available nitrogen and other biological functions that affect how plants grow. The microbes desired in an orchard soil appreciate a proportional salad bar, and it's in achieving this goal that up-front compromise to adjust pH in a significant way becomes acceptable when preparing orchard ground. Establishing desired ratios between certain mineral elements ensures that the biology being fostered for fruit trees will keep such matters in line thereafter with far less intrusion on our part.
Cation balance
What truly counts are exchangeable nutrients in the right places. Cation balance is a question of having proportional ratios among calcium, magnesium, and potassium (somewhat determined by soil type), backed by a similar rule of thumb involving phosphorus and potassium. These are the numbers to be addressed with soil amendments prior to establishing a fungal-dominated food web and planting out fruit trees and berries.
All soil elements carrying an electrical charge are referred to as ions. Ions with a positive charge are called cations (pronounced CAT-ions), and those with a negative charge are called anions (AN-ions). What soil scientists call the cation exchange capacity represents the sum total of exchangeable cations that a soil can adsorb. Clay soils and soils high in organic matter have higher cation exchange capacities than sandy soils. The CEC number revealed on a soil test indicates how porous a soil is nutrient-wise and therefore how soil chemistry can be used (in addition to organic matter) to begin to improve this. A light-colored sandy soil will have a CEC around 3–7; a fine-textured loam will have a CEC of 8–14; a clay soil will have a CEC of 15 or more. That sets the stage for balancing calcium and magnesium levels in relation to each other.
Magnesium serves to pull soil particles closer together, whereas calcium will spread the particles farther apart. See where we're going with this? Slightly more magnesium is called for in a porous soil, whereas clay requires higher levels of calcium to improve drainage and aeration. The percentage of base saturation for each of these elements provided on a soil test is how we compare the relative levels of each. The Ca:Mg ratio for a sandy soil can be targeted at 5:1 (noting that the structural need for magnesium may skew this even lower). This same ratio for the soil of your dreams—that fine-textured loam—should be close to 7:1. The heaviest clay soils benefit from even more calcium, so now a slightly higher Ca:Mg ratio becomes appropriate. The calcium pushes soil particles apart—that's good for clay. The magnesium pulls soil particles together—that's bad for clay, but ever so good for sandy soils that lose water too quickly, which is when a higher proportion of magnesium is desirable. You determine which ratio range to use based on where the CEC number falls for your soil.
This ratio business really has to do with balanced plant uptake of these important macronutrients. An excessive amount of one cation can block the availability of another cation. Ratios that stray too far from these ideal numbers lead to calcium and magnesium deficiency symptoms. Potassium enters in here as well, tagging along on the heels of calcium at no greater than a 14:1 ratio.43 The percent base saturation numbers that represent cation balance for a loam soil with respect to Ca:Mg:K are on the order of 70:12:4. These numbers shift for a sandy soil to more like 65:16–18:3–4 and for a clayey soil to more like 76:10:4–5. Don't be wrapped up in rigidity around this and carry a calculator out to the orchard . . . proportional guidelines are fluid at best in addressing the needs of soil structure, nutrient exchange, and microbe efficiency.
Here's why we just undertook that mathematical plunge. Modern growers have a cultural tendency to overemphasize pH and then add any ol' lime to favorably alter soil acidity. Ground limestone introduces substantial amounts of calcium and magnesium to a soil profile to replace those excess hydrogen ions. The type of lime used has a Ca:Mg ratio of its own to be considered.44 The recommended rate should not exceed 2 tons per acre that first year, with or without tillage,45 and even that amount will stifle microorganism activity for a spell. If additional lime beyond this is recommended, soil food web proponents favor making additional applications in fall on the order of 200–400 pounds per acre (rather than a tonnage basis) per year after this. Lime added by way of a substantial compost pile is taken up more efficiently, if given time, reducing the amount needed to a quarter of what might be called for as a surface application.
- Dolomitic limestone is about 20–25 percent calcium and about 10–15 percent magnesium. Local garden centers generally carry this type of lime. All for the good if you have a strong Mg deficiency, but totally the wrong choice if you have too low a Ca:Mg ratio to start. If you're not sure, choose the other lime; overdoing magnesium will cause a portion of nitrogen reserves to be lost to the air or leaching.
- Calcitic limestone is about 38 percent calcium and around 0.2 percent magnesium. Hi-cal lime, (as it's also known) may be available in a farm supply store and most certainly can be special-ordered. Use calcium carbonate—this sedimentary rock's molecular name—wherever magnesium levels are close to sufficient. (Other soil amendments like Sul-Po-Mag can be used to up magnesium levels instead.) Oyster shell lime is a sea-derived source of calcium carbonate for those located closer to the coast.
- Carbonized limestone comes in pelleted form only and includes low levels of humates and sugars added in as carbon sources. This biological rendition of calcitic lime allows calcium to be taken up by the microorganisms that much quicker and thus makes it available to fruiting plants more efficiently.
- Gypsum (23 percent calcium) is the right choice to boost calcium levels when no adjustment to pH is needed. The sulfate portion of
land plaster
reacts with water to form a weak sulfuric acid solution that releases the calcium into the soil—the abundant calcium ions then secure more of the exchange sites, thereby shoving excess magnesium and potassium back into solution. Gypsum is a powerful tool for regaining cation balance in messed-up soils! This rock dust also does wonders to improve the permeability of clay soils. A tonic rate of 200–400 pounds per acre (which translates to 5–10 pounds of gypsum per 1,000 square feet) can be used each year until calcium reserves reach an optimum level. The sulfur in gypsum will help slow the nitrate release of decomposing organic matter as well.
Basic Soil Values
Seems like a whole lot of shaking is going on here with this soil-testing business, eh? Every orchard soil has parameters established around organic matter content, cation exchange capacity, and the geological history of the place where you live.
Some basic values can be articulated for those who are not quite ready for the full monty of soil considerations. Keep in mind that these generalized guidelines aren't as optimum as it gets. The purpose here is simply to give your trees ground to stand on with a reasonable chance of success.
- Get the pH in the 6.3–6.7 range.
- Do this in the context of cation balance based on the CEC number for your soil.
- Organic matter fuels the biology. Get OM to 3 percent at a bare minimum.
- Strive for total phosphate (P2O5) and potash (KO2) readings of at least 200 lbs./acre.
This checklist defines clear goals for the soil-buildup phase in preparing any orchard. Holistic methods are not going to work as well if the basics of mineral nutrition in the soil are not up to snuff.
Macronutrients
The essential soil nutrients that plants need in substantial amounts are calcium (Ca), magnesium (Mg), nitrogen (N), phosphorus (P), potassium (K), and sulfur (S). Plants also need carbon (C), hydrogen (H), and oxygen (O), derived from air and water. All nine of these nutrients are collectively referred to as macronutrients.
Emphasizing cation balance highlights calcium's premier role in the scheme of things. The desirable level to see in terms of total calcium on a soil test report is a bare minimum of 2,000 pounds per acre. That sets a calcium baseline for where base saturation ratios should begin. Orchard soils coming in below this gross figure will produce fruit with weakened skin and cell strength, leading to bruising susceptibility of that fruit and impacting its keeping ability. Strong fruit, so to speak, also has better membrane integrity to resist pathogenic fungi throughout the growing season.
Viewing the soil as a regenerative living system is one big kick in the pants for anyone who has been taught that chemical NPK fertilization is more relevant than soil biology. Don't be fooled by the prevalence of that attitude! Nutrient balance certainly depends on nitrogen, phosphate, and potash—these being the three numbers provided on a bag of fertilizer to indicate its relative value—yet we shouldn't stress this part of the picture over the rest. Biological growers view the npk perspective
as merely another means of complementing the soil food web. Accordingly, organic soil amendment choices to address additional testing shortfalls still tie in to the calcium dynamic and what we know of soil life contributions in these areas. Do not shortchange the nutrient density of fruit by using soluble chemical fertilizers. Investing in rock powders where mineral needs become apparent is the healthier investment.
Nitrogen
The majority of nitrogen in any soil needs to be converted from locked organic nitrogen to mineral nitrogen that can be used by the plants. The protein forms of this element in organic matter must first be ammonified, and then a portion of this might indeed be nitrified in order to be taken up by the feeder roots. Fungi and bacteria drive these processes. The available levels of ammonium and nitrates constantly bounce back and forth between immobilization and mineralization as the soil food web in its entirety cycles nutrients.
A fungally dominated soil delivers the right nitrogen to fruit trees and berries, which in turn allows these plants to better resist disease. (Brace yourself for one of those moments when big-time truth reveals itself.) Feeder roots are taking in the nitrogen made available by one microorganism consuming another. The release of plant-available ammonium results from that everyday digestive process. In a bacterially dominated soil, nitrifying bacteria rapidly convert the ammonified form of nitrogen into nitrate. In a fungally dominated soil, something else entirely is taking place. The enzymes produced by fungi are decidedly acidic. This lowers the pH in the rhizosphere . . . which greatly reduces the amount of these special bacteria, as nitrifying bacteria absolutely favor an alkaline root zone. More ammonium therefore remains as plant-available ammonium in a fungally dominated soil instead of being converted to nitrates.
No fruiting plant flourishes on a diet of straight nitrate. Admittedly, the trees get very green and grow fruit that are humongous yet empty (nutritionally speaking), but this comes at the cost of not being able to stand up to environmental pressures. Susceptibility to disease skyrockets whenever an orchard tree takes in nutrition in a form that undermines immune function. One of the principal reasons that chemical orchards require so much medicine to control disease is to compensate for the fact that chemical fertilizers are nitrate-based. And one of the principal reasons that certified organic orchards using sulfur and other mineral fungicides require more and more of that medicine to control disease is to compensate for the fact that fungal dominance shifts in the soil—thereby allowing a greater portion of the food-web-derived nitrogen to be nitrate-based. The picture becomes clear now, eh? Our precious fungal duff, the heart and soul of holistic orcharding, delivers the right form of nitrogen all by itself and in the quantities needed (thanks to abundant organic matter) for sustainable fruit production.
It's totally fine to call upon inputs in the process of gearing up for long-term fungal dominance. Poor soils simply do not deliver good wood growth in those important early years. Nor is the surrounding understory particularly lush and thus able to contribute organic matter. Additional nitrogen from an organic fertilizer blend can be applied directly to the soil surface. Don't overdo this, of course, as too much nitrogen knocks many things a-kilter. Other soil amendments offering nitrogen may be an ongoing component for making high-quality compost, because not every home orchardist is going to have access to decent manure to mix with those ramial wood chips.
- Fish meal (9-3-0). Excellent source of slowly to moderately released nitrogen. The N is tied up in proteins, so there's no risk of burning young trees. The fish essence may attract animals, but for the most part its odor has been stabilized with hydrogen peroxide. This nitrogen charge will supplement very poor orchard soils after the year of planting and boost compost potential.
- Alfalfa meal (2-1-2). A plant-based source that releases nitrogen relatively fast to feeding soil organisms. Useful in the nursery as a side dressing for an early-summer boost and for renewing haggard-looking berry beds.
- Feather meal (14-1-1). This protein source works very well where phosphate and potash soil test levels are good but organic matter is low.
- Soybean meal (6-1-1). Seed meals are an economical source of N for organic growers because they are the best value except for manure. The nitrogen is moderately available because the plant proteins can be mineralized by the biology slightly faster than fish meal.
- Composted manure (approximately 1-1-1). Woodsy compost made in part with animal manure maintains orchard nutrient levels and boosts fungal diversity. Its relatively stable organic matter will be broken down steadily over the growing season. Trace minerals can be delivered through the compost by adding kelp, Azomite, and so forth while forming the pile. Fresh manure (without composting) should never ever be used in any orchard.
- Organic fertilizer blends (N-P-K varies by manufacturer). Organic slow-release plant food made with various protein meals, rock phosphates, sulfate of potash, greensand, kelp, and so forth. I use higher-N blends like Pro-Gro (5-3-4) to develop wood structure on young trees and maintain berry plantings, and lower-N blends like Pro-Start (2-3-3) to support return bloom on heavy-bearing trees.
Phosphorus
This complex soil nutrient is made available by the surface feeding of decomposing fungi and then delivered to the plant by the hyphal reach of mycorrhizae. Biological management of the fungal duff addresses the phosphorus availability challenge faced by chemical growers. Still, a net phosphorus deficiency in holistic orchard ground often proves to be the missing link in increasing the nutrient density of fruit, particularly with respect to calcium. Paying attention to soil test ratios is pertinent.
Phosphate (chemically notated as P2O5) requires time to get functioning organically. Ecological ag people have suggested that a phosphate-to-potash ratio of 2:1 is necessary to sustain crop refractometer readings above 12 degrees Brix (the Brix scale being the measure of soluble solids in plant tissue, indicative of overall health). Yet often the reverse is true in biologically managed soils, as potassium levels get renewed constantly by decomposing organic matter. Indigenous soil attributes vary widely across the continent as well. Getting this ratio to toe the line nearer to 1:1 can be challenging enough. Soil test readings of 200 pounds per acre for both phosphate and potash define an achievable goal for every soil. Supplementing phosphate more often than not proves to be a biological imperative, especially in the development years when the fungal system isn't yet what it should be.
This essential nutrient plays a significant role in root development. I incorporate rock phosphate into the soil when planting trees as a matter of course. Surface application of colloidal phosphate (on the order of 1–2 pounds per tree) in the second and fourth years to the fungal duff zone in late summer serves to improve P-challenged soils until bearing begins. That's the point when I expect cation balance to be spot-on, and a follow-up soil test will reveal how orchard-wide phosphorus levels are looking with respect to potassium. Bearing fruit trees remove relatively little phosphorus from the soil each year when leaves and prunings are dutifully returned. Phosphorus can be tied up by excess calcium and magnesium in alkaline soils (leading to purple margins on leaves), but that's more about the need to restore a degree of acidity than it is about adding P.
- Black rock phosphate (0-3-0) is about 30 percent phosphorus, of which a tenth part at most becomes available each year. It is generally used to build up a reservoir of phosphate, spread atop the orchard floor every ten to twelve years for slow release. This sand-like amendment has less available P than colloidal phosphate offers for immediate root uptake. Black rock phosphate is about 48 percent calcium (as CaO) as well, giving it approximately one-fifth the neutralizing power of lime.
- Colloidal phosphate (0-3-0), also known as soft rock phosphate, averages about 18 percent phosphorus, of which a fifth part becomes available each season. The bony structures of prehistoric marine creatures mined in Florida are the source of this fine clay-like dust. The solubility of colloidal phosphate makes this a good choice in the early years while building the fungal ecosystem.
- Tennessee brown phosphate (0-3-0) is neither a colloidal nor a rock phosphate, but rather the consistency of rich soil. It comes from the washing piles that were left behind when high-grade ore was extracted to produce superphosphates in the early twentieth century. Levels of available P were regularly over 6 percent when tested in midwestern labs, making this amendment a fine alternative for root-development needs and sprinkling onto compost piles.
- Bonemeal (2-11-0, with 22 percent calcium) is an immediately available source of phosphorus that's good for side-dressing berry plantings early in the season before biological activity gets going. Steamed bonemeal has more nitrogen than precipitated bonemeal (which is not considered an acceptable organic soil amendment) and tends to be a good choice where phosphate levels are seriously low from the get-go. A biochar version of bonemeal is a recommended biological alternative: Bone char (0-16-0) brings considerable calcium and mycorrhizal benefits to the action as well. This dusty by-product of refining cane sugar has more than five times the concentration of available phosphate and almost double the total phosphate of colloidal phosphate.
Potassium
Potassium is needed to renew what has gone into the fruit and to increase tolerance to winter cold and spring frosts. This mineral also strongly influences fruit color and fruit size. A huge heaping of organic matter, whether through generous composting and/or aggressive mulching, may nudge potassium levels too high relative to Ca and Mg, especially in dry land soils. Orchardists with shallow soils are the ones most likely to run short on the K score. The term potash (being potassium oxide, KO2) is often used to refer to various mined salts that contain the element potassium in water-soluble form.
- Wood ash (0-1-5). Potassium in this form is readily available, and so wood ash should be applied only once active growth has engaged. Wood ash has two-thirds the liming power of limestone and acts very quickly. Its calcium content runs between 20 and 30 percent, but magnesium tends to be quite low. Wood ash contains various trace minerals, including boron and zinc. Different woods vary in these respects, with denser hardwoods tending to offer the most, nutritionally speaking.
- Greensand (0-1-7, with 3 percent magnesium). This naturally occurring iron-potassium silicate, also called glauconite, is released over time as the mineral breaks down. It has the consistency of sand but is able to absorb ten times more moisture, making it an exceptional soil conditioner. Many other nutrients occur in greensand, principally magnesium, iron, phosphorus, and as many as thirty trace minerals. The potash in greensand is insoluble (until taken up by the biology), so it can't be claimed in the fertilizer analysis without qualifying it as insoluble.
- Granite dust (0-0-6). Ground rock is widely used to remineralize soils, providing both potassium and micronutrients. Granite releases nutrients very slowly—the coarser the grind, the slower the release—and greatly enhances soil structure. This rock dust regularly features in my compost piles for both garden and orchard, given its long-term nature.
- Sul-Po-Mag (0-0-22, with 11 percent magnesium). Langbeinite ore mined near Carlsbad, New Mexico, is the most economical source of available potassium for organic growers provided magnesium is needed as well. Its 22 percent sulfur content helps the soil food web process nitrogen properly. Another common brand name is K-Mag. The nutrients are immediately available to plants, so apply only once growth has begun.
- Sulfate of potash (0-0-50). This mineral application tends to be expensive, because the natural process used to precipitate magnesium from langbeinite involves high heat. Sulfate of potash adds K to the soil without any other cation contributions. It is very soluble and should be used only when trees are growing; otherwise the potassium will be lost to leaching.
- Organic matter. It goes without saying that the biology benefits most from potassium delivered in the form of rotting hay, ramial wood chips, and compost. Lots of nutrients come this way!
Micronutrients
The essential soil nutrients that plants need in very small amounts are iron (Fe), manganese (Mn), boron (B), molybdenum (Mo), copper (Cu), zinc (Zn), and chlorine (Cl). These micronutrients are sometimes referred to as trace minerals. Soil tests may reveal a strong need to supplement one or two of these throughout certain regions—and that can be done—but for the long haul I prefer using broad-source soil condiments in my orchard and garden on an ongoing basis.
- Kelp meal (1–5 percent N, 3–10 percent potash). Seaweed has a variety of micronutrients in addition to the macronutrients, especially boron, copper, iron, manganese, and molybdenum. The organic matter of seaweed breaks down quickly in soil because its enzymes and amino acids stimulate the soil food web across the board. Kelp meal can be sprinkled atop different layers in building a compost pile or added en masse near the end of the finishing process (forked into the pile a month or two before fall application). Needless to say, foliar kelp added to the spray tank offers similar assurance.
- Azomite (0-0-2.5, with 5 percent calcium). This ancient deposit of aluminum silicate clay with marine minerals is named after its A-to-Z of more than fifty minerals beneficial to plants and animals. Use in the planting hole, regularly in compost, and to boost severely disease-stricken trees (as much as 10–15 pounds per tree) by applying throughout the dripline area in late summer.
- Florastim. The micronutrients in this mineral clay base come with a host of beneficial microbes (over four billion organisms per pound) and fulvic acids essential to the recovery and maintenance of healthy soil. These trace minerals are spread directly atop the soil and should not be plowed under.
A deficiency of any of the essential trace minerals can interfere with nutrient flow. Yellow leaves, poor fruit set, and limited return bloom are among the possible symptoms. Holistic growers are going to see less of this simply because our stewardship efforts center upon deep nutrition. Still, let's review a few possibilities to give you a basis of concern that may suggest the need for a soil test checkup and/or leaf tissue analysis.
- Southern clays and moist ground farther north often exhibit a boron deficiency, whereas dry areas out west aren't likely to lack this trace element. Severe boron deficiency can result in stunted shoot growth that looks like a virus infection, apples cracking about a month after fruit set, and internal corking. Boron plays a key role in calcium transport in the plant . . . so without enough boron, calcium deficiency symptoms result. The soils lab will pinpoint such a need, making a recommendation for 2 pounds (say) of boron per acre. Rarely do they specify which compound of boron to apply; the recommendation is for actual boron. Boric acid is about 16.5 percent boron, and borax is about 11.3 percent boron. Let's use the latter (a commonly available laundry soap) to clarify this: Applying 17.7 pounds of borax to that acre of ground meets the soil requirement identified in this example. Here's the rub, though: Excess boron is toxic to plants, so this application must not be overdone. Boron is sprinkled on like fairy dust, approximately 2.5 ounces per freestanding tree for this example, spread quite thinly around an anticipated circumference of 16–18 feet per tree. Check in every few years to keep a firm hand on the proper availability of boron if this turns out to be a regional concern. Sites with bedrock relatively near the surface and significant annual rainfall tend to be depleted of boron fairly rapidly. Other places may be verging on boron toxicity, due either to overly enthusiastic application or high boron levels in the subsoil.
- Severe gummosis on stone fruit trunks and summer leaves that appear as having undergone drought damage can be symptoms of copper deficiency in trees. Leafing out late, particularly in apple and pear, may indicate this as well. Foliar applications of copper are going to reach the soil, suggesting that application timing be in early spring when a degree of bacterial disease control might be garnered as well. Reluctant buds will often start to break dormancy (with green showing in the buds) within a few days following a copper application, especially if accompanied by a soaking rain.
- When a plant has iron deficiency, you will usually see chlorosis at the tips of the branches, with the newest leaves turning yellow first and older leaves below staying green longer. This situation gets reversed by magnesium deficiency—the new leaves at the tips stay green, with the older leaves at the base of each branch turning a chlorotic yellow first. This rule is not hard and fast, but it does help us figure out which mineral element might be of concern. Excessive phosphate content and a low level of potassium may also be contributing factors in causing iron deficiency. While the ideal is to fix the soil, foliar applications of manure tea (enforced with dollops of blackstrap molasses in the brew) or Epsom salts (magnesium sulfate) can help the immediate situation, respectively.
Short-term mineral deficiencies can also be dealt with using quick-fix medicine based upon organic chemistry principles. Chelation makes this possible by fixing the inorganic ion (the mineral in question) to an organic acid chain. A highly synthetic compound (EDTA) is used to form chemical chelates, so organic growers are advised to seek out foliar formulations made with natural lignosulfonates, which are wood-processing derivatives. Chelate combinations can include iron, zinc, manganese, copper, sulfur, boron, and/or molybdenum, all chosen to meet the situation at hand.
Tree Doings
You will quickly discover that your relationship with the orchard becomes a year-round affair. All sorts of wonders get revealed by visiting your trees often. Nor is this simply about looking for problems. Paying attention to how buds grow, when roots are in full gear, and what tree health looks like deepens your understanding as a steward. Take time in the early morning to observe what's changing as each season progresses. Come back again in the evening to listen and share a glass of cider. The pleasures of orcharding go way beyond the fruit.
The unfolding bud
Orchardists share a common language to describe the season at hand. The trees are at rest in the dormant season. Bud stages distinguish tree awakening and associated pest activity nicely. Silver tip, green tip, quarter-inch green, half-inch green, tight cluster, open cluster, pink, first bloom, and full bloom are very observable benchmarks of the apple's spring. This progression varies slightly in stone fruits that blossom without spur leaves. Peaches start at first swell and proceed through calyx green, calyx red, and first pink into full bloom. Cherries go from full swell to side green before tight cluster shows. Pears straddle a line of their own, as bud scales separate to show a fruit bud cluster, which quickly moves along to first white and then full bloom.
Bud progression allows me to speak to you about when certain tasks need doing, despite the fact that I live in northern New Hampshire and you live elsewhere. What day it is on the wall calendar isn't nearly as important as the pace of warming in the place each of us grows fruit. Orchardists in Zone 8 may observe first bloom in February, whereas this far north in Zone 4 things get going only come May. The month is in fact irrelevant—tree time is revealed by what's going on with the buds.
The orchard calendar is based on solar revolutions of a different kind. Actively growing plant tissue requires warmth to do its thing. Growth happens at a much slower pace in a cold spell than when the thermometer rises to 70°F (21°C) or more. Longer and longer days allow our precious sun to warm one half of the planet once again and thereby break winter's grip. Expectations at any given site can actually be tracked mathematically by keeping score of minimum and maximum temperatures each day. Each bud stage occurs only when enough degree-days have accumulated to achieve that next point of growth. Apple buds, averaged across cultivars, will show pink after 300 degree-days, and the whole pollination shebang will end when the blossom petals fall to the ground 240 degree-days later.
This probably seems silly—you just have to look at the tree to see what's happening, right?—yet such tracking ability has definite use. Community orchardists use pest-specific benchmarks to set the orchard alarm clock as regards the need to act. Some of you growing at home may relish precise knowledge about codling moth egg hatch, scab ascospore maturity, and plum curculio's last stand. Others will be pleased to simply have a general idea of such critical events . . . based on the degree-day observations of researchers who started with the unfolding buds.
Flower buds are larger than those that leaf, whether placed on the end of a fruiting spur or the longer shoot of a tip-bearing variety. Next year's potential crop can be seen throughout the winter months strictly by attuning your eyes to these rounded buds distributed throughout the tree. Leaf buds, on the other hand, are triangular-shaped and appear of far less consequence, essentially a mere bump on the shoot. Terms like bud swell indicate what's happening as sap starts to flow once again. The potential fruit crop becomes more and more obvious as the dormant season ends. You will find that being aware of visual fruit prospects becomes very important when those pruners are in hand.
Two practical spray applications tie in to early bud progression. That same liquid fish being recommended for holistic disease management provides a foliar nitrogen boost just prior to bloom. Such a fertility boost keeps the flower viable that wee bit longer, giving bees a better shot at successful pollination when conditions are less than ideal. The pink bud stage attracts the attention of others as well. Watch for chewing on the edges of fruit buds and tender leaves that have been wrapped shut. Both of these visual cues indicate the presence of bud caterpillars (the larvae of leafroller moths), which can easily be discovered with further investigation. The inclusion of Bt (Bacillus thuringiensis, a biological toxin for caterpillar species) in the spray tank mix at pink (going into bloom time) will be directed at these surface feeders if deemed abundant.
All of us at one time or another absolutely should play at being a bee when fruit blossoms open. I mean this in several ways. Breathe deep . . . the scent of plum blossoms alone makes up for almost everything that is aggravating or disappointing in life. Now look closer than you ever have at a single fruit tree flower with the help of a magnifying glass. The center flower parts lead to the seed ovaries of the fruit; this is where a bee graciously delivers pollen while gathering nectar. The flower of any stone fruit has a single pistil, whereas the flower of pome fruit has multiple pistils. Think about it. How many pits are there in a peach? How many seeds in an apple? Bees know what the flower reveals. But we're not done yet. Go to a neighboring tree—same fruit type, different variety. Roll the golden pollen grains of a vibrant flower onto your fingertips. Now buzz back to that first tree. Brush one of its open blossoms ever so gently, dropping pollen grains into the flower in the process. The human bee can pollinate too, you see, working in the same thankful spirit of all bees.
Root happenings
You are about to learn the why behind doing certain orchard tasks at specific points in the growing season. So much of the biological hubbub we need to undertake as organic fruit growers relates entirely to what's up with the roots of our fruiting plants.
Roots can be thought of as the inverse of the tree above. We find a supporting trunk in the quasi-taproot structure of the larger-sized rootstocks. The brown transport roots are akin to lateral branches, sharing a brisk trade in photosynthate carbon and sugars. White feeder roots are ephemeral, much like leaves in this regard, and charged with the task of acquiring nutrients for the plant as a whole. I find it invaluable to visualize being the tip of a root when thinking about understory management in the orchard . . . knowing that the search for rich humus begins with understanding what's taking place beneath the ground.
The absorptive roots of the tree are born in the spring, die, and are reborn in staggered fashion later in the growing season. Feeder roots live as little as fourteen days—perhaps up to sixty days where nutrient supply warrants—growing on the order of mere centimeters in the search for phosphorus and other nutrients. These fine white roots access new nutrient zones with the help of mycorrhizal fungi. The job early on is to find sustenance for fruit production in the current year. Once the harvest is under way, feeder roots focus entirely on supplying the cambium fuel that will drive leaf and shoot growth the following spring.
The first flush of root growth in every growing season kicks into full gear following bloom. A second flush of new root growth comes in late summer and early fall, often of greater duration and deeper down than what's seen in late spring. The competition for carbohydrates above- and belowground determines that shoot growth and vigorous root growth rarely overlap. Watch for this. This year's vegetative shoot reaches for the sun not long after blossoms unfurl. Tip expansion comes to a stop by the time fruitlets begin to noticeably size. Shoot growth essentially takes a few weeks off at this point precisely because that first flush of feeder root growth has begun in earnest. An unobserved autumn occurs out of our sight next . . . the feeder root system shuts down and sloughs away prior to the summer solstice . . . allowing top shoot growth to resume for the next month or so. Terminal bud set in late summer marks the end of growth and subsequent hardening off of all buds in preparation for winter's cold. Once again, unbeknownst to us, things are stirring down below, as the root system engages on a massive mission to store nutrients in bud and twig to drive next year's growth cycle.
As growers we have our own missions correlated to this intimate understanding of root purpose. Catalyst sprays directed at the ground in early spring stimulate mycorrhizal fungi into action. Biological mowing is all about waiting to cut the grass until that first flush of feeder root growth begins. Disease suppression, room in the humus, nutrient availability, and fungal happiness are all related in how and when we cut the orchard understory. Shallow tillage and cover cropping around dwarf trees in midsummer direct the hardening-off progression of buds. The feeder root system takes a recess in that month prior to terminal bud set, thereby allowing the more aggressive management (any form of cultivation) from which smaller trees in a garden setting can benefit. Leaf decomposition on the orchard floor is abetted when we spread orchard compost in fall when about half of the leaves have fallen off the tree. Fungal-rich compost provides a plethora of bioavailable nutrients just when that second flush of feeder roots runs at full bore.
Orchard tasks at ground level are sensibly tied to root happenings.
Trunk care
Welcome to the home orchard health spa! Maintaining a healthy-looking trunk and scaffold structure for many years down the road is the goal. While the human species may get concerned with wrinkles and chin sag, trees have winter injury, cankers, black rot, borers, and the incessant sapsucker to worry cambium flow.
A young fruit tree has bark vigor that bespeaks supple and smooth. Pruning cuts on a healthy tree readily callus over in several years' time. Age leads to a rougher bark appearance, going outright flaky on some varieties and fruit types, but still retaining a solid degree of adhesion and an invigorated appearance in its tan-to-gray coloration.
Biodynamic tree paste helps maintain these youthful attributes. This slurry mixture of a native clay and fresh cow manure helps wounds to close properly by introducing friendly organisms so that decaying rots do not win out in the long run. I find that putting trunk care in the context of a health spa helps rookie orchardists better understand this earthy technique. Application of a clay face mask restores elasticity, tightens up pores, and brightens our human skin . . . so why not the same for tree bark? Granted, the cow's contribution would be a stretch in renewing our personal radiance, but the diversity of microbes found in barnyard manure can be integral to bark health when it comes to fungal and bacterial blights.
You will find different recipes and suggestions for applying biodynamic tree paste in an Internet search, but basically it comes down to slathering the tree structure going into the new growing season. The paste can be brushed thickly onto the trunk and branch scaffolds as a general curative treatment. At the very least find time to apply this mudpack to areas with obvious bark stress that caught your eye while pruning. A slurry mix of half clay and half cow manure works; adding a few handfuls of sand adds a crystalline bond to this earth poultice. I gather gray clay from a vein exposed on the banks of a nearby stream—going native here (provided you find a similar source) is desirable. I also fully understand that it will be a rare home orchardist who pastures a milk cow. Keep in mind this is all about introducing microbe diversity: Understory humus or rich compost can be used in a pinch instead if fresh cow manure isn't your thing.
Blistering, peeling, splitting, cracking, sun scald, sunken cambium, blotchiness, sooty mold, sap ooze (gummosis), sporulating fungi, and outright dieback describe myriad sad bark conditions. Sometimes experts can tell you exactly what's taking place, even naming a specific disease pathogen . . . but the truth is we often don't know. Injuries happen to trees, from winter cold and careless mowing to innocent openings in the vascular system (from, say, hail bombardment) and sun exposure following severe pruning. Infectious organisms take such opportunities given the chance. Tree paste gives a big leg up in overall trunk care, but other specific situations call for additional action.
So-called southwest injury occurs when the winter sun is closer to the horizon and thus strikes the tree almost perpendicular to the trunk in late afternoon. The tree bark warms up, thereby thawing sap and cambium cells alike . . . and then all freezes when the sun goes down. Vertical cracks down through wood may occur at the time of freezing, though it's far more likely to see surface splits in the bark. Less noticeable injury may appear as flattened, darkened cambial areas under the bark that will become more apparent during the growing season. Snow cover accentuates the risk by bouncing the light up into the armpits
of branch unions. This type of freezing injury can be prevented! A whitewash applied in late fall makes for a reflective trunk and branch structure; it's the very darkness of the bark that makes it a solar collector. Diluted latex paint should be applied to all young trees (by the third season for sure) until such time as the bark gets flakier and lighter in color. Use a cheap interior grade of white latex, adding enough water (50 percent by volume) to obtain a whitewash consistency. Paint all sides of the trunk up to 3 feet high, and do include the undersides of the lower branch scaffolds. This is a fall chore, best done after the harvest has been completed but before it snows. Choose a warm, sunny day when the air temperature is above 50°F (10°C) to facilitate fast drying. Adding milk powder to the tree paste recipe, along with using light-colored clay, may well suffice to protect from southwest injury. Scraping off loose bark scales before painting—it's back to the spa for a loofah rubdown!—provides surer coverage and helps eliminate hiding places for caterpillar larvae.
Canker diseases are common and destructive. These cause wilting and dieback of nearby shoots and can structurally weaken branches so much that limbs snap off in a wind- or ice storm. Cankers allow a progression of organisms to run amok by slowing the normal closure of wounds, thus providing easy entry for black rot and eventual wood decay. The canker itself is a dead area or lesion in the bark of a woody plant that often results in an open wound. All begins with a small, sharply delineated dead spot, usually round or oval to elongated in shape. You will notice this more when the canker enlarges and then girdles the cane, shoot, branch, trunk, or yes, even a root.
Fungi cause the majority of cankers. Perennial cankers on pome fruits establish themselves in mechanical wounds in the bark (such as a branch stub or mowing bruise) when opportunistic fungi move in at the start of the dormant period. The host plant tries to limit invasion by producing a layer of callus cells around and over the edge of the invaded tissue; the fungus invades the callus tissue at the end of the growing season; the host then forms new callus tissue. This cycle of fungal invasion and formation of concentric layers of callus tissue by the plant may repeat itself for many years. Pruning out a perennial canker on a redundant branch is no big deal; breaking the disease cycle on an integral branch may require supplementary preparations of certain herbs. Early signs of peach perennial canker on any of the stone fruits (a different beast entirely) should be dealt with similarly. Annual cankers contain little or no callus and increase rapidly during a single growing season. Branches or even entire woody plants, especially young ones, may be girdled and killed in one growing season by severe cases of anthracnose canker. Holistic nutritional sprays are going to help prevent all this.
Bacteria enter the canker scene as fire blight on pome fruits and as bacterial canker on cherries and plums. Evident cankers should be pruned several inches below obvious infection during the winter when temperatures are below freezing. Chemical control of bacteria-spread disease is based on protective copper sprays just as fruit trees come out of dormancy. Copper limits initial infections but cannot prevent the canker phase once infection has begun. All fruit crops are sensitive to copper, and injury is common. Here, as always, I prefer to place my bet on the diversity of microbes found in an enhanced arboreal food web.
Let's talk now of pruning cuts that conspicuously blacken in subsequent growing seasons. The unhealthy-looking coating on the exposed cut and extending down on the surface of the bark can often be attributed to sooty mold. These superficial fungi grow off sap that oozed from pruning cuts made in previous years. Sooty mold never becomes directly parasitic. The fact that sap continues to ooze from such cuts is indicative of cold injury and/or the gaining of a foothold by black rot. These fungi are another class entirely, moving in to form a sporulating canker edge that can eventually lead to extensive dieback of the entire branch. Don't worry so much about surface mold, but definitely bring on the biological mudpack at any sign of rot. Pruning a badly infected limb may prove the only recourse.
Any fruit grower down on his or her knees at the trunk should be absolutely aware of borers. Varietal pests in this category include the roundheaded appletree borer, flatheaded appletree borer, dogwood borer, peachtree borers, shothole borer, and American plum borer. Some are beetles; some are moths; all are bastards. The grub stage of all these insects consumes both cambium and sapwood. Badly infested trees are girdled by the chewing and then die. The culprits will be anywhere from egg-slit big to a hefty half inch of destruction long by the end of autumn. Probe any suspicious spot on the trunk, often marked by an orange-reddish protruding frass. Follow every crooked corner with a sharp-edged probe (like a pocketknife or your bypass pruners) until all edges of the damage are revealed. Remember, the tree survived grafting . . . it will also survive this surgery. A mass infestation can be treated with a biological mudpack of a different sort. Parasitic nematodes—sprayed in solution with a hand mister to the problem area, then protected with moistened topsoil packed around the soil line or farther up where limb damage occurs—will seek out the grubs in the next seventy-two hours and end the battle. Some growers will have no borer pressure, while others (apparently those of you with karma like mine!) will have to do yearly penance. Luckily, drenching the soil zone at the base of each trunk with neem oil (applied at a 1 percent concentration) a couple times each summer has proven quite satisfactory in negating the roundheaded threat faced here.
Yellow-bellied sapsuckers attack living trees, with apples and cherries definitely high on the preference list. These birds drill a series of beak-deep holes in the bark, usually in regularly spaced, horizontal rows. Unlike woodpeckers, sapsuckers are not searching for grubs, intending instead to drink sap as it oozes into the holes. As one row of holes dries up, another row is drilled. A branch, or even a whole tree—depending on the height of the drilling—can eventually be girdled and then die. Sapsuckers are a migratory bird, passing through in early spring and again in fall. These birds seem to have excellent memory, zooming in on favored trees year after year. Trees may survive a couple sessions of incessant drilling, but this cannot be left unchecked indefinitely. Hanging fluttering objects (old CDs quiver best of all) can help deter repetitive damage. Wrapping the trunk and major branch unions with burlap is ponderous but worth considering if it's one particular tree. Some sapsuckers will be content to feed on orange halves put out to attract nesting orioles. Owls living nearby change sapsucker dynamics dramatically. Slathering over areas of fresh drilling with biodynamic tree paste will facilitate bark closure and perhaps make the bird ponder why anyone would cover a tasty tree with unpalatable muck.
Pruning Overview
A calm yet fruitful tree is the overarching goal of orchard pruning.
There's a directing order to my pruning mantra: Framework first, then the thinning; lastly see the fruit and how it grows.
Nothing too mystical, but it's a beat that keeps me to task and includes all the important details. An intuitive pruner works in several years at once: seeing the fruiting prospects of the current year; training a new scaffold branch to eventually replace old wood; making a stubbing cut to encourage laterals farther back on a pole-like branch; visualizing how the sunlight will reach within the tree when the leaves are full; and providing good access when it comes time to pick the fruit. These things aren't deliberately thought through as much as felt. Such oneness with the tree comes with years of experience and confidence.
Approach each tree with an introductory intake of the breath. This meditative pause is when you take in the tree's framework and overall shape. How does it fit alongside its neighbors? Are some branches too low? Is the leader beyond reach? Are the scaffolds properly spaced? Where does a new branch need to be developed to fill an empty hole? These questions answer themselves quickly in a well-worked orchard. Restoring years of neglect is another matter.
- Sunlight interception is a function of tree spacing and height. The light environment throughout the tree canopy must be no lower than 30 percent of the available sunlight to produce high-quality fruit and spurs for successive cropping throughout the tree. Probably no other statement better describes why we prune apple trees annually.
- Good tree structure ultimately is as much about seeing the space left between scaffolds—so that sunlight and drying breezes can reach every apple—as it is about considering the limbs themselves. Learn to look at your tree as if wearing a pair of polarized glasses that gives emphasis to the inverse: First you see the tree structure; put on the glasses, and now you see the light space between the limbs.
- Future fruiting prospects depend entirely on allowing/encouraging/abetting new and renewed shoot growth to develop young fruit buds. Fruiting spurs are best developed by a light pruning touch rather than invigorated into long, unfruitful shoots by heavy pruning. Be very generous about leaving the pencil-thin laterals radiating off structural wood that will bear in future years. Our ideal as orchardists is to grow pome fruit on three- to ten-year-old wood. We cultivate such youthful wood by keeping a balanced percentage of shoots to develop spurs.
- Tree calmness is the result of striking that delicate balance between excessive pruning and pruning enough to ensure an annual crop. Try not to eliminate all vertical growth in one fell swoop when taking back the central leader and/or thinning out the top of the tree. Some shorter vertical shoots are always necessary to satisfy the tree's desire to reach toward the sun. Scalping a tree in its entirety subsequently calls forth a forest of watersprouts. If you remove all of the watersprouts, just as many come back. Some vertical growth is necessary to apically dominate the branch structure below in order to keep the tree calm.
- Renewal pruning in the top portion of the tree is an ongoing process of removing larger laterals while at the same time growing out replacement branches to renew the bearing surface of the tree. The primary tenet of diameter-based pruning is to remove any upper lateral branch that gets to be one-third to half the size of the trunk where it joins. While this may sound severe at first reading, it's a sure way of judging when higher laterals have to make way so smaller shoots can develop to replace them.
Pruning 101
We always begin with a vision of tree shape and branch spacing.
An apple grower will speak of maintaining a central leader within a framework of three scaffolds. Like a conifer, the base is kept broad and the top more upright to allow sunlight to reach the fruit buds on the lower branches. A scaffold consists of three to five limbs radiating out from the trunk within a 1- to 2-foot span of the trunk. Having approximately 3 feet between scaffolds is a goal on larger-sized rootstock, with the first scaffold starting 3 feet or so above the ground on a semi-dwarf tree kept to 12 feet high. Branches originating much lower than this won't produce high-quality fruit. Good tree structure ultimately is as much about seeing the space left between scaffolds—so that sunlight can reach every apple—as it is about considering the limbs themselves.
Pears are overly enthusiastic about this central leader business. Nearly every shoot will tend toward being vertically inclined on most pear varieties, and this growth habit makes defining scaffold layers a tad more complex. Cherries, plums, apricots, and the like often are initiated as central leader trees but quickly opt to go in a modified central leader direction. Here the top of the tree naturally branches off to form several tops. This is often easier to maintain than other forms of pruning, as this is what fruit trees do given their druthers.
Peach trees in particular lend themselves to the open vase style of pruning. Creating an open center allows a bowl of sunlight to reach the inside of the bearing canopy. The branch structure of an open vase tree tends to be weaker, which results from favoring steeper crotch angles to create this shape. Lighter-weighing stone fruits help compensate for this style, as does renewal pruning of bearing limbs. I find my plum and apricot trees oscillating (in a sense) between having a multiple top and then having a more open center as a result of righteous branch removal every few years.
I'll address pruning specifics for each fruit type more thoroughly in the varietal sections ahead. Knowing why you do what you do in making any pruning cut is what matters now. A tree responds to different cuts in different ways, and an understanding of these variables is what will make you a proficient pruner.
Use a thinning cut to remove a branch that is no longer desirable because of excessive crowding. Anytime a branch is removed at its juncture to another branch, the resulting vegetative response is considerably reduced from that of shearing the branch midway. Such cuts will help in maintaining those calm trees that do not put excessive energy into shoot development . . . thus keeping fruit production to the fore. A properly made thinning cut will readily compartmentalize to form a barrier zone within the wood, thus preventing rot organisms from entering deeper into the vascular system of the tree.
- Thinning from the top down is a good idea, because this way you follow the path of the sun's rays to the fruit. It's easier to thin the lower scaffolds—they're within reach—but more critical to achieve the topwork. Too many vigorous watersprouts that shoot vertically upward to the sun block the light that should be allotted to fruiting buds in the interior of the tree canopy.
- Overly tall leaders, crossing branches, and those limbs growing back toward the center or with narrow crotch angles always make the hit list.
- Another problem situation develops when too many limbs radiate off one section of the trunk. Crossing side branches then tend to be trimmed off in order to maintain each scaffold member, resulting in blind wood, where fruit buds are found farther and farther out from the trunk the longer you let this go on. Learning to thin excess limbs early on will save a series of painful decisions later.
- Spent wood results when bearing branches bend under the load of successive harvests. The most obvious thinning cuts are these understory branches, which have become too shaded to fruit well. The newer growth naturally arising over these branches keeps the fruiting canopy renewed.
A heading cut is made across the branch, out from the branch union, thereby exposing the vascular flow of the tree straight-on. Any pruning cut unveils sap flow, of course, but a heading cut tends not to shut off quite as readily as a thinning cut. The terminal bud has been removed, thereby eliciting a vigorous hormonal response (described earlier on with regard to the Heading height of nursery whips). Healthy closure of the pruning wound becomes far less likely as the diameter of the heading cut increases.
- The leaders on young trees entering the
teen years
(just before bearing begins) can be stiffened up by a heading cut. This pushes back fruiting for a year or two but often is necessary with lanky, upward-reaching growth. - Typically, established branches need to be
moved back
in order to remain fruitful closer to the trunk. The lateral shoots that result from stubbing cuts are intended to restore fruiting potential in the interior. - Varieties that tend to develop fruit at the end of shoots benefit from heading back excessively long shoots (more than 9 inches) to encourage compactness and lateral branching.
- Once the tree extends beyond a desired height, the dominant leader will need to be cut back to a weaker lateral. Ofttimes this heading-cut-by-default will induce numerous watersprouts, despite having been made at the branch union. Summer pruning most of this new growth response helps keep the tree fruitful.
- Don't make a heading cut if you can't envision a specific need to work with tree vigor in these ways.
Knowledge of how to use these two horticulturally distinct pruning cuts brings us to the actual deed. This is the big step, from theory to doing a good job by your trees. One last pep talk, methinks, before you head out the door.
Light space psychology
Good light penetration is needed to ripen and sweeten fruit. Air movement between branches helps considerably in preventing disease. Evaluating the light space between branches and competing shoots—and thereby considering how the chosen limb will develop to fill this space—has helped me more than any other pruning parameter in making good decisions. Pruning rules (about vertical shoots and the like) are useful up to a point. But it's only when you grasp what happens beyond the moment of the cut that you truly become effective from the tree's point of view.
Heed this advice given to me by a Vermont hill farmer: You done a good job at pruning if afterward you can take the family cow and fling her between the branches. Words like that certainly paint a vivid image of just how much to open up a standard-sized apple tree to the sunshine. Rookie pruners tend to do one of two things. The very timid never come close to removing enough, whereas ax-minded literalists follow pruning rules to the extreme. Neither will realize the fruiting potential of the tree standing before them. And that's a shame.
Pruning a tree properly (or a bramble or a fruiting shrub, for that matter) requires empathy. You project your mind into the buds before you and feel how additional sunshine and room to breathe will allow a chosen branch to become fruitful. Another branch competing for the very same light in a given space means neither can send out laterals and develop fruiting spurs throughout. I'm very serious here. Feel the warmth of the sun. Stretch out into this newly freed space. Be the bud. Understanding how to prune correctly involves consciously crossing the line between species and feeling what it's like to embrace photosynthesis.
Some of you will miss the gift attempted here. That's fine; go back to the rules; purchase more extensive pruning guides. A good many of you, on the other hand, might now be ready to grasp the core tenets of pruning. I've dealt with the psychic boundary around teaching this skill to novice orchardists for years. You need confidence. It comes from projecting your mind into the light space surrounding a branch. It comes from being the bud.
Growth habit
Every fruit tree has a natural growth habit. This tendency to grow in a such-and-such a way sometimes makes pruning easy as pie, while other trees defy all notions of ruly behavior. A bit of vocabulary is in order to further additional pruning advice related to tree vigor:
- Compact: The tree tends to grow tightly and close together within itself.
- Erect: The tree has distinct upright growth, favoring a vertical configuration.
- Spreading: The tree readily directs branches out to all sides.
- Twiggy: The tree droops numerous whippy branches downward.
The degree of vigor in a tree—whether this vigor stems from the innate nature of a particular variety or exceedingly fertile ground—accentuates the pruning task. Part of the fascination with dwarf trees is in keeping tree reach to a certain height through the use of runted genetics in the root. However, you actually can also restrain a full-sized tree to a reasonable height through knowledge-based pruning. Earlier we established a goal of keeping a tree calm, of striking that delicate balance between excessive pruning and pruning enough. Growth habit enters in here in a big way. The compact tree cooperates nicely. Pruning to favor outward growth will create a reasonably open limb structure. Erect trees with severe upright tendencies tend to be the most vigorous. Allowing a small percentage of weaker shoots up top to provide shading helps in training other shoots to adhere to a more horizontal position below. Spreading trees grow just like you might hope, though long branches might need to be braced under a full crop and occasionally trimmed back to a branch juncture. Twiggy types require substantial thinning of branches on the outer canopy.
Understanding where the flowers develop for different fruit types is equally apropos. Apples and pears initiate fruit buds either on short spurs found along the branch or toward the end of shoots, or some combination of the two. Spur-bound trees result when tree vigor is low, so thinning older spurs helps encourage new shoot growth. On the other hand, being too aggressive about branch thinning with tip bearers can quickly remove too many fruit buds. Stone fruits initiate fruit buds on young shoots in the node positions, the details of which will determine pruning tips specific to each fruit type.
The time to prune
Dormant pruning should be done in late winter before any sign of growth begins. How soon you begin depends on where you live. Northern growers run the risk of winter injury as long as subzero temperatures are still a possibility, and thus the suggestion to wait until February and March. Orchardists in warmer zones can start in right after leaf fall, if desired. Ideally each of us wraps up the pruning season before budbreak, but . . . truth be known . . . you can persevere up till bloom if necessary.
Early summer marks the beginning of a shift in vegetative response to pruning. This is not the time for any major pruning cuts, but rather what I would call training cuts on young trees and directed intent on espalier stock. You can shorten the time to fruit production when working with young trees in this window (around the time of the summer solstice) rather than in the dormant season. Vigorous shoots can be nipped in the bud and often pushed into a fruitful direction by pinching off the growing tip. Coming back to deal with the crow's-foot response to a heading cut now reclaims a single guiding shoot as the central leader. Similarly, thinning the tops of vertically inclined apple trees (like Gala) now will tone down that rocketing-upward response to cuts made in the dormant season. Supple vertical shoots can be literally snapped off should you find unwanted interior growth while thinning the fruit crop.
Late-summer pruning differs significantly from dormant pruning in that leaves actively involved in photosynthesis are being removed. The trees have entered physiological dormancy by the end of July and therefore will not respond with renewed growth. The shoots being thinned out have contributed starch and sugar to terminal bud formation by this point, so taking away these excess growing tips leaves photosynthates primarily for the fruit-manufacturing end of the tree. The sun has been granted time enough to reach fall-ripening varieties. Thinning out vegetative watersprouts in early August improves light penetration, thereby increasing fruit color throughout the canopy. These same pruning cuts also reduce the incidence of sooty blotch and flyspeck (summer fungal diseases) on light-colored pome fruit by as much as half.
Growers in warmer zones—especially where winter
implies a rainy season—will find the drier weather following harvest helps promote faster closure of pruning cuts for stone fruits. Cherries and apricots particularly are prone to bacterial canker and gummosis, which are abetted by damp weather. Late-summer pruning of these fruits makes a world of difference in keeping those diseases at bay.
Fall pruning of pome fruits before the leaves have dropped is the wrong thing to do, however. These trees are in hardening-off mode now. Stimulating any growth response at this time, including callus to close the wound, will set up cold injury in the winter months.
Renovating an Abandoned Tree
Every pruning season people ask me how to care for a long-abandoned apple tree. The journey back to a manageable-sized tree is doable. The quality of the fruit is another matter, for a chance seedling has about a one in ten thousand chance of being pomologically worthy. Your tree may have been a named variety grafted a century ago, or it may be a pasture tree once valued for its bittersweet cider potential.
The leaf canopy of a tree supports a vast root system, and vice versa. Going in with a pruning saw to undo decades of overgrowth all at once can be disastrous to an old tree. It's far better to approach this task over the course of a few growing cycles. Year one is the time to think big. All dead and broken branches can be removed first to clarify what's going on in that tumbled confusion of limbs. Next seek out three or four cuts either back at the trunk or on major scaffold limbs—overly tall leaders and crossing branches will be the chief targets. An overgrown tree likely has a structure of its own that defies orderly notions of a single leader. You're the one who needs to adapt and recognize the virtue of an elder's decision to fill its light space in artistic ways. Properly made cuts are important, as a stub of deadwood is an entry point for rot-causing organisms. Nor cut too deeply: The branch collar will produce callus tissue needed to close the wound.
The year ahead provides plenty of opportunity to ruminate on the shape of your tree. Heavy pruning invariably results in an abundance of watersprouts, vegetative vertical shoots that can keep your tree in a nonfruiting mode for years to come. These suckers should be summer-pruned in early August to stimulate the tree to put more energy into fruit buds the following spring. Limit your summer cutting to upright shoots less than an inch in diameter, leaving the weakest 10–20 percent of these to provide a modicum of shading.
Midsized pruning cuts resume when the late dormant season (January through April, depending on your latitude) comes around again. One or two big cuts may still be in order; otherwise focus on those weak crotch angles and excessive growth that blocks sunlight between scaffolds. Stop short of removing more than a third of a tree's canopy in any one year.
The focus on young wood capable of bearing fruit happens in year three. Improved light penetration will have initiated a shoot response throughout the tree that's now ready to form fruiting spurs. This same energy can be channeled by bending supple watersprouts (the ones you left!) beneath an existing branch the growing season before. Vertical suckers, if held to a lateral position, will develop fruit buds for the next growing season. Moderate thinning cuts aimed at removing the spent portion of branch ends helps make room for this new wave of fruitful growth. The days of large limb removal should be behind you. Fertilizing a tree during these years of invigorating pruning cuts is usually not advised if terminal bud growth is 8 inches or more and the leaves are a healthy dark green hue. Woodsy compost and a widespread sprinkle of borax (in regions typically deficient in boron) in the fall of year two are appropriate for what should now be a productive and beautiful apple tree.
Tree Dynamics*
The Great Green Wall: African Farmers Beat Back Drought and Climate Change with Tree
Yacouba Sawadogo was not sure how old he was. With a hatchet slung over his shoulder, he strode through the woods and fields of his farm with an easy grace. But up close his beard was gray, and it turned out he had great-grandchildren, so he had to be at least sixty and perhaps closer to seventy years old. That means he was born well before 1960, the year the country now known as Burkina Faso gained independence from France, which explains why he was never taught to read and write.
Nor did he learn French. He spoke his tribal language, Mòoré, in a deep, unhurried rumble, occasionally punctuating sentences with a brief grunt. Yet despite his illiteracy, Yacouba Sawadogo is a pioneer of the tree-based approach to farming that has transformed the western Sahel over the last twenty years.
Climate change is a subject I have something to say about,
said Sawadogo, who unlike most local farmers had some understanding of the term. Wearing a brown cotton gown, he sat beneath acacia and zizyphus trees that shaded a pen holding guinea fowl. Two cows dozed at his feet; bleats of goats floated through the still late-afternoon air. His farm in northern Burkina Faso was large by local standards—fifty acres—and had been in his family for generations. The rest of his family abandoned it after the terrible droughts of the 1980s, when a 20 percent decline in annual rainfall slashed food production throughout the Sahel, turned vast stretches of savanna into desert, and caused millions of deaths by hunger. For Sawadogo, leaving the farm was unthinkable. My father is buried here,
he said simply. In his mind, the droughts of the 1980s marked the beginning of climate change, and he may be right: scientists are still analyzing when man-made climate change began, some dating its onset to the mid-twentieth century. In any case, Sawadogo said he had been adapting to a hotter, drier climate for twenty years now.
In the drought years, people found themselves in such a terrible situation they had to think in new ways,
said Sawadogo, who prided himself on being an innovator. For example, it was a long-standing practice among local farmers to dig what they called zai—shallow pits that collected and concentrated scarce rainfall onto the roots of crops. Sawadogo increased the size of his zai in hopes of capturing more rainfall. But his most important innovation, he said, was to add manure to the zai during the dry season, a practice his peers derided as wasteful.
Sawadogo's experiments proved out: crop yields duly increased. But the most important result was one he hadn't anticipated: trees began to sprout amid his rows of millet and sorghum, thanks to seeds contained in the manure. As one growing season followed another, it became apparent that the trees—now a few feet high—were further increasing his yields of millet and sorghum while also restoring the degraded soil's vitality. Since I began this technique of rehabilitating degraded land, my family has enjoyed food security in good years and bad,
Sawadogo told me.
Farmers in the western Sahel have achieved a remarkable success by deploying a secret weapon often overlooked in wealthier places: trees. Not planting trees. Growing them. Chris Reij, a Dutch environmental specialist at VU University Amsterdam who has worked on agricultural issues in the Sahel for thirty years, and other scientists who have studied the technique say that mixing trees and crops—a practice they have named farmer-managed natural regeneration,
or FMNR, and that is known generally as agro-forestry—brings a range of benefits. The trees' shade and bulk offer crops relief from the overwhelming heat and gusting winds. In the past, farmers sometimes had to sow their fields three, four, or five times because wind-blown sand would cover or destroy seedlings,
said Reij, a silver-haired Dutchman with the zeal of a missionary. With trees to buffer the wind and anchor the soil, farmers need sow only once.
Leaves serve other purposes. After they fall to the ground, they act as mulch, boosting soil fertility; they also provide fodder for livestock in a season when little other food is available. In emergencies, people too can eat the leaves to avoid starvation.
The improved planting pits developed by Sawadogo and other simple water-harvesting techniques have enabled more water to infiltrate the soil. Amazingly, underground water tables that plummeted after the droughts of the 1980s had now begun recharging. In the 1980s, water tables on the Central Plateau of Burkina Faso were falling by an average of one meter a year,
Reij said. Since FMNR and the water-harvesting techniques began to take hold in the late 1980s, water tables in many villages have risen by at least five meters, despite a growing population.
Some analysts attributed the rise in water tables to an increase in rainfall that occurred beginning in 1994, Reij added, but that doesn't make sense—the water tables began rising well before that.
Studies have documented the same phenomenon in some villages in Niger, where extensive water-harvesting measures helped raise water tables by fifteen meters between the early 1990s and 2005.
Over time, Sawadogo grew more and more enamored of trees, until now his land looked less like a farm than a forest, albeit a forest composed of trees that, to my California eyes, often looked rather thin and patchy. Trees can be harvested—their branches pruned and sold—and then they grow back, and their benefits for the soil make it easier for additional trees to grow. The more trees you have, the more you get,
Sawadogo explained. Wood is the main energy source in rural Africa, and as his tree cover expanded, Sawadogo sold wood for cooking, furniture making, and construction, thus increasing and diversifying his income—a key adaptation tactic. Trees, he says, are also a source of natural medicines, no small advantage in an area where modern health care is scarce and expensive.
I think trees are at least a partial answer to climate change, and I've tried to share this information with others,
Sawadogo added. My conviction, based on personal experience, is that trees are like lungs. If we do not protect them, and increase their numbers, it will be the end of the world.
Sawadogo was not an anomaly. In Mali, the practice of growing trees amid rows of cropland seemed to be everywhere. A bone-jarring three hour drive from the Burkina Faso border brought us to the village of Sokoura. By global standards, Sokoura was very poor. Houses were made of sticks covered by mud. There was no electricity or running water.
Children wore dirty, torn clothes, and more than a few were naked, their distended bellies hinting at insufficient diets. When one of our team let an empty plastic bottle fall to the ground, kids wrestled for it as if it were gold. Yet to hear locals tell it, life was improving in Sokoura.
It was a five-minute walk from the village to the land of Omar Guindo. Missing a front tooth and wearing a black smock over green slacks, Guindo said that ten years ago he began taking advice from Sahel Eco, a Malian NGO that promotes agro-forestry. Now, Guindo's land was dotted with trees, one every five meters or so. Most were young, with such spindly branches that they resembled bushes more than trees, but there were also a few specimens with trunks the width of fire hydrants. We sat beneath a large tree known as the Apple of the Sahel,
whose twigs sported inch-long thorns. The soil was sandy in both color and consistency—not a farmer's ideal—but water availability and crop yields had increased substantially. Before, this fi eld couldn't fill even one granary,
he said. Now, it fills one granary and half of another
—roughly a 50 percent increase in production.
Back in the village, we examined the granaries, which were built by layering mud over stick frames. Oblong in shape, the structures had sides that were six feet wide and fifteen feet tall. A notched tree trunk served as a ladder to an opening near the top. Reij was the first to climb, serenaded by jovial laughter from the crowd below; it was not often these villagers got to see a white man make a spectacle of himself. Reij played to the crowd, joking about being too clumsy to manage such a steep ladder and asking one of the grannies to help him. After inspecting all four granaries, the Dutchman descended, turned to me, and exclaimed, This is thrilling.
Pointing to the closest granary, he said, This one still has a little millet in it. The next one is more than half full, the third is totally full, and the last is a third full. What that means is, this farmer has tremendous food security. It is now May. Harvest will be in November. So he has plenty to last his family until then and even some in reserve.
As word of such successes travels, FMNR has spread throughout the region, according to Salif Ali, a neighboring farmer. Twenty years ago, after the drought, our situation here was quite desperate, but now we live much better,
he said. Before, most families had only one granary each. Now, they have three or four, though the land they cultivate has not increased. And we have more livestock as well.
After extolling the many benefits trees have provided—shade, livestock fodder, drought protection, firewood, even the return of hares and other small wildlife—Salif was asked by one member of our group, almost in disbelief, Can we find anyone around here who doesn't practice this type of agro-forestry?
Good luck,
he replied. Nowadays, everyone does it this way.
These farmers were not planting these trees, as Nobel Prize–winning activist Wangari Maathai has promoted in Kenya. Planting trees is much too expensive and risky for poor farmers, Reij said, adding, Studies in the western Sahel have found that 80 percent of planted trees die within a year or two.
By contrast, trees that sprout naturally are native species and more resilient. And, of course, such trees cost the farmers nothing.
Even naturally sprouting trees were off-limits to farmers until laws were changed to recognize their property rights. Tree management was traditionally part of normal agricultural practice here, Salif explained; it was encouraged by the Barahogon, a voluntary association of farmers to which both Salif and his father belonged. But the practice was largely abandoned after first colonial and later African governments declared that all trees belonged to the state, a policy that gave officials the opportunity to sell timber rights to business people. Under this system, farmers were punished if they were caught cutting trees, so to avoid hassles they often uprooted seedlings as soon as they sprouted. In the early 1990s, a new Malian government, mindful that forestry agency officials had been killed in some villages by farmers furious about illegal burning of trees by forestry agents, passed a law giving farmers legal ownership of trees on their land (though farmers did not hear about the law until NGOs mounted a campaign to inform them via radio and word of mouth). Since then, FMNR has spread rapidly. Recently, farmers even shared their knowledge with officials visiting from Burkina Faso—twenty mayors and provincial directors of agricultural and environmental agencies. They seemed astonished to hear our story and see the evidence,
Salif recalled. They asked, 'Is this really possible?'
Recognizing farmers' property rights was equally crucial in Niger, according to Tony Rinaudo, an Australian missionary and development worker who was one of the original champions of FMNR. The great thing about FMNR is that it's free for farmers,
Rinaudo told me. They stop seeing trees as weeds and start seeing them as assets.
But only if they're not penalized for doing so. In Niger, said Rinaudo, FMNR had a hard time gaining traction until he and others convinced government officials to suspend enforcement of the regulations against cutting trees. Once farmers felt they owned the trees in their fields, FMNR took off,
Rinaudo recalled.
The pattern has been the same throughout the western Sahel: FMNR has spread largely by itself, from farmer to farmer and village to village, as people see the results with their own eyes and move to adopt the practice. Not until Gray Tappan of the U.S. Geological Survey compared aerial photos from 1975 with satellite images of the same region in 2005 was it apparent just how widespread FMNR had become: one could discern the border between Niger and Nigeria from outer space.
On the Niger side, where farmers were allowed to own trees and FMNR was commonplace, there was abundant tree cover; but in Nigeria, the land was barren. Reij, Rinaudo, and other FMNR advocates were surprised by the satellite evidence; they had had no idea so many farmers in so many places had grown so many trees.
This is probably the largest positive environmental transformation in the Sahel and perhaps in all of Africa,
said Reij. Combining the satellite evidence with ground surveys and anecdotal evidence, Reij estimated that in Niger alone farmers had grown 200 million trees and rehabilitated 12.5 million acres of land. Many people believe the Sahel is nothing but doom and gloom, and I could tell lots of doom-and-gloom stories myself,
he said. But many farmers in the Sahel are better off now than they were thirty years ago because of the agro-forestry innovations they have made.
What makes FMNR so empowering—and sustainable—Reij added, is that Africans themselves own the technology, which is simply the knowledge that nurturing trees alongside one's crops brings many benefits. Before this trip, I always thought about what external inputs were required to increase food production,
Gabriel Coulibaly said at a debriefing session after our fact-finding expedition. Coulibaly, a Malian who worked as a consultant to the European Union and other international organizations, added, But now I see that farmers can create solutions themselves, and that is what will make those solutions sustainable. Farmers manage this technology, so no one can take it away from them.
After a string of similar comments from other activists—The farmers understand why they are doing this, so they will defend it,
one said—Reij leaned over and, his eyes shining, whispered, They have been transformed into FMNR champions.
And FMNR's success does not depend on large donations from foreign governments or humanitarian groups—donations that often do not materialize or can be withdrawn when money gets tight. This is one reason Reij sees FMNR as superior to the Millennium Villages model promoted by Jeffrey Sachs, the economist who directs Columbia University's Earth Institute. The Millennium Villages program focuses on twelve villages in various parts of Africa, providing them free of charge with what are said to be the building blocks of development: modern seeds and fertilizer, boreholes for clean water, health clinics. If you read their website, tears come to your eyes,
said Reij. It's beautiful, their vision of ending hunger in Africa. The problem is, it can only work temporarily for a small number of selected villages. Millennium Villages require continuing external inputs—not just fertilizer and other technology, but the money to pay for them—and that is not a sustainable solution. It's hard to imagine the outside world providing free or subsidized fertilizer and boreholes to every African village that needs them.
Outsiders do have a role to play, however. Overseas governments and NGOs can encourage the necessary policy changes by African governments, such as granting farmers ownership of trees. And they can fund, at very low cost, the grassroots information sharing that has spread FMNR so effectively in the western Sahel. Although farmers have done the most to alert peers to FMNR's benefits, crucial assistance has come from a handful of activists like Reij and Rinaudo and NGOs such as Sahel- Eco and World Vision Australia. These advocates now hope to encourage the adoption of FMNR in other African countries through an initiative called Re-greening the Sahel,
said Reij.
If humanity is to avoid the unmanageable and manage the unavoidable of climate change, we must pursue the best options available. FMNR certainly seems to be one of them, at least for the poorest members of the human family. Let's look at what's already been achieved in Africa and build on that,
urged Reij. In the end, what happens in Africa will depend on what Africans do, so they must own the process. For our part, we must realize that farmers in Africa know a lot, so there are things we can learn from them as well.